
LILYGO T3S3 ESP32-S3 LoRa TTGO Development Board (SX1276 915MHz)
Contents
LILYGO T3S3 ESP32-S3 LoRa TTGO Development Board User Manual
Model: T3S3 ESP32-S3 LoRa TTGO Development Board (SX1276 915MHz)
Introduction
The LILYGO T3S3 ESP32-S3 LoRa TTGO Development Board is a versatile wireless module designed for various IoT applications. It integrates an ESP32-S3 microcontroller, a LoRa transceiver (SX1276 for 915MHz variant), and a 0.96-inch OLED display, providing a comprehensive platform for development. This manual provides essential information for setting up, operating, and maintaining your device.
Specifications
| Feature | Detail |
|---|---|
| MCU | ESP32-S3FH4R2 |
| Flash Memory | 4MB |
| PSRAM | 2MB |
| Wireless Protocol | Wi-Fi, Bluetooth 5.0, LoRa (SX1276 915MHz) |
| OLED Display | 0.96 inch SSD1306 Driver I2C OLED (128x64 resolution) |
| Power Supply | USB / 3.7V Lipo battery (with battery switch) |
| Onboard Functions | Reset Button, Boot Button, TF Card Support |
| Operating System | FreeRTOS |
| Dimensions (LxWxH) | 3.45 x 2.6 x 1.06 inches (approx. 87.6 x 66 x 26.9 mm) |

Figure 1: LILYGO T3S3 board with approximate dimensions (L:66mm, W:36mm, H:14mm).
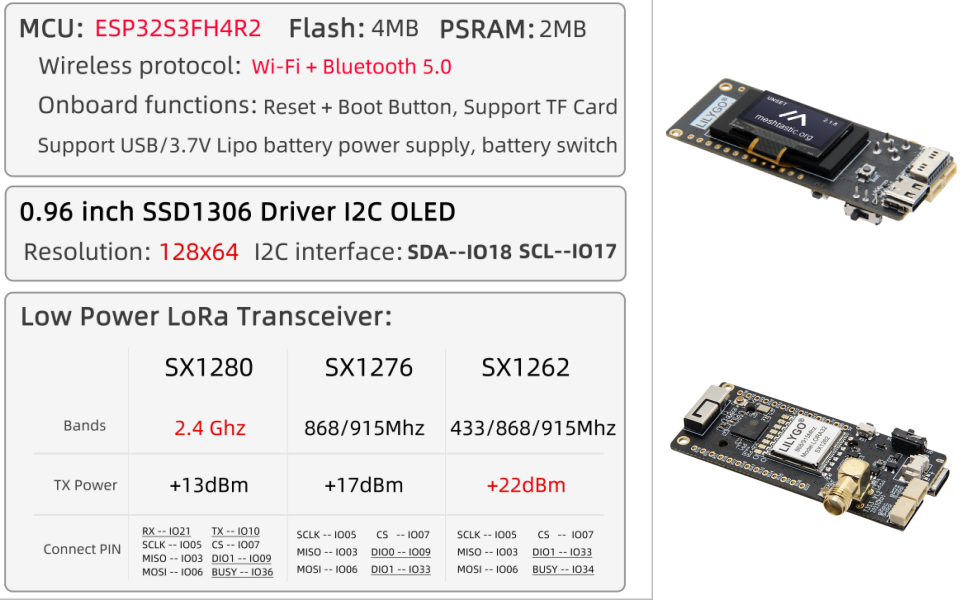
Figure 2: Detailed technical specifications including MCU, memory, wireless protocols, and OLED display characteristics.
Package Contents
Please verify that all items are present in your package:
- 1 x LILYGO T3S3 ESP32-S3 LoRa TTGO Development Board
- 1 x Power Cable (for battery connection)
- 2 x Pin Headers (for expansion)
- 1 x LoRa Antenna (915MHz for this model)

Figure 3: Contents of the LILYGO T3S3 package.
Product Overview
The LILYGO T3S3 board features several key components for its operation:
- ESP32-S3 Microcontroller: The central processing unit for your applications.
- LoRa Transceiver (SX1276): Enables long-range, low-power wireless communication.
- 0.96-inch OLED Display: For displaying information directly on the board.
- USB Type-C Port: For power supply and data communication (programming).
- Battery Connector: JST 2-pin connector for 3.7V LiPo battery.
- Battery Switch: To control power from the connected battery.
- Reset Button: To restart the microcontroller.
- Boot Button: Used for entering bootloader mode for firmware flashing.
- TF Card Slot: For external storage.
- Antenna Connector (IPEX/U.FL): For connecting the LoRa antenna.
- GPIO Pins: Exposed pins for connecting external sensors and peripherals.

Figure 4: Top view of the LILYGO T3S3 board, highlighting the OLED display.

Figure 5: Bottom view of the LILYGO T3S3 board, showing the LoRa module and other integrated circuits.
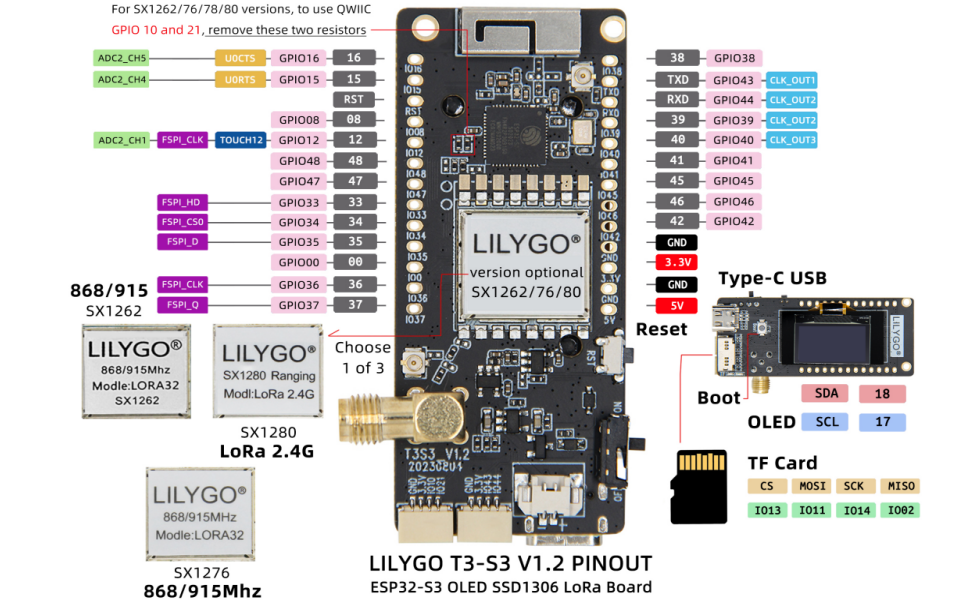
Figure 6: Detailed pinout diagram for the LILYGO T3S3 V1.2 board, showing GPIO assignments, power pins, and peripheral connections.
Setup
1. Connecting the Antenna
Carefully connect the provided LoRa antenna to the IPEX/U.FL connector on the board. Ensure a secure connection to maximize LoRa performance.

Figure 7: LILYGO T3S3 board with the LoRa antenna attached.
2. Powering the Board
The board can be powered via the USB Type-C port or a 3.7V LiPo battery.
- USB Power: Connect a USB Type-C cable from your computer or a 5V USB power adapter to the board's USB port.
- Battery Power: Connect a 3.7V LiPo battery to the JST 2-pin battery connector. Ensure the battery switch is in the 'ON' position to power the board from the battery.
3. Initial Firmware Upload (Optional)
For initial setup or custom firmware, you may need to upload firmware. Refer to the official LILYGO GitHub repository for detailed instructions and example code:
github.com/Xinyuan-LilyGO/Lilygo-LoRa-Epaper-series
Typically, you will need to press and hold the Boot button, then briefly press the Reset button, and release the Boot button to enter programming mode. Use a suitable ESP32-S3 development environment (e.g., Arduino IDE with ESP32 board support, PlatformIO) to upload your code.
Operating the Board
Basic Operation
Once powered and programmed, the LILYGO T3S3 board will execute the loaded firmware. The 0.96-inch OLED display can be used to show real-time data, status, or other information as programmed.
Using the OLED Display
The OLED display is connected via I2C. The SDA pin is IO18 and the SCL pin is IO17. Libraries such as Adafruit_SSD1306 are commonly used for programming the display.
LoRa Communication
The SX1276 LoRa transceiver operates at 915MHz. Ensure your LoRa application adheres to local regulations for frequency usage and transmission power. Example code for LoRa communication can be found in the provided GitHub repository.
TF Card Usage
The onboard TF card slot allows for data logging or storing configuration files. Standard SD card libraries can be used to interface with the TF card.
Maintenance
- Keep Dry: Protect the board from moisture and extreme temperatures.
- Handle with Care: Avoid static discharge when handling the board. Use anti-static precautions.
- Cleanliness: Keep the board free from dust and debris. Use a soft, dry brush or compressed air for cleaning.
- Firmware Updates: Regularly check the official GitHub repository for firmware updates and improvements.
- Battery Care: If using a LiPo battery, follow standard LiPo battery safety guidelines for charging and storage. Do not overcharge or deep discharge.
Troubleshooting
- Board not powering on:
- Ensure USB cable is properly connected and providing power.
- If using battery, check battery charge level and ensure the battery switch is in the 'ON' position.
- Firmware upload fails:
- Verify correct COM port is selected in your IDE.
- Ensure you are holding the Boot button while pressing and releasing Reset, then releasing Boot to enter programming mode.
- Check USB cable for data transfer capability (some cables are charge-only).
- Install necessary USB drivers for the ESP32-S3.
- OLED display not working:
- Verify I2C connections (SDA to IO18, SCL to IO17) in your code.
- Ensure the correct display library (e.g., Adafruit_SSD1306) is installed and initialized correctly.
- LoRa communication issues:
- Ensure the antenna is securely connected.
- Verify that both transmitting and receiving devices are configured for the correct frequency (915MHz) and LoRa parameters (spreading factor, bandwidth, coding rate).
- Check for local interference or obstructions.
Warranty and Support
LILYGO products are designed for reliability and performance. For technical support, community forums, and the latest documentation, please refer to the official LILYGO GitHub repository and community channels.
Official GitHub Repository: github.com/Xinyuan-LilyGO/Lilygo-LoRa-Epaper-series
If you have any questions or suggestions about the product, please feel free to contact LILYGO customer support. We will answer your question as soon as possible.
Ask a question about this manual
Ask about setup, troubleshooting, compatibility, parts, safety, or missing instructions. Manuals+ will review the question and use this page’s manual context to help answer it.