
1. Introduction
Thank you for choosing the DWT Cordless Drill ABS-14.4L-2. This manual provides essential information for the safe and efficient operation, maintenance, and troubleshooting of your new cordless drill. Please read this manual thoroughly before first use and keep it for future reference.
The DWT ABS-14.4L-2 is a versatile 14V cordless drill designed for various drilling and fastening tasks. It features a 10mm chuck and comes with an extra 1.5AMP battery for extended use.
2. General Safety Instructions
WARNING: Read all safety warnings, instructions, illustrations, and specifications provided with this power tool. Failure to follow all instructions listed below may result in electric shock, fire, and/or serious injury.
2.1 Work Area Safety
- Keep work area clean and well lit. Cluttered or dark areas invite accidents.
- Do not operate power tools in explosive atmospheres, such as in the presence of flammable liquids, gases, or dust. Power tools create sparks which may ignite the dust or fumes.
- Keep children and bystanders away while operating a power tool. Distractions can cause you to lose control.
2.2 Electrical Safety
- Power tool plugs must match the outlet. Never modify the plug in any way.
- Do not expose power tools to rain or wet conditions. Water entering a power tool will increase the risk of electric shock.
- Do not abuse the cord. Never use the cord for carrying, pulling, or unplugging the power tool. Keep cord away from heat, oil, sharp edges, or moving parts.
2.3 Personal Safety
- Always wear eye protection. Use safety glasses, goggles, or a face shield.
- Dress properly. Do not wear loose clothing or jewelry. Keep your hair and clothing away from moving parts.
- Stay alert, watch what you are doing, and use common sense when operating a power tool.
2.4 Power Tool Use and Care
- Do not force the power tool. Use the correct power tool for your application.
- Disconnect the battery pack from the power tool before making any adjustments, changing accessories, or storing power tools.
- Store idle power tools out of the reach of children and do not allow persons unfamiliar with the power tool or these instructions to operate the power tool.
- Maintain power tools and accessories. Check for misalignment or binding of moving parts, breakage of parts, and any other condition that may affect the power tool’s operation.
3. Package Contents
Carefully unpack all items and ensure you have received the following:
- 1 x DWT Cordless Drill (ABS-14.4L-2)
- 2 x 14V 1.5AMP Lithium-Ion Battery Packs
- 1 x Battery Charger
- 1 x User Manual
- Assorted Drill Bits/Accessories (TOOLS)
If any items are missing or damaged, please contact DWT customer support.
4. Setup
4.1 Charging the Battery
- Connect the battery charger to a standard power outlet.
- Slide the battery pack onto the charger until it clicks into place.
- Allow the battery to charge fully. The charger's indicator light will typically change color or turn off when charging is complete.
- Once charged, remove the battery from the charger.
Note: For optimal battery life, fully charge the battery before first use.
4.2 Installing/Removing Drill Bits
- Ensure the drill is switched off and the battery pack is removed for safety.
- Rotate the chuck collar counter-clockwise to open the chuck jaws.
- Insert the drill bit or accessory into the chuck, ensuring it is centered.
- Rotate the chuck collar clockwise to tighten the jaws securely around the bit. Hand-tighten firmly.
- To remove, rotate the chuck collar counter-clockwise and pull the bit out.
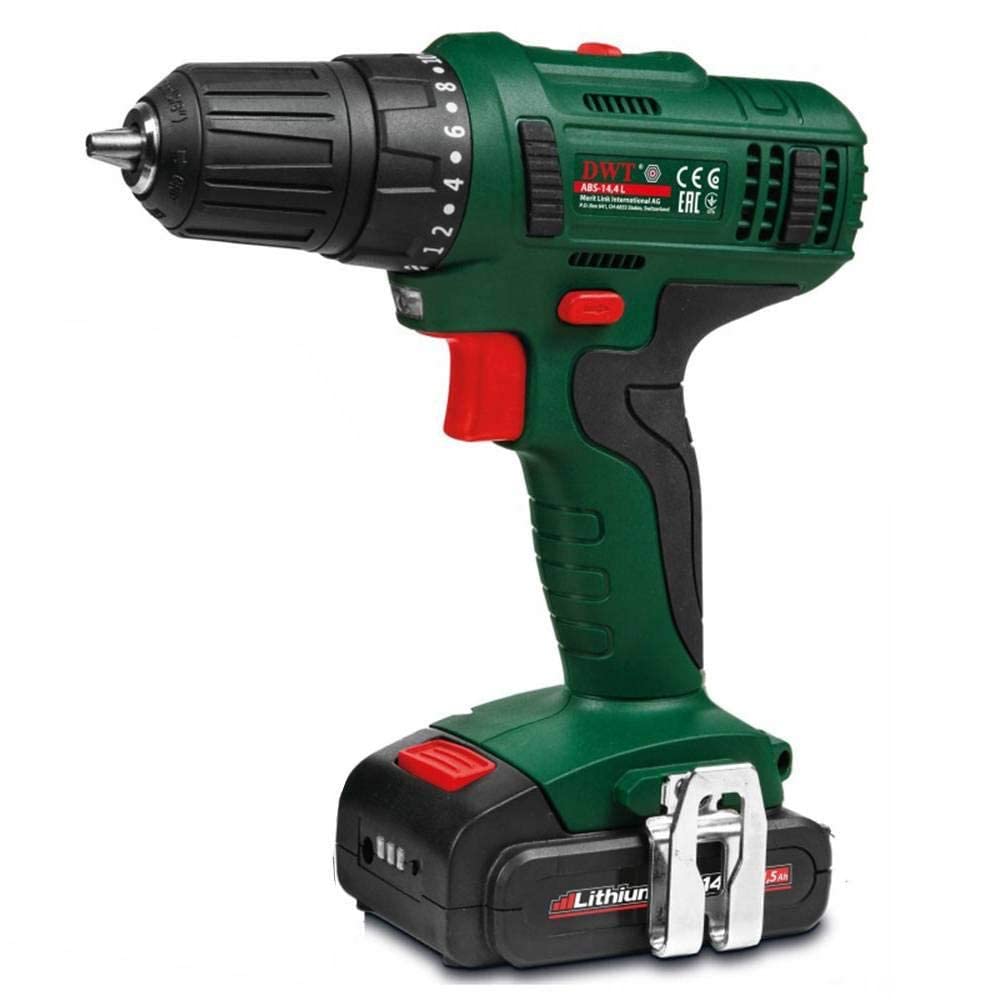
Image 1: DWT Cordless Drill ABS-14.4L-2 showing its dimensions. The drill is green and black, with a battery attached, and a measurement graphic indicating its height.
5. Operating Instructions
5.1 Attaching the Battery
Slide the charged battery pack into the base of the drill handle until it clicks securely into place.
5.2 Forward/Reverse Rotation
The forward/reverse selector switch is located above the trigger. Push it to the left for forward rotation (drilling/driving screws in) and to the right for reverse rotation (removing screws). Ensure the switch is in the center position for safety when not in use.
5.3 Speed Control and Torque Settings
- Variable Speed Trigger: The drill speed is controlled by the pressure applied to the trigger. Press lightly for slower speeds and harder for faster speeds.
- Torque Adjustment Ring: Rotate the numbered ring behind the chuck to select the desired torque setting. Lower numbers are for driving small screws or working with soft materials, while higher numbers are for larger screws or harder materials. The drill will stop when the set torque is reached, preventing overtightening.
- Drill Mode: For drilling into wood, metal, or plastic, set the torque adjustment ring to the drill symbol. This provides maximum torque without clutch engagement.
5.4 Drilling and Driving
- Secure the workpiece firmly to prevent movement.
- Select the appropriate drill bit or screwdriver bit.
- Set the forward/reverse switch to the desired direction.
- For drilling, select the drill mode. For driving screws, select an appropriate torque setting.
- Position the bit on the workpiece.
- Start the drill by gently pressing the trigger, gradually increasing pressure to achieve the desired speed.
- Apply steady, even pressure. Do not force the drill.
- When finished, release the trigger and wait for the chuck to stop rotating before setting the tool down.
6. Maintenance
6.1 Cleaning
- Always disconnect the battery pack before cleaning.
- Use a clean, damp cloth to wipe down the exterior of the drill. Do not use harsh chemicals or abrasive cleaners.
- Keep the ventilation openings clear of dust and debris to prevent overheating. Use compressed air if necessary.
- Clean the chuck jaws regularly to ensure proper grip on bits.
6.2 Battery Care and Storage
- Store batteries in a cool, dry place away from direct sunlight and extreme temperatures.
- Do not store fully discharged batteries for extended periods. Charge them periodically if not in use.
- Do not short-circuit battery terminals.
- Dispose of old batteries responsibly according to local regulations.
7. Troubleshooting
| Problem | Possible Cause | Solution |
|---|---|---|
| Drill does not start. | Battery not charged or not properly inserted. | Ensure battery is fully charged and securely attached. |
| Loss of power during operation. | Battery charge is low. | Recharge the battery or replace with a fully charged one. |
| Bit slips in chuck. | Chuck not tightened sufficiently or jaws are dirty. | Tighten chuck firmly. Clean chuck jaws if necessary. |
| Drill overheats. | Overloading the tool or blocked ventilation. | Reduce load, allow tool to cool. Clear ventilation slots. |
8. Specifications
| Feature | Detail |
|---|---|
| Model | ABS-14.4L-2 |
| Brand | DWT |
| Voltage | 14 Volts |
| Amperage | 1.5 Amps |
| Chuck Size | 10mm (0.5 Inches) |
| Power Source | Battery Powered |
| Battery Cell Type | Lithium Ion |
| Material | Plastic |
| Color | Green |
| Item Weight | 4 Kilograms |
| Package Dimensions | 34.7 x 28.9 x 12.3 cm |
| Special Features | Cordless |
9. Warranty and Support
DWT products are manufactured to high-quality standards and are warranted against defects in materials and workmanship. For specific warranty terms and conditions, please refer to the warranty card included with your product or visit the official DWT website.
For technical support, service, or replacement parts, please contact DWT customer service through their official channels. Keep your purchase receipt and product model number (ABS-14.4L-2) handy when contacting support.
You can visit the DWT Store on Amazon for more information: DWT Store