
MiLESEEY S7-PRO
Contents
MiLESEEY S7 Pro Laser Measure User Manual
Model: S7-PRO | Brand: MiLESEEY
1. Introduction
Thank you for choosing the MiLESEEY S7 Pro Laser Measure. This advanced tool is designed for precise distance measurement, offering a range of features including a Pointfinder Camera, P2P Technology, and seamless app connectivity. It is ideal for both indoor and outdoor applications, providing accurate measurements up to 330 feet with an accuracy of +/- 1/16 inch.
This manual provides detailed instructions on how to set up, operate, and maintain your device to ensure optimal performance and longevity. Please read this manual thoroughly before using the device.
2. Safety Information
Always adhere to safety guidelines when operating the MiLESEEY S7 Pro Laser Measure. This device emits a Class 2 laser, which can cause eye injury if viewed directly. Avoid direct eye exposure to the laser beam.
- Do not stare into the laser beam or direct it at other people.
- Do not disassemble or modify the device. Unauthorized modifications can lead to hazardous radiation exposure.
- Keep the device out of reach of children.
- Operate the device only in accordance with the instructions provided in this manual.
- The device has an IP65 protection rating, indicating excellent resistance to dust and water splashes. However, it is not designed for submersion.

Figure 2.1: The MiLESEEY S7 Pro is built with IP65 protection, making it resistant to dust and water splashes, suitable for various job site conditions.
3. Package Contents
Upon opening the package, please verify that all the following items are included:
- S7 Laser Measure Device x1
- Carrying Case x1
- Hand Strap x1
- Rechargeable AAA Battery x 3
- User Manual x1

Figure 3.1: All included components of the MiLESEEY S7 Pro package.
4. Product Overview
4.1 Components and Controls
The MiLESEEY S7 Pro features a robust design with intuitive controls for ease of use. Key components include the laser emission and reception lenses, the digital display, and a set of function buttons.

Figure 4.1: Front view of the MiLESEEY S7 Pro, highlighting the display and control panel.
The control panel consists of several buttons, each with a specific function:
- MEAS Button: Initiates a measurement or confirms a selection.
- SET Button: Accesses settings menu or confirms settings.
- Power Button: Turns the device on/off.
- Function Buttons: For selecting various measurement modes (e.g., area, volume, Pythagoras).
- Navigation Buttons: Used to navigate through menus and adjust settings.
4.2 Display Features
The device features a large 2.4-inch IPS display that provides clear readouts even in bright sunlight. The display also supports rotation and dual white/black text modes for enhanced readability.

Figure 4.2: Intuitive navigation menu on the MiLESEEY S7 Pro display.

Figure 4.3: The device offers dual white/black text display modes for optimal visibility in different lighting conditions.
5. Setup
5.1 Battery Installation and Charging
The MiLESEEY S7 Pro uses 3 x AAA NiMH rechargeable batteries, which are included. Ensure the batteries are properly inserted according to the polarity markings inside the battery compartment.
To charge the device, connect it to a USB power source using the provided USB cable. The battery indicator on the display will show the charging status.

Figure 5.1: The MiLESEEY S7 Pro supports both rechargeable Ni-MH batteries and USB power supply.
5.2 Initial Power On
Press and hold the Power button (usually marked with a circle and vertical line) to turn on the device. The display will light up, and the device will be ready for use.
6. Operating Instructions
6.1 Basic Distance Measurement
- Turn on the device.
- Point the laser at the target object.
- Press the MEAS button. The measured distance will be displayed on the screen.
6.2 Pointfinder Camera
The built-in 2x zoom digital Pointfinder Camera allows you to easily locate the laser spot and confidently measure distances, especially outdoors in bright sunlight where the laser dot might be difficult to see with the naked eye. The camera displays on-screen targeting crosshairs to assist with precise aiming.

Figure 6.1: Using the Pointfinder Camera to accurately target and measure distances outdoors.
Video 6.1: Demonstration of the MiLESEEY S7 Laser distance meter with its pointfinder camera in action, showing how it aids in targeting for accurate measurements.
6.3 P2P Technology (Measure between Two Points)
The integrated 360° high-accuracy tilt sensor and smart base enable P2P (Point-to-Point) technology. This allows you to capture accurate measurements between any two points from a single remote location, even if direct line-of-sight is obstructed or difficult to access.

Figure 6.2: Illustrates the use of P2P technology for measuring distances between two points from a single remote position.
6.4 App Connectivity
The MiLESEEY S7 Pro can connect to the "Smart Life" app, expanding its functionality. Through the app, you can transfer dimensions directly onto on-site photographs, draw projects, and construct plans. The app also features a built-in memory storage for up to 1,000 groups of data, allowing for efficient record-keeping and analysis.

Figure 6.3: Seamless connectivity between the MiLESEEY S7 Pro and the "Smart Life" app for data management.
Video 6.2: Detailed overview of the MILESEEY SMART LIFE app's enhanced Excel Spreadsheet Functionality, demonstrating data export and organization.
Video 6.3: Operating instructions for the S7 (camera version) laser measure app, guiding users through its features and functions.
6.5 Measurement Modes
The device supports various measurement modes to suit different needs, including:
- Single Measurement
- Area Calculation
- Volume Calculation
- Pythagoras (2-point and 3-point)
- Auto Level Measurement
- Auto Height Measurement
- Trapezium Measurement
- Triangle Area
- Circular Area
- Cylinder Volume
- Stake Out
- Add/Subtract Measurements
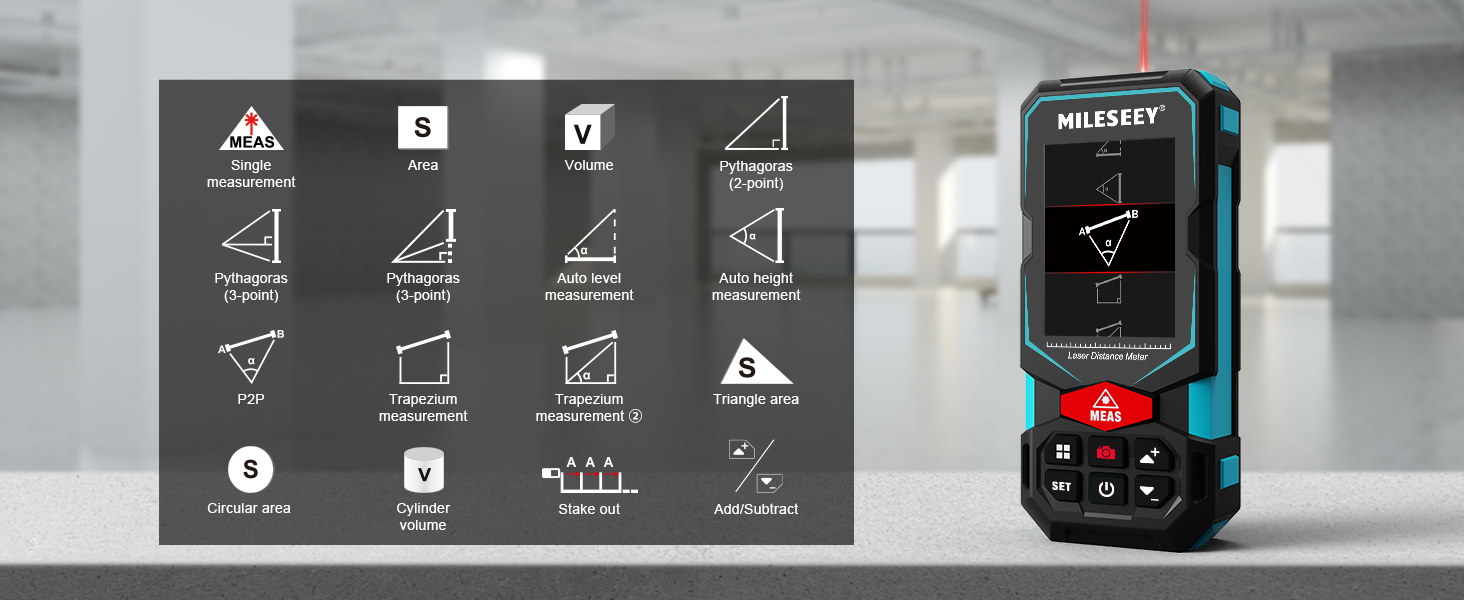
Figure 6.4: Overview of the diverse measurement functions supported by the device.
7. Maintenance
To ensure the longevity and accuracy of your MiLESEEY S7 Pro Laser Measure, follow these maintenance guidelines:
- Cleaning: Use a soft, damp cloth to clean the device. Do not use abrasive cleaners or solvents. Pay special attention to the laser emission and reception lenses, keeping them free of dust and debris.
- Storage: Store the device in its carrying case in a cool, dry place when not in use. Avoid extreme temperatures and direct sunlight.
- Battery Care: If the device will not be used for an extended period, remove the batteries to prevent leakage. Recharge the batteries regularly to maintain their capacity.
- Avoid Impact: While the device is robust, avoid dropping it or subjecting it to strong impacts, which can affect its calibration and internal components.
8. Troubleshooting
If you encounter issues with your MiLESEEY S7 Pro, please refer to the following common troubleshooting steps:
| Problem | Possible Cause | Solution |
|---|---|---|
| Device does not turn on. | Low or depleted batteries; improperly inserted batteries. | Charge the batteries or replace them. Ensure batteries are inserted with correct polarity. |
| Inaccurate measurements. | Dirty laser lens; unstable measuring surface; extreme environmental conditions. | Clean the laser lens. Ensure the device is stable during measurement. Avoid measuring in conditions beyond specified operating range. |
| Laser dot not visible outdoors. | Bright sunlight. | Use the Pointfinder Camera for targeting. Adjust viewing angle to avoid direct sunlight on the screen. |
| App connectivity issues. | Bluetooth not enabled; app not updated; device not paired. | Ensure Bluetooth is on. Update the app to the latest version. Follow app pairing instructions. |
9. Specifications
| Feature | Detail |
|---|---|
| Brand | MiLESEEY |
| Model Number | S7-PRO |
| Measuring Range | 330 feet |
| Accuracy | +/- 1/16" |
| Power Source | 3 x AAA NiMH rechargeable batteries (included) |
| Display | 2.4" IPS Display |
| Pointfinder Camera | 2x Digital Zoom |
| P2P Technology | Yes, with 360° high accuracy tilt sensor |
| Connectivity | App (Smart Life) |
| Data Storage | Up to 1,000 groups (via app) |
| IP Rating | IP65 |
| Product Dimensions | 5"L x 1"W x 2"H |
| Item Weight | 6.3 ounces (180 Grams) |
| Material | Acrylonitrile Butadiene Styrene, Rubber |
10. Warranty and Support
10.1 Warranty Information
The MiLESEEY S7 Pro Laser Measure comes with a 12-month warranty from the date of purchase. This warranty covers defects in materials and workmanship under normal use. It does not cover damage caused by misuse, accidents, unauthorized modifications, or natural disasters.
Please retain your proof of purchase for warranty claims.
10.2 Customer Support
For technical assistance, troubleshooting not covered in this manual, or warranty inquiries, please contact MiLESEEY customer support. Refer to the contact information provided on the product packaging or the official MiLESEEY website.
Ask a question about this manual
Ask about setup, troubleshooting, compatibility, parts, safety, or missing instructions. Manuals+ will review the question and use this page’s manual context to help answer it.