
1. Safety Information
Please read this manual carefully before installing, operating, or performing maintenance on your Teka Maestro GFL 57760 EOS conventional hood. Keep this manual for future reference.
- Electrical Safety: Ensure the electrical installation complies with local regulations. Disconnect power before any installation or maintenance.
- Installation: The hood must be installed by a qualified technician. Maintain minimum distances from cooking surfaces as specified in the installation guide.
- Ventilation: Ensure adequate ventilation in the room when the hood is used simultaneously with appliances burning gas or other fuels.
- Cleaning: Regularly clean the hood and grease filters to prevent fire hazards. Do not flambé under the hood.
- Children: This appliance is not intended for use by persons (including children) with reduced physical, sensory or mental capabilities, or lack of experience and knowledge, unless they have been given supervision or instruction.
2. Product Overview
The Teka Maestro GFL 57760 EOS is a 50 cm conventional hood designed for efficient extraction of cooking fumes and odors. It features a durable stainless steel finish and offers four extraction levels to suit various cooking needs.
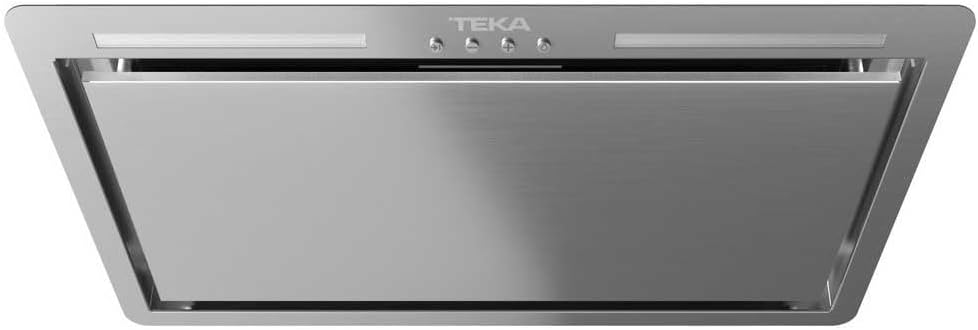
Figure 2.1: Front view of the Teka GFL 57760 EOS conventional hood, showcasing its stainless steel finish and integrated control buttons.

Figure 2.2: Top-down view of the Teka GFL 57760 EOS hood, highlighting its sleek, integrated design suitable for modern kitchens.
3. Setup and Installation
3.1 Pre-Installation Checks
- Unpack the hood and check for any transport damage.
- Ensure all components are present as per the packing list.
- Verify the electrical supply matches the hood's requirements (Voltage: 50 Volts, Frequency: 50/60Hz - check product label for exact details).
3.2 Mounting the Hood
The hood is designed for under-cabinet installation. Refer to the detailed installation template provided with the product for precise measurements and drilling points.
- Mark the mounting points on the underside of the cabinet according to the template.
- Drill pilot holes for screws.
- Secure the hood to the cabinet using appropriate fasteners.

Figure 3.1: Angled side view of the hood, illustrating its slim profile suitable for discreet under-cabinet installation.
3.3 Electrical Connection
Connect the hood to a grounded electrical outlet. Ensure the connection is secure and protected by a circuit breaker. If in doubt, consult a qualified electrician.
3.4 Ducting Options
This hood can operate in two modes:
- Ducted Mode: Air is extracted and expelled outside through a ducting system. Ensure the ducting is of appropriate diameter and material for optimal performance.
- Recirculating Mode: Air is filtered through charcoal filters (purchased separately) and recirculated back into the kitchen. Install charcoal filters as per their instructions for this mode.
4. Operating Instructions
The Teka Maestro GFL 57760 EOS hood features intuitive push-button controls for fan speed and lighting.

Figure 4.1: Close-up of the control panel, showing the push-buttons for fan speed selection and lighting control.
4.1 Powering On/Off
- Press the power button (often marked with a circle or '0') to turn the hood on or off.
4.2 Fan Speed Control
The hood offers 4 extraction levels:
- Press the '+' button to increase the fan speed.
- Press the '-' button to decrease the fan speed.
- Select a higher speed for intense cooking (e.g., frying) and a lower speed for simmering or light cooking.
4.3 Light Operation
- Press the light button (often marked with a light bulb symbol) to turn the integrated lighting on or off.

Figure 4.2: The Teka GFL 57760 EOS hood installed under a kitchen cabinet, demonstrating its flush integration and effective lighting over a cooking area.
5. Maintenance
Regular maintenance ensures optimal performance and extends the lifespan of your hood.
5.1 Cleaning Grease Filters
The metallic grease filters should be cleaned regularly (approximately every 2-4 weeks, depending on usage) to prevent grease buildup and maintain extraction efficiency.
- Disconnect the hood from the main power supply.
- Open the lower panel of the hood to access the filters.
- Release the filter clips and carefully remove the grease filters.
- Wash the filters by hand in hot soapy water or in a dishwasher (ensure they are suitable for dishwasher cleaning).
- Allow filters to dry completely before re-installing.
- Re-install the filters and close the panel.

Figure 5.1: Front view of the Teka GFL 57760 EOS hood with the lower panel open, revealing the metallic grease filters ready for removal and cleaning.
5.2 Replacing Charcoal Filters (Recirculating Mode Only)
If your hood is operating in recirculating mode, charcoal filters need to be replaced every 3-6 months, depending on usage.
- Disconnect the hood from the main power supply.
- Remove the metallic grease filters as described above.
- Remove the saturated charcoal filters (refer to specific filter instructions for attachment method).
- Install new charcoal filters.
- Re-install the metallic grease filters.
5.3 Exterior Cleaning
Clean the exterior of the hood with a soft cloth and a mild, non-abrasive cleaner. For stainless steel surfaces, use a specialized stainless steel cleaner to maintain its finish. Avoid abrasive sponges or harsh chemicals.
5.4 Light Bulb Replacement
If a light bulb needs replacement, ensure the hood is disconnected from power. Refer to the specific bulb type and replacement instructions in the full product manual or contact customer support.
6. Troubleshooting
Before contacting service, check the following common issues and solutions:
| Problem | Possible Cause | Solution |
|---|---|---|
| Hood does not start | No power supply; Power cord disconnected; Fuse blown. | Check power connection; Check circuit breaker/fuse box. |
| Poor extraction performance | Grease filters clogged; Charcoal filters saturated (recirculating mode); Ducting obstructed or too long/narrow. | Clean grease filters; Replace charcoal filters; Check ducting for obstructions. |
| Lights not working | Light bulb faulty; Electrical connection issue. | Replace light bulb; Check electrical connections. |
| Excessive noise | Fan obstruction; Loose components; Incorrect installation. | Check for foreign objects in fan; Ensure all parts are secure; Verify installation. |
7. Specifications
Technical specifications for the Teka Maestro GFL 57760 EOS Conventional Hood:
| Feature | Detail |
|---|---|
| Brand | Teka |
| Model Number | GFL 57760 EOS (113100007) |
| Product Dimensions (L x W x H) | 53.2 x 53.2 x 28.2 cm |
| Item Weight | 9 Kilograms |
| Material | Stainless Steel |
| Finish Type | Inox |
| Noise Level | 68 Decibels |
| Voltage | 50 Volts |
| Energy Efficiency Class | A+ (on a scale of A+++ to D) |
| Extraction Levels | 4 |
8. Warranty and Support
Your Teka Maestro GFL 57760 EOS Conventional Hood is covered by a manufacturer's warranty. Please refer to the warranty card included with your product for specific terms and conditions, including the warranty period and coverage details.
For technical assistance, spare parts, or warranty claims, please contact Teka customer support or your authorized dealer. Have your model number (GFL 57760 EOS) and serial number ready when contacting support.
Teka Customer Service: Please visit the official Teka website for contact information specific to your region or country. www.teka.com


