1. Introduction
This manual provides essential information for the safe and efficient operation, installation, and maintenance of your Rx Clear 16" Inch Sand Filter. Designed for above-ground pools, this filter system ensures crystal clear water by effectively removing debris and impurities. Please read this manual thoroughly before installation and use to ensure proper setup and longevity of your equipment.
2. Safety Information
WARNING: Failure to follow these instructions can result in serious injury or death.
- Always disconnect power to the pump before performing any service or maintenance on the filter system.
- Ensure all electrical connections are made by a qualified electrician and comply with local codes.
- Do not operate the filter if any part is damaged or missing.
- Never attempt to open or service the filter while it is under pressure. Always relieve pressure before opening.
- Keep children away from pool equipment.
- Use only clean, graded filter sand as specified in this manual.
- Ensure proper ventilation when working with pool chemicals.
3. Components and Assembly
Your Rx Clear 16" Sand Filter system includes the following main components:
- Filter Tank (16" diameter)
- Universal Base
- 6-Position Multi-Port Valve (Top Mount)
- Pressure Gauge
- Two 6-foot Hoses
- One 3-foot Hose
- Required Clamps and Fittings
3.1. Installation Steps
- Positioning the Filter: Place the universal base on a firm, level surface, preferably concrete, as close to the pool as possible. Ensure there is adequate space around the filter for maintenance and operation.
- Assembling the Tank and Base: Carefully place the filter tank onto the universal base. Ensure it is seated securely.
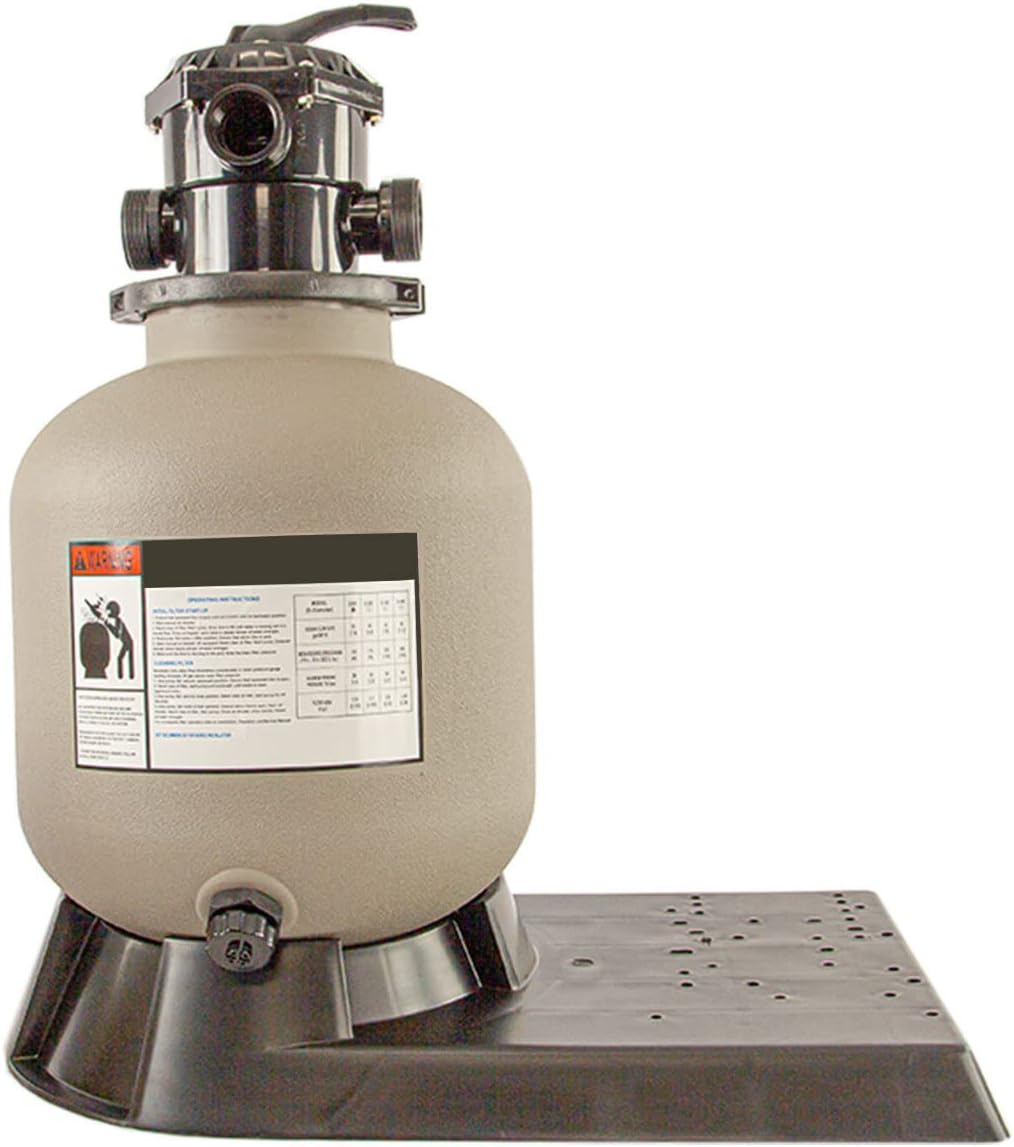
Image: The Rx Clear 16-inch sand filter unit, showing the tank, multi-port valve on top, and the universal base. This image illustrates the main components assembled.
- Adding Filter Sand:
- Remove the multi-port valve from the top of the tank.
- Cover the standpipe opening inside the tank to prevent sand from entering it. A small cup or plastic bag can be used.
- Carefully pour approximately 110 lbs of #20 silica sand (0.45-0.55 mm) into the filter tank. Distribute the sand evenly.
- Remove the cover from the standpipe.
- Installing the Multi-Port Valve:
- Ensure the O-ring is properly seated on the valve.
- Carefully lower the multi-port valve onto the tank, aligning the standpipe with the valve's opening. Do not force it.
- Secure the valve to the tank using the provided clamp or bolts. Ensure a tight, leak-free seal.
- Install the pressure gauge into the designated port on the valve. Do not overtighten the gauge.
- Connecting Hoses:
- Connect the pool pump's discharge port to the "PUMP" port on the multi-port valve using one of the 6-foot hoses and clamps.
- Connect the "RETURN" port on the multi-port valve to the pool's return inlet using the other 6-foot hose and clamps.
- Connect the "WASTE" port on the multi-port valve to a suitable waste line or discharge area using the 3-foot hose and clamps. Ensure the waste line directs water away from the pool area and complies with local regulations.
- Ensure all connections are secure and leak-free. The filter is designed to accept most standard pool pumps and plumbing configurations, including 1.5-inch PVC pipes.
- Priming the Pump: Before starting the filter, ensure the pool pump is primed according to its manufacturer's instructions.
4. Operating the Filter System
The 6-position multi-port valve allows for various operational modes. Always turn off the pump before changing the valve position to prevent damage.
| Position | Function | Description |
|---|---|---|
| FILTER | Normal Filtration | For daily filtering of pool water. Water flows through the sand bed, trapping debris, and returns to the pool. |
| BACKWASH | Cleaning Filter | Reverses water flow through the sand bed to flush trapped debris out the waste port. Perform when pressure gauge reads 8-10 PSI above starting pressure. |
| RINSE | Flushing Lines | Used after backwashing to flush out any remaining dirt from the valve and sand bed, sending it to waste. Run for 30-60 seconds. |
| WASTE/DRAIN | Draining Pool/Vacuum to Waste | Bypasses the filter, sending water directly out the waste port. Useful for vacuuming heavy debris or lowering pool water level. |
| RECIRCULATE | Circulate Water (No Filtering) | Circulates pool water without passing it through the filter sand. Useful for distributing chemicals quickly. |
| CLOSED | Shuts Off Flow | Closes all flow to the filter and pool. Use only when the pump is off. |
To begin normal filtration, ensure the pump is off, set the valve to FILTER, then turn on the pump. Note the initial pressure gauge reading; this is your clean filter pressure.
5. Maintenance
5.1. Backwashing
Backwash your filter when the pressure gauge reads 8-10 PSI above its clean starting pressure, or when water flow to the pool noticeably decreases. This indicates that the sand bed has accumulated debris and needs cleaning.
- Turn off the pool pump.
- Rotate the multi-port valve handle to the BACKWASH position.
- Turn on the pump and backwash for approximately 2-3 minutes, or until the water flowing out of the waste line appears clear.
- Turn off the pump.
- Rotate the multi-port valve handle to the RINSE position.
- Turn on the pump and rinse for 30-60 seconds.
- Turn off the pump.
- Rotate the multi-port valve handle back to the FILTER position.
- Turn on the pump to resume normal filtration.
5.2. Sand Replacement
Filter sand typically needs to be replaced every 3-5 years, depending on usage and water quality. Over time, sand particles can become worn and less effective at filtering. Consult a pool professional if you are unsure.
5.3. Winterization
For colder climates, proper winterization is crucial to prevent damage to your filter system:
- Backwash and rinse the filter thoroughly.
- Drain all water from the filter tank by opening the drain plug at the bottom.
- Remove the multi-port valve and store it in a warm, dry place.
- Remove the pressure gauge.
- Store hoses in a dry place.
- Leave the drain plug open during winter to allow any remaining moisture to escape.
6. Troubleshooting
| Problem | Possible Cause | Solution |
|---|---|---|
| Low Water Flow / High Pressure | Clogged filter sand bed | Perform a backwash and rinse cycle. |
| Cloudy Pool Water |
|
|
| Water Leaking from Valve |
|
|
| Sand Returning to Pool |
|
|
7. Specifications
- Model Number: AC166GSLB
- Tank Diameter: 16 inches
- Sand Capacity: Approximately 110 lbs (#20 Silica Sand)
- Product Dimensions: 29.5 x 21.5 x 18 inches
- Item Weight: 27.5 pounds
- Valve Type: 6-Position Multi-Port (Top Mount)
- Manufacturer: Rx Clear
- Country of Origin: USA
8. Warranty and Support
For warranty information, technical support, or to order replacement parts, please contact Rx Clear customer service. Keep your purchase receipt and model number (AC166GSLB) readily available when contacting support.
For more information and products, visit the official Rx Clear store: Rx Clear Store on Amazon


