Introduction
This manual provides detailed instructions for the setup, operation, and maintenance of your Uplayteck SG5 Kids Alarm Clock. Please read this manual thoroughly before using the product to ensure proper function and longevity. Keep this manual for future reference.

Figure 1: Front view of the Uplayteck SG5 Kids Alarm Clock.
Product Overview
The Uplayteck SG5 Kids Alarm Clock is designed to assist children in developing healthy sleep habits with its intuitive features. Key functionalities include:
- Sleep Training: Uses sun/moon icons and color-changing lights (green for wake, blue for sleep) to visually guide children.
- Sound Machine: Features 3 lullabies and 4 nature sounds (bird, rain, campfire, white noise) with adjustable playback duration (15, 30, 60 minutes, or continuous).
- Night Light: Offers 5 color options (white, yellow, 2 mixed colors, 1 breathing light) and 4 adjustable brightness levels. Can be set to turn off automatically.
- Dual Alarms: Allows setting two independent alarms with 6 selectable ringtones and weekend/weekday distinction.
- Snooze Function: Provides an additional 9 minutes of sleep.
- Time Display: Supports 12/24-hour format with 4 levels of LED display brightness.
- Portable Design: Lightweight and rechargeable via USB Type-C.

Figure 2: Overview of the alarm clock's multifunctional features.
Setup
1. Charging the Device
Before first use, fully charge the alarm clock. Connect the provided USB Type-C cable to the charging port on the back of the device and plug the other end into a compatible USB power adapter (not included).
- A full charge typically takes approximately 3 hours.
- The battery indicator on the display will show charging status.
- The device can operate while charging.

Figure 3: Location of the USB Type-C charging port.
2. Initial Power On
Press and hold the Power ON/OFF button (located on the back) to turn on the device. The display will illuminate.
Operating Instructions
The alarm clock features 10 individual buttons on the back for easy control. Refer to Figure 4 for button identification.

Figure 4: Back panel button layout and functions.
Button Functions Overview:
- Power ON/OFF: Short press to turn on/off the light and adjust brightness (when alarm goes off, press to enter snooze). Long press to turn on/off the alarm clock.
- Alarm 1 ON/OFF: Short press to enable/disable Alarm 1. Long press to set Alarm 1.
- Alarm 2 ON/OFF: Short press to enable/disable Alarm 2. Long press to set Alarm 2.
- Time: Long press to set the current time.
- Sun/Moon ON/OFF: Short press to turn on/off the sleep training function. Long press to set Sun/Moon times.
- Display Brightness: Short press to adjust the LED display brightness.
- Selecting Light Color: Short press to cycle through night light colors.
- Sleep Sounds: Short press to cycle through sleep sounds. Long press to set sleep sound timer.
- Timer: Short press to set a countdown timer.
- Exit: Press to exit current setting mode.
1. Setting the Time
- Long press the Time button. The hour display will flash.
- Use the + and - buttons (often integrated with other buttons, refer to specific model instructions if not clear) to adjust the hour.
- Press the Time button again to confirm the hour and move to minutes. Adjust minutes using + and -.
- Press the Time button to confirm.
- To switch between 12/24-hour format, short press the Time button during time display.

Figure 5: Display showing 12-hour and 24-hour time formats.
2. Sleep Training Function (Sun/Moon Icons)
This feature uses visual cues to help children understand when it's time to sleep and wake up.
- Wake-Up Time: When it's time to wake up, the clock will display a flashing SUN icon and the light will turn GREEN.
- Sleep Time: When it's time to sleep, the clock will display a flashing MOON icon and the light will turn BLUE.
- Long press the Sun/Moon ON/OFF button to set the desired wake-up (Sun) and sleep (Moon) times.
- Use the + and - buttons to adjust the hours and minutes for both Sun and Moon times.
- Short press the Sun/Moon ON/OFF button to activate or deactivate the sleep training function.
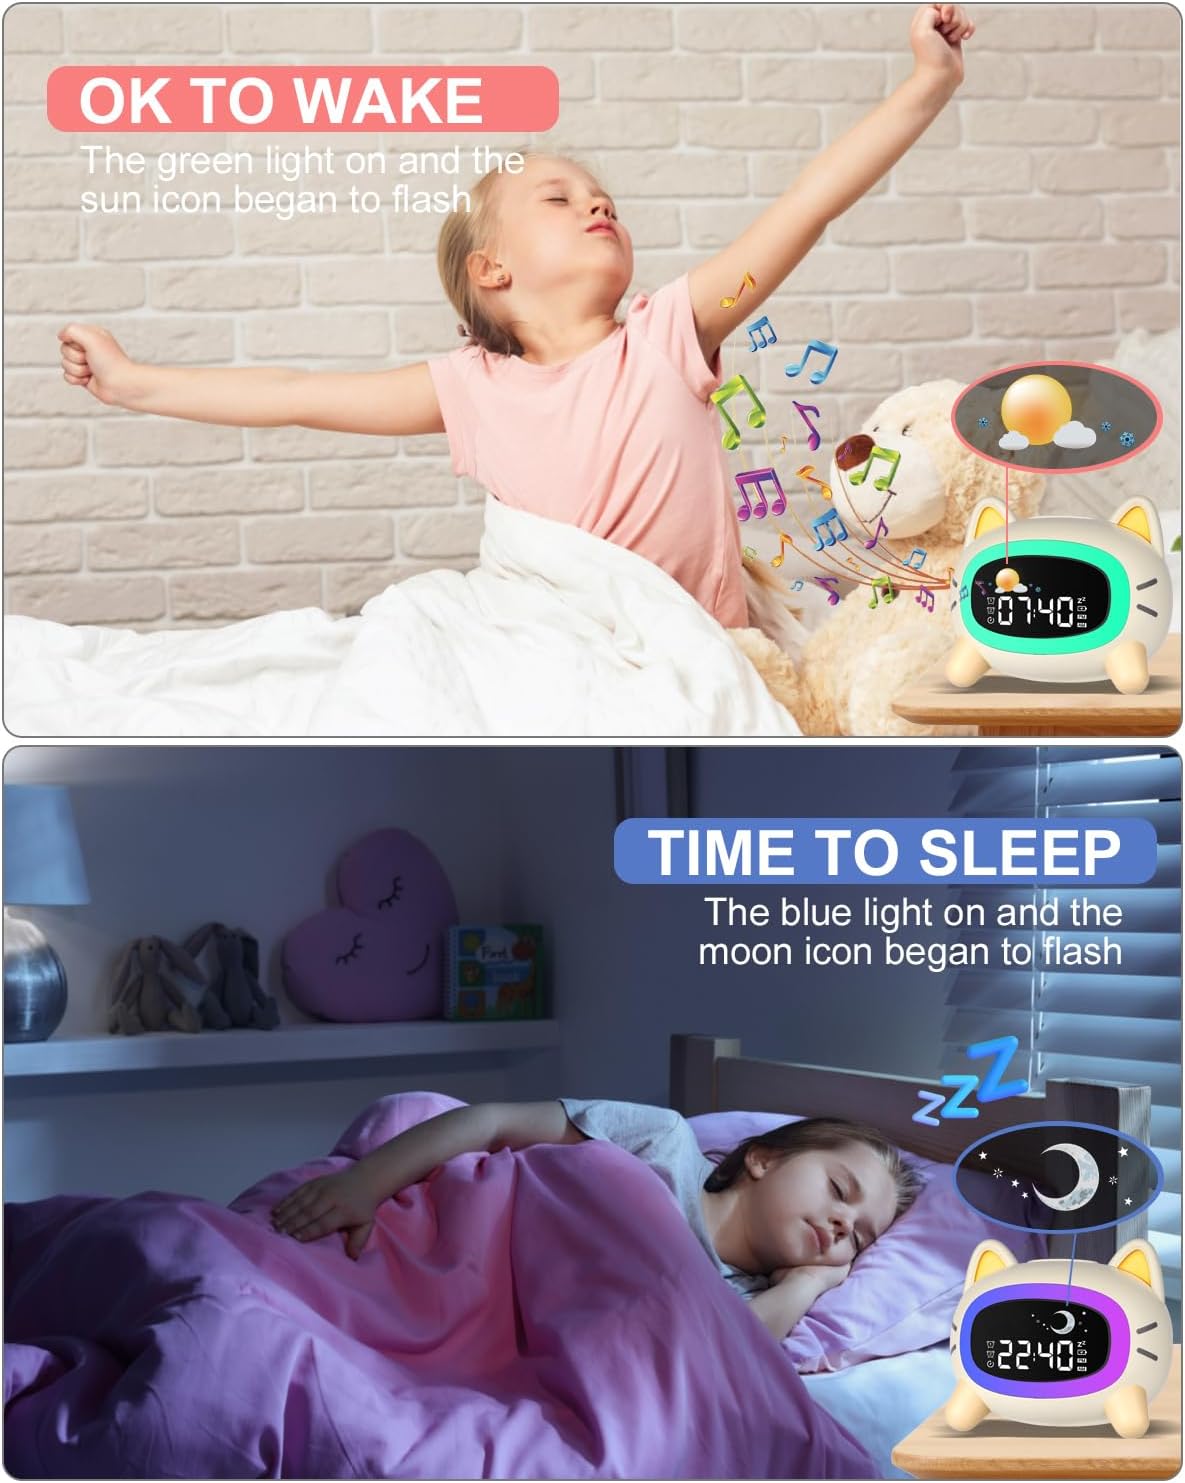
Figure 6: Visual representation of 'OK to Wake' (Sun icon, green light) and 'Time to Sleep' (Moon icon, blue light).
3. Setting Alarms (Alarm 1 & Alarm 2)
The clock supports two independent alarms.
- Long press the Alarm 1 ON/OFF button to set Alarm 1. The hour display will flash.
- Use the + and - buttons to adjust the hour, then press Alarm 1 ON/OFF to move to minutes. Adjust minutes and confirm.
- Next, select the alarm ringtone (6 options available) and volume level using the + and - buttons.
- Choose between weekday (Mon-Fri) or everyday (Mon-Sun) alarm settings.
- Repeat the process for Alarm 2 using the Alarm 2 ON/OFF button.
- Short press the respective Alarm ON/OFF button to activate or deactivate each alarm.

Figure 7: The alarm clock supports setting two distinct alarms.
4. Night Light Control
The night light offers various colors and brightness levels.
- Short press the Selecting Light Color button to cycle through the 5 available night light colors (white, yellow, 2 mixed colors, 1 breathing light).
- Short press the Power ON/OFF button to adjust the night light brightness (4 levels).
- To set an auto-off timer for the night light, long press the Selecting Light Color button and use + and - to set the duration.

Figure 8: The alarm clock offers five distinct night light colors.
5. Sleep Sound Machine
Choose from 7 soothing sounds to aid sleep.
- Short press the Sleep Sounds button to cycle through the 7 available sounds (3 lullabies, bird, rain, campfire, white noise).
- Long press the Sleep Sounds button to set the playback duration (15, 30, 60 minutes, or continuous play).
- Adjust the volume using the + and - buttons.

Figure 9: The sleep sound machine offers 7 sounds and adjustable timers.
6. Snooze Function
When an alarm sounds, short press the Power ON/OFF button (or the top of the clock) to activate the snooze function. The alarm will pause for 9 minutes and then sound again.

Figure 10: Activating the snooze function for an additional 9 minutes of sleep.
7. Display Brightness
Short press the Display Brightness button to cycle through 4 levels of LED display brightness.

Figure 11: The display brightness can be adjusted to four different levels.
Maintenance
Cleaning
To clean the alarm clock, gently wipe the surface with a soft, dry cloth. Do not use abrasive cleaners, solvents, or immerse the device in water.
Battery Care
- For optimal battery life, avoid fully discharging the battery frequently.
- If the device will not be used for an extended period, charge it periodically to maintain battery health.
Troubleshooting
| Problem | Possible Cause | Solution |
|---|---|---|
| Device does not turn on. | Low battery or device is off. | Charge the device using the USB Type-C cable. Ensure the power button is pressed and held to turn on. |
| Alarm does not sound. | Alarm is not activated or volume is too low. | Ensure Alarm 1 or Alarm 2 is enabled (short press respective button). Check alarm volume settings. |
| Night light is too bright/dim. | Brightness level needs adjustment. | Short press the Power ON/OFF button to cycle through brightness levels. |
| Battery life is shorter than expected. | Frequent use of night light or continuous sleep sounds. | Reduce night light brightness, set timers for sleep sounds, or keep the device plugged in for continuous use. |
| Display is too bright at night. | Display brightness is set too high. | Short press the Display Brightness button to lower the LED display brightness. |
Specifications
| Feature | Detail |
|---|---|
| Brand | Uplayteck |
| Model Number | SG5 |
| Color | White |
| Dimensions (L x W x H) | 11.9 x 3.81 x 6 cm |
| Weight | 186 g |
| Material | Plastic |
| Special Features | 4 Adjustable Light Levels, 5 Night Lights, 7 Sleep Sounds, Rechargeable, Snooze Function |
| Display Type | Digital |
| Power Source | Battery Powered (Rechargeable) |
| Usage | Indoor |

Figure 12: Diagram showing the dimensions of the alarm clock.
Warranty and Support
For warranty information and customer support, please refer to the product packaging or contact the retailer where the product was purchased. Keep your proof of purchase for any warranty claims.


