1. Introduction
This manual provides instructions for the safe installation, operation, and maintenance of your Goeco 30W 3375LM Dimmable LED Ceiling Light. Please read this manual thoroughly before installation and retain it for future reference.
2. Safety Instructions
- Ensure the power supply is disconnected before installation or maintenance.
- Installation should be performed by a qualified electrician to prevent electric shock or fire hazards.
- Do not install the light in damp environments or outdoors. This product is designed for indoor use only.
- Do not modify the product in any way, as this will void the warranty and may cause safety issues.
- Keep the product away from flammable materials.
- Clean the light with a soft, dry cloth. Do not use abrasive cleaners or solvents.
3. Package Contents
Please check the package contents upon opening. If any items are missing or damaged, contact customer support.
- Goeco LED Ceiling Light (Model 3HEA/STAR-CE)
- Remote Control
- Mounting Material (screws, wall plugs)
- Instruction Manual
4. Specifications
| Feature | Specification |
|---|---|
| Brand | Goeco |
| Model Number | 3HEA/STAR-CE |
| Power | 30 Watts |
| Luminous Flux | 3375 Lumens |
| Color Temperature | 3000K - 6500K (Dimmable) |
| Dimmability | 5% - 100% Brightness (via remote control) |
| Product Dimensions | 50 x 50 x 8 cm (19.68 x 19.68 x 3.14 inches) |
| Chassis Diameter | 25 cm (9.84 inches) |
| Product Weight | 1.89 kg |
| Material | Aluminum base, Acrylic shade |
| Power Source | AC Adapter |
| Control Method | Remote Control |
| Installation Type | Ceiling Mount |
| Energy Efficiency Rating | E |
For detailed energy information, refer to the EU EPREL database: https://eprel.ec.europa.eu/qr/1498742

EU Energy Label for the Goeco LED Ceiling Light.
5. Setup and Installation
Note: Disconnect power at the circuit breaker before beginning installation.
- Assemble the Light Fixture: The light fixture may require minor assembly. Connect the star-shaped light arms to the central base using the provided screws and nuts. Ensure all electrical connections within the fixture are secure as per the internal wiring diagram (if provided).
- Mount the Bracket: Secure the mounting bracket to the ceiling junction box using the provided screws. Ensure the bracket is firmly attached and can support the weight of the light fixture.
- Wire the Fixture: Connect the household electrical wires to the corresponding wires on the light fixture. Typically, this involves connecting live (L), neutral (N), and ground (GND) wires. Use appropriate wire connectors (e.g., terminal blocks or wire nuts) to ensure secure and insulated connections.
- Attach the Fixture: Carefully lift the light fixture and align it with the mounting bracket. Secure the fixture to the bracket using the provided screws. Ensure no wires are pinched during this process.
- Restore Power: Once the installation is complete and all connections are secure, restore power at the circuit breaker.
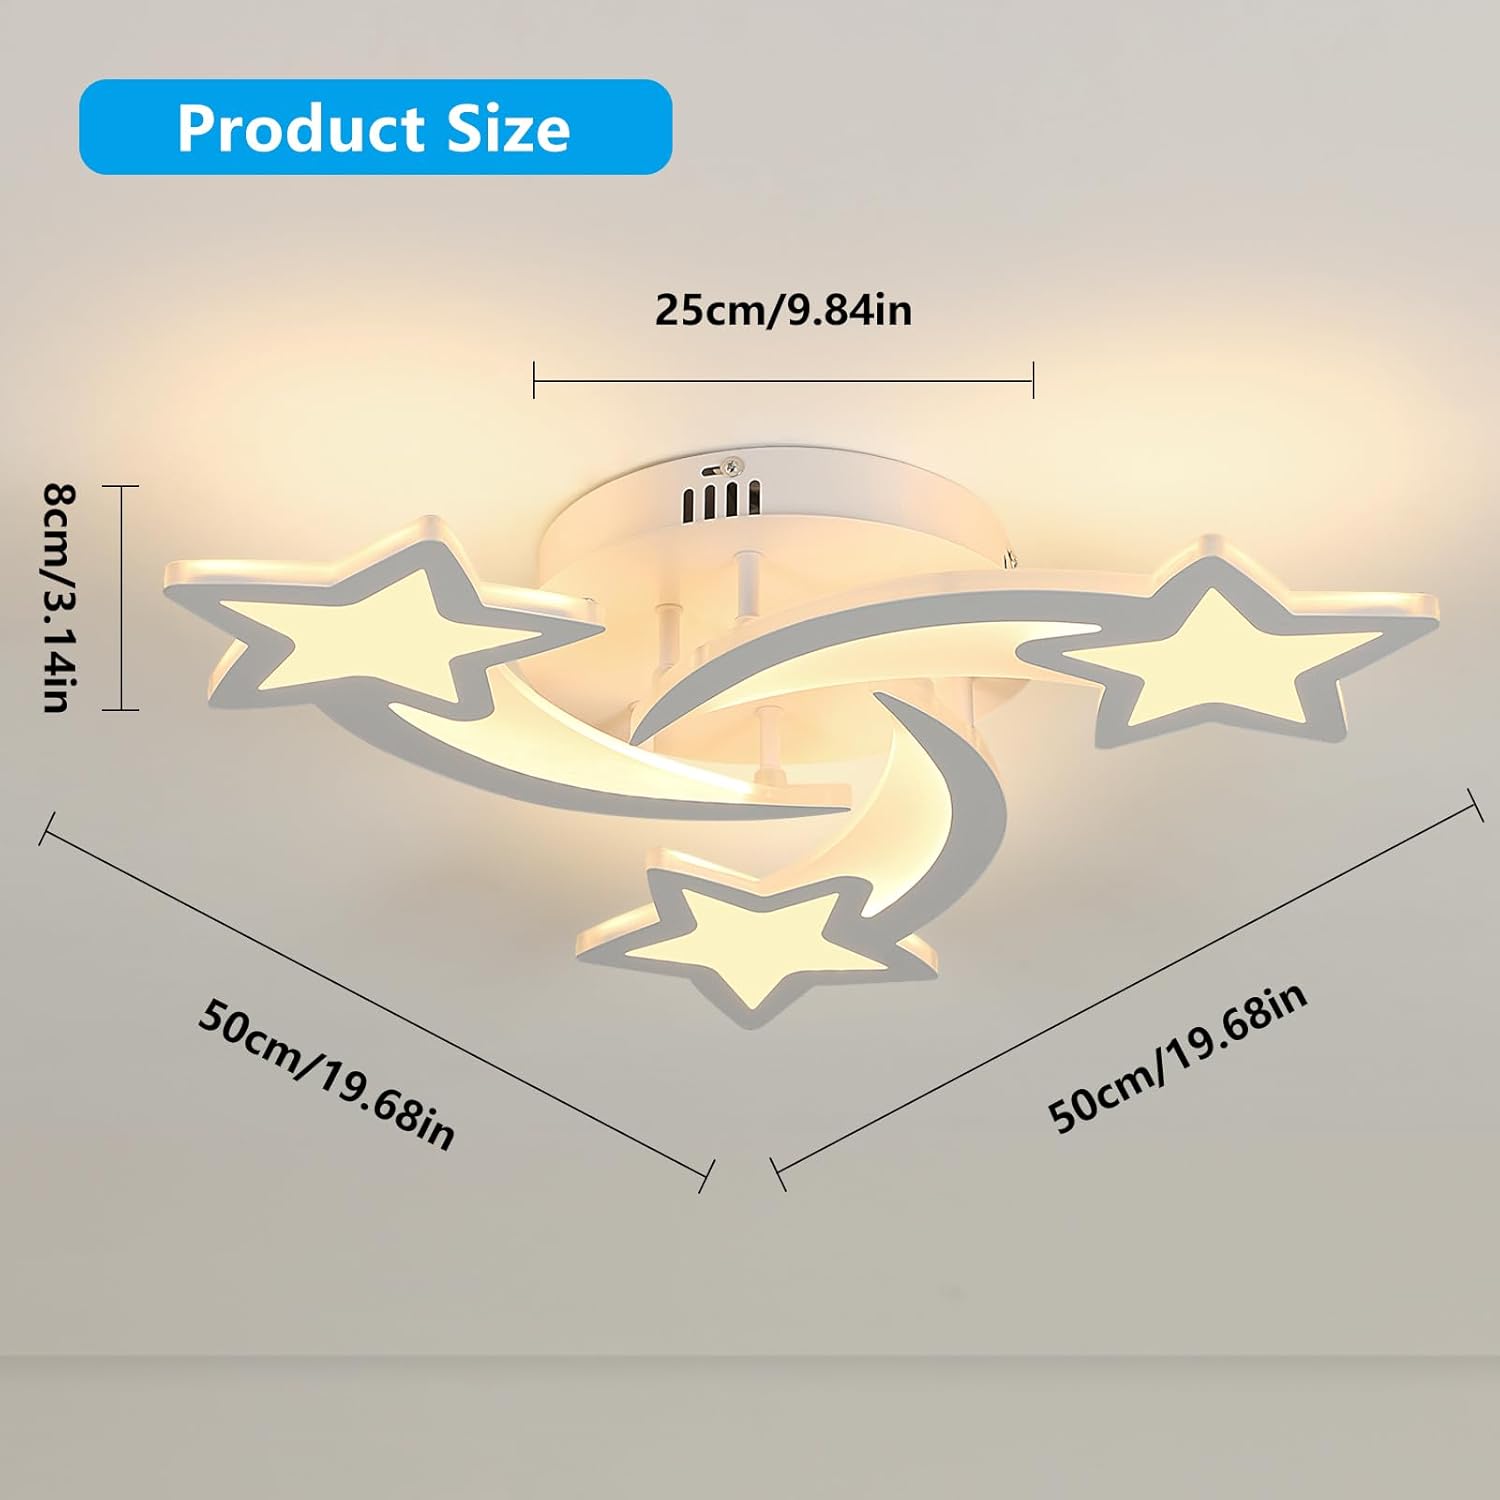
Product dimensions for installation planning.

Example of the ceiling light installed.
6. Operating Instructions
The Goeco LED Ceiling Light is operated using the included remote control.
Remote Control Functions:
- ON/OFF: Press to turn the light on or off.
- Brightness Adjustment: Use the brightness buttons (usually marked with '+' and '-') to adjust the light intensity from 5% to 100%.
- Color Temperature Adjustment: Use the color temperature buttons (often marked with 'Cool' and 'Warm' or sun/snowflake icons) to change the light color from 3000K (warm white) to 6500K (cool white).
- Night Light Mode: Activates a low brightness setting (approximately 10%) suitable for night use.
- Timer Function: Some remote controls may include a timer function to automatically turn off the light after a set period. Refer to the remote's specific markings.

Night Light Mode at 10% brightness, controlled by remote.

Remote control allows continuous adjustment of both color temperature and brightness.

Visual representation of the light turned on and off.
7. Maintenance
- Cleaning: Ensure the light is turned off and cooled before cleaning. Wipe the surface with a soft, dry, or slightly damp cloth. Do not use harsh chemicals or abrasive materials.
- Bulb Replacement: This fixture uses integrated LED chips and does not require bulb replacement. If the LEDs fail, the entire fixture may need to be replaced.
- Inspection: Periodically check the fixture for any signs of damage, loose connections, or wear. If any issues are found, disconnect power and consult a qualified electrician.
8. Troubleshooting
| Problem | Possible Cause | Solution |
|---|---|---|
| Light does not turn on | No power supply Loose wiring Remote control battery dead | Check circuit breaker. Verify wiring connections (consult electrician). Replace remote control batteries. |
| Light flickers | Unstable power supply Loose wiring Incompatible dimmer switch (if applicable) | Ensure stable power. Check wiring connections. This light is dimmable via its own remote; do not use with external dimmer switches unless specified. |
| Remote control not working | Batteries dead or incorrectly inserted Obstruction between remote and light Remote not paired (if required) | Replace batteries, ensure correct polarity. Remove obstructions. Ensure remote is within range. Refer to remote pairing instructions (if any, typically automatic). |
| Light is not dimming or changing color | Remote control issue Light fixture malfunction | Check remote batteries and functionality. If remote works for ON/OFF but not dimming/color, contact customer support. |
9. Warranty and Support
Goeco products are designed for quality and reliability. For warranty information or technical support, please refer to the purchase platform or contact Goeco customer service directly. Keep your proof of purchase for warranty claims.


