Alarm.com V724X
Alarm.com ADC-V724X Outdoor Wi-Fi Camera User Manual
Model: V724X
Introduction
The Alarm.com ADC-V724X is an advanced outdoor Wi-Fi camera designed to enhance the security of your property. It features High Dynamic Range (HDR) for clear imaging, two-way audio for communication, 1080p resolution, and a wide 117-degree field of view. Equipped with Video Analytics and IR Night Vision, it provides intelligent detection and monitoring capabilities. The camera also includes a MicroSD card slot for local storage and boasts an IP66 ingress protection rating, ensuring durability in various outdoor conditions.
Safety Information
- Ensure the camera is installed by a qualified professional or with proper safety precautions.
- Use only the specified 12VDC power supply.
- Do not expose the camera to extreme temperatures outside its operating range.
- Avoid direct exposure of the lens to strong light sources for extended periods.
- Disconnect power before performing any maintenance or cleaning.
- Keep out of reach of children.
Package Contents
Verify that all items are present in the package:
- Alarm.com ADC-V724X Outdoor Wi-Fi Camera
- Mounting Hardware (screws, anchors)
- Installation Guide
- Power Adapter (12VDC)
Setup
1. Physical Installation
The ADC-V724X camera is designed for outdoor wall mounting. Choose a location that provides the desired field of view and is within range of your Wi-Fi network.
- Prepare the Mounting Surface: Use the included mounting template (if provided) or the camera base to mark drill holes.
- Drill Holes: Drill pilot holes for the mounting screws. Insert wall anchors if mounting into drywall or masonry.
- Secure the Mount: Attach the camera's mounting base securely to the surface using the provided screws.
- Attach the Camera: Connect the camera body to the mounted base. Adjust the camera angle for optimal coverage.

Figure 1: Front view of the ADC-V724X camera, highlighting its compact design and lens.
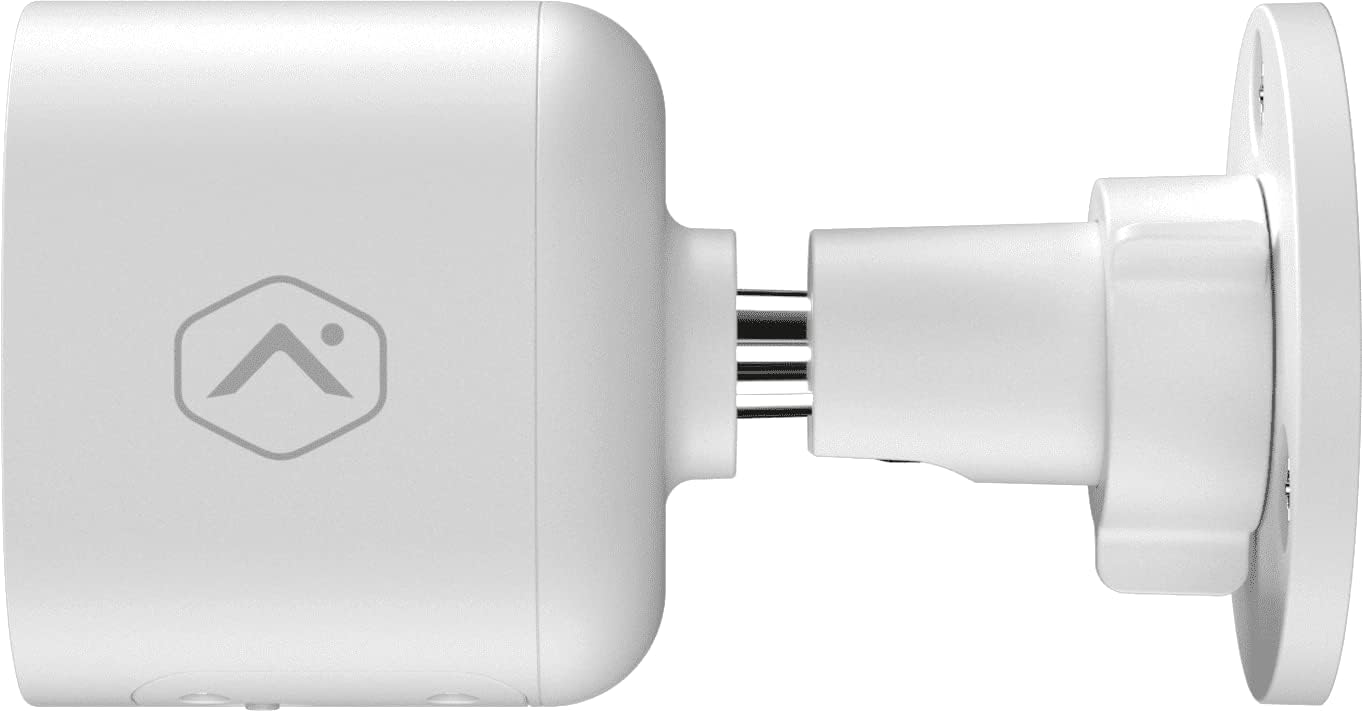
Figure 2: Side profile of the camera, illustrating how it connects to the wall mount.

Figure 3: Angled view of the camera, demonstrating its adjustable mounting capabilities.
2. Power Connection
Connect the provided 12VDC power adapter to the camera's power input. Ensure the connection is secure and protected from weather elements if applicable.
3. Network Connection (Wi-Fi)
The ADC-V724X connects to your network via Wi-Fi (2.4 or 5 GHz). Integration with your Alarm.com system typically requires activation through your Alarm.com service provider.
- Power On: Plug in the camera. The LED indicator will show its status (refer to LED status guide in your Alarm.com app or provider's documentation).
- Add to System: Contact your Alarm.com service provider to add the camera to your existing security system. They will guide you through the process, which often involves scanning a QR code on the camera or entering its MAC address.
- Configure Wi-Fi: Your service provider will assist in connecting the camera to your home Wi-Fi network through the Alarm.com app or website.

Figure 4: Back view of the camera, displaying the QR code and product information essential for system integration.
Operating the Camera
Once installed and connected, the ADC-V724X camera operates primarily through the Alarm.com Customer Website and Mobile App.
Live View and Recording
- Access Live Feed: Open the Alarm.com app or website, navigate to the camera section, and select the ADC-V724X to view its live feed.
- Onboard Recording (Smart View): The camera supports local recording to a MicroSD card (sold separately, up to 512 GB). This allows for continuous, encrypted recordings that can be viewed from anywhere via the Alarm.com platform.
- Cloud Recording: Depending on your Alarm.com service plan, video clips triggered by events (e.g., motion) will be uploaded to the cloud for secure storage and access.
Two-Way Audio
The camera features a built-in microphone and speaker, enabling two-way communication.
- Initiate Communication: From the live view in the Alarm.com app, tap the microphone icon to speak through the camera's speaker. Release the icon to listen.
- Audio in Recorded Clips: Audio is included in recorded video clips, providing additional context for events.
Video Analytics and Alerts
Configure Video Analytics rules through your Alarm.com account to receive smarter, more relevant alerts.
- Detection Zones: Define specific areas within the camera's field of view for motion detection.
- Object Classification: The camera can differentiate between people, animals, and vehicles, reducing false alerts.
- Alert Settings: Customize notifications (e.g., push notifications, email) for specific events detected by Video Analytics.
Night Vision (IR)
The camera automatically switches to infrared (IR) night vision in low-light conditions, providing clear black-and-white video.
- Automatic Activation: The camera's built-in light sensor detects ambient light levels and activates IR LEDs as needed.
- Optimal Performance: Ensure no obstructions are blocking the IR illuminators on the camera's front.
Maintenance
Cleaning the Camera
- Lens: Gently wipe the camera lens with a soft, clean, lint-free cloth. If necessary, use a small amount of lens cleaning solution. Avoid abrasive cleaners.
- Body: Wipe the camera body with a damp cloth. Do not use harsh chemicals or solvents.
- Frequency: Clean the camera periodically, especially if installed in dusty or high-traffic areas, to ensure optimal image quality.
MicroSD Card Management
The camera supports a MicroSD card for local storage. The slot is located on the bottom of the camera, protected by a cover.

Figure 5: Bottom view of the camera showing the access panel for the MicroSD card slot.
- Installation: Carefully insert a compatible MicroSD card (up to 512 GB) into the slot until it clicks into place. Ensure the camera is powered off before insertion or removal.
- Formatting: The Alarm.com system may prompt you to format the card upon first use.
- Replacement: If the card becomes full or corrupted, replace it with a new one. Data on the card can be managed through the Alarm.com platform.
Troubleshooting
| Problem | Possible Cause | Solution |
|---|---|---|
| Camera not powering on | No power, faulty adapter, loose connection. | Check power outlet, ensure adapter is securely connected to camera and power source. |
| Cannot connect to Wi-Fi | Incorrect Wi-Fi password, camera too far from router, network interference. | Verify Wi-Fi password. Move camera closer to router or use a Wi-Fi extender. Reduce interference from other devices. Contact your Alarm.com provider for assistance with network setup. |
| Poor image quality | Dirty lens, low light, network bandwidth issues. | Clean the camera lens. Ensure adequate lighting or check night vision settings. Verify stable internet connection. |
| Two-way audio not working | Microphone/speaker blocked, volume too low, app settings. | Ensure nothing is obstructing the microphone or speaker. Check volume settings in the Alarm.com app. |
| No local recording | No MicroSD card, incompatible card, card full/corrupted. | Insert a compatible MicroSD card. Format the card via the Alarm.com app. Replace the card if corrupted. |
For further assistance, please contact your Alarm.com service provider.
Specifications
| Feature | Detail |
|---|---|
| Model Number | V724X |
| Effective Camera Resolution | 2MP |
| Maximum Video Resolution | 1920 x 1080 (1080p Full HD) |
| Field of View (FOV) | 117-degree |
| Audio | 2-Way Audio (Microphone and Speaker) |
| Night Vision Type | IR (Infrared) |
| Connectivity | Wi-Fi (2.4 or 5 GHz) |
| Local Storage | MicroSD Card Slot (up to 512 GB, sold separately) |
| Ingress Protection Rating | IP66 |
| Power Supply | 12VDC |
| Dimensions (L x W x H) | 2.5 x 2.5 x 4.5 inches |
| Weight | 1.46 pounds (0.66 Kilograms) |
| Special Features | HDR, Video Analytics, Motion Sensor |
Warranty and Support
For warranty information and technical support, please refer to the documentation provided by your Alarm.com service provider or visit the official Alarm.com website. Support for the ADC-V724X camera is typically handled through your authorized Alarm.com dealer or installer.
Online Resources:
Ask a question about this manual
Ask about setup, troubleshooting, compatibility, parts, safety, or missing instructions. Manuals+ will review the question and use this page’s manual context to help answer it.