Introduction
Thank you for choosing the G-Homa 24 Hour Mechanical Outdoor Timer Outlet. This device is designed to provide convenient and reliable automated control for your outdoor lights and other electrical appliances. Its robust, waterproof construction ensures durability in various weather conditions, making it ideal for year-round outdoor use. This manual provides essential information for safe installation, operation, and maintenance of your timer.

Image: The G-Homa 24 Hour Mechanical Outdoor Timer Outlet, featuring its durable black casing, clear protective cover over the dial, and two grounded outlets.
Safety Information
Please read and understand all safety instructions before using this product. Failure to follow these instructions may result in electric shock, fire, or serious injury.
- Outdoor Use Only: This timer is specifically designed for outdoor use. Ensure all connected devices are also rated for outdoor use.
- Proper Placement: To ensure optimal performance and safety, use the timer vertically and at least 2 feet (0.6 meters) above the ground. This helps prevent water accumulation and ensures proper drainage.
- Waterproof Design: While the timer is designed to be rainproof, avoid submerging it in water. Ensure the transparent lid is securely closed to protect the internal components.
- Electrical Ratings: Do not exceed the maximum electrical ratings: 125V 60Hz, 15A, 1875W (resistance or general purpose), 10A (tungsten lamp), 1/2HP. Overloading the timer can cause overheating and fire hazards.
- Grounding: Always plug the timer into a grounded outlet. The timer features two grounded outlets for safe operation.
- Disconnect Power: Always disconnect power before performing any maintenance or making adjustments to the timer or connected devices.

Image: The G-Homa outdoor timer shown in a rainy environment, demonstrating its waterproof capability. It is installed vertically and elevated from the ground, as recommended for safe operation.
Product Overview
The G-Homa outdoor timer is a mechanical device designed for simple and reliable operation. Key features include:
- 24-Hour Dial: A rotating dial with 30-minute increments allows for precise scheduling. The dial is divided into a DARK section (6 PM - 6 AM) for night time and a WHITE section (6 AM - 6 PM) for day time.
- Push-Down Pins: Integrated pins around the dial can be pushed down to set "ON" times and pulled up for "OFF" times. Each pin represents a 30-minute interval.
- Two Grounded Outlets: Provides two outlets for connecting multiple devices simultaneously.
- Manual Override Switch: A switch allows you to select between "Timer" mode and "Always ON" mode.
- Rain-Tight Cover: A clear, durable cover protects the dial and internal mechanisms from rain, wind, and snow.
- Mounting Hole: Located on the back for easy vertical installation.
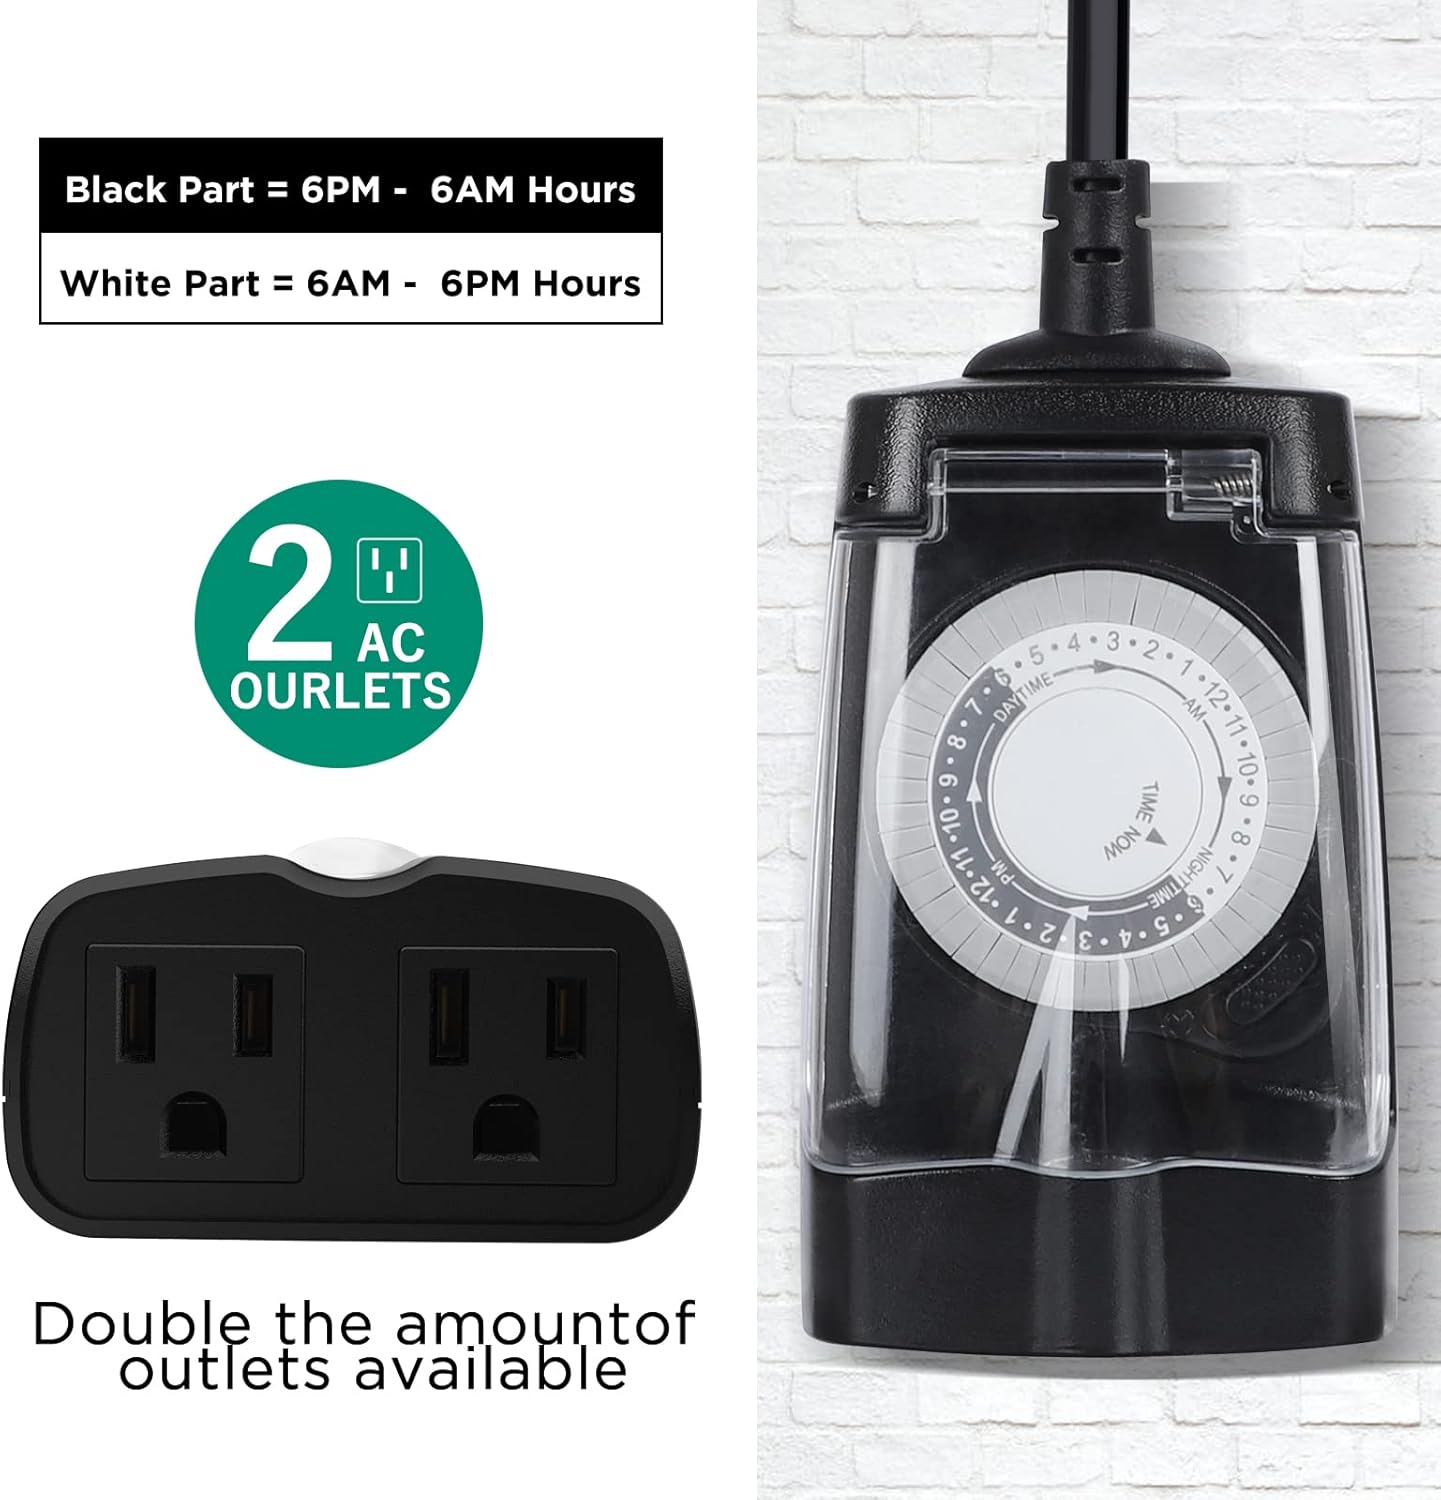
Image: A detailed view of the timer's dial, showing the black and white sections for night and day hours, and the two AC outlets at the bottom.

Image: An illustration highlighting the physical dimensions (4.72 inches height, 2.95 inches width), the heavy-duty construction, ETL listing, rain-tight cover, and the mounting hole on the back of the timer.
Setup
Follow these steps to set up your G-Homa outdoor timer:
- Prepare the Dial: Before setting any times, ensure all pins around the dial are pulled UP. This sets all intervals to "OFF" initially.
- Set ON Times: Push DOWN the pins corresponding to the specific 30-minute intervals when you want your connected devices to turn ON. For example, if you want lights to turn on from 6:00 PM to 10:00 PM, push down the pins from the 6 PM mark to the 10 PM mark on the dial.
- Set Current Time: Rotate the entire dial clockwise until the "TIME NOW" arrow aligns with the current time of day. Ensure you differentiate between AM and PM hours using the white (day) and dark (night) sections of the dial.
- Select Mode: Slide the manual switch on the side of the timer to the "Timer" mode (usually indicated by a clock icon). If you want the outlets to be continuously powered, slide the switch to the "Always ON" mode (usually indicated by a power icon).
- Plug In: Plug the timer into a grounded outdoor electrical outlet. Ensure the timer is installed vertically and at least 2 feet above the ground.

Image: A four-step visual guide demonstrating how to set up the timer: 1. Lift all pins up, 2. Press down pins for desired ON times, 3. Turn the dial to the current time, 4. Turn on the timer mode.

Image: Close-up showing the pins (pins up for OFF, pins down for ON) and the manual switch for selecting between "Timer" mode and "Always ON" mode.
Operating
Once set up, the G-Homa timer will automatically cycle daily based on your programmed settings. The dial will continuously rotate, and power will be supplied to the outlets when the "TIME NOW" arrow passes over the pushed-down pins (ON intervals).
- Automatic Cycling: The timer will repeat your programmed schedule every 24 hours without needing to be reset, unless power is interrupted.
- Manual Override: If you need to temporarily turn on or off your devices outside of the programmed schedule, you can slide the manual switch to "Always ON" for continuous power, or to "Timer" mode to resume the programmed schedule.
- Adjusting Schedule: To change the ON/OFF times, simply pull up or push down the relevant pins on the dial. No need to reset the current time unless the timer has been unplugged for an extended period.

Image: A visual representation of the timer's daily repeat function, showing outdoor lights automatically turning on/off, ideal for holiday decorations or landscape lighting.
Maintenance
The G-Homa outdoor timer is designed for minimal maintenance due to its durable and waterproof construction. However, periodic checks can ensure its longevity and safe operation:
- Keep Clean: Periodically wipe the exterior of the timer with a damp cloth to remove dirt or debris. Ensure the transparent cover remains clear for visibility of the dial.
- Inspect for Damage: Regularly check the power cord, plug, and the timer casing for any signs of damage, cracks, or fraying. Do not use the timer if any damage is observed.
- Secure Cover: Always ensure the rain-tight cover is securely latched to protect the internal components from moisture.
- Proper Drainage: Confirm that the timer is installed vertically and elevated to allow for proper water runoff, especially during heavy rain or snow.

Image: The timer shown in a rainy outdoor setting, emphasizing its weatherproof design and the recommendation to use it vertically at least 2 feet above the ground for optimal performance and safety.
Troubleshooting
If your G-Homa outdoor timer is not functioning as expected, consider the following common issues and solutions:
- Timer Not Turning ON/OFF:
- Check if the timer is securely plugged into a live outlet.
- Ensure the manual switch is set to "Timer" mode, not "Always ON".
- Verify that the pins for the desired ON/OFF times are correctly pushed down (ON) or pulled up (OFF).
- Confirm the "TIME NOW" arrow is accurately set to the current time.
- Devices Not Receiving Power:
- Check if the connected device is properly plugged into the timer's outlets.
- Test the connected device by plugging it directly into a working wall outlet to ensure it is functional.
- Ensure the timer is receiving power from the wall outlet.
- Dial Not Rotating:
- Ensure the timer is plugged into a live power source. The mechanical timer requires power to operate its internal clock.
- Check for any obstructions preventing the dial from rotating freely.
If these steps do not resolve the issue, please refer to the Warranty and Support section for assistance.
Specifications
| Brand | G-Homa |
| Model Number | OT1002 |
| Color | Black |
| Material | Plastic |
| Product Dimensions (D x W x H) | 1.5" x 2.9" x 4.7" |
| Item Weight | 0.26 Kilograms (9.1 ounces) |
| Number of Settings | 48 (30-minute intervals) |
| Electrical Rating | 125V 60Hz, 15A, 1875W (resistance/general purpose), 10A (tungsten lamp), 1/2HP |
| Outlets | 2 Grounded Outlets |
| Certifications | ETL Listed |
| Operating Temperature | Down to -40°F (as indicated by A+ content image) |

Image: The G-Homa timer shown in a cold weather application, highlighting its ability to operate effectively down to -40°F, making it suitable for engine block heaters or car warmers.
Warranty and Support
G-Homa stands behind the quality of its products. This product comes with a 1-year manufacturer's warranty.
For any questions, technical assistance, or warranty claims, please contact G-Homa customer service. Our experienced and dedicated USA-based customer service team is available to help you within 24 hours.
Please visit the official G-Homa store for more information and contact details: G-Homa Store on Amazon


