
Introduction
This manual provides detailed instructions for the assembly, operation, and maintenance of your Spider Farmer Grow Tent Complete System. This system is designed to create an optimal indoor growing environment, featuring an SF-2000 LED grow light, a durable grow tent, a powerful ventilation system, and a GGS Smart Controller for automated environmental management.
Components Overview
The Spider Farmer Grow Tent Complete System includes the following main components:
- Grow Tent: 47"L x 24"W x 71"H, constructed with 1680D Oxford fabric and a reflective Mylar interior.
- SF-2000 LED Grow Light: 200W, featuring Samsung LM301H EVO Diodes with dimming capabilities.
- GGS Smart Controller: Integrates with various sensors and manages light intensity, grow cycles, and fan speeds via an app or manual operation.
- 4-Inch Inline Fan: 205 CFM airflow, quiet operation (26.8 dB).
- Activated Carbon Filter (RC412): For odor elimination.
- Flexible Ducting: For ventilation setup.
- Clip Fan: Provides additional air circulation with 10 customizable speeds.
- Accessories: Includes grow bags, trellis plant netting, YOYO hangers, vent covers, corner shelves, hose clamps, and a timer.

Image: All components included in the Spider Farmer Grow Tent Complete System, laid out for clear identification.

Image: A diagram illustrating how the grow tent, SF2000 LED Grow Light, GGS Smart Controller, 4-inch inline fan, ducting, carbon filter, and 6-inch clip fan connect within the system.
Setup Instructions
Follow these steps to assemble your Spider Farmer Grow Tent Complete System:
1. Grow Tent Assembly
- Unpack all tent frame components and the tent fabric.
- Assemble the steel frame according to the included diagram, ensuring all poles are securely connected. The frame is designed for stability and can support up to 120 lbs.
- Carefully pull the tent fabric over the assembled frame. Ensure the zippers are open to facilitate fitting.
- Zip up the tent completely once the fabric is properly aligned on the frame.

Image: A close-up of the grow tent's alloy steel frame, highlighting its 16mm diameter and 0.8mm thickness for enhanced stability.
2. LED Grow Light Installation (SF-2000)
- Attach the included YOYO hangers or rope ratchets to the top bars of the tent frame.
- Connect the hangers to the SF-2000 LED grow light.
- Adjust the height of the light using the hangers to the recommended distance for your plant stage (refer to the Operating Instructions section).
3. Ventilation System Setup
The ventilation system consists of the inline fan, carbon filter, and flexible ducting. There are several ways to configure this system:
- Option 1 (Internal Filter, External Fan): Mount the carbon filter inside the tent, connect it to the inline fan via ducting, and place the fan outside the tent.
- Option 2 (Internal Fan & Filter): Mount both the carbon filter and inline fan inside the tent, connecting them with a short piece of ducting.
- Option 3 (External Filter, External Fan): Place both the carbon filter and inline fan outside the tent, connecting them to the tent's exhaust port via ducting.
- Option 4 (Internal Fan, External Filter): Mount the inline fan inside the tent, connect it to the carbon filter placed outside the tent via ducting.
Secure all connections with hose clamps to prevent air leaks. Utilize the tent's multiple access ports for ducting and wiring.
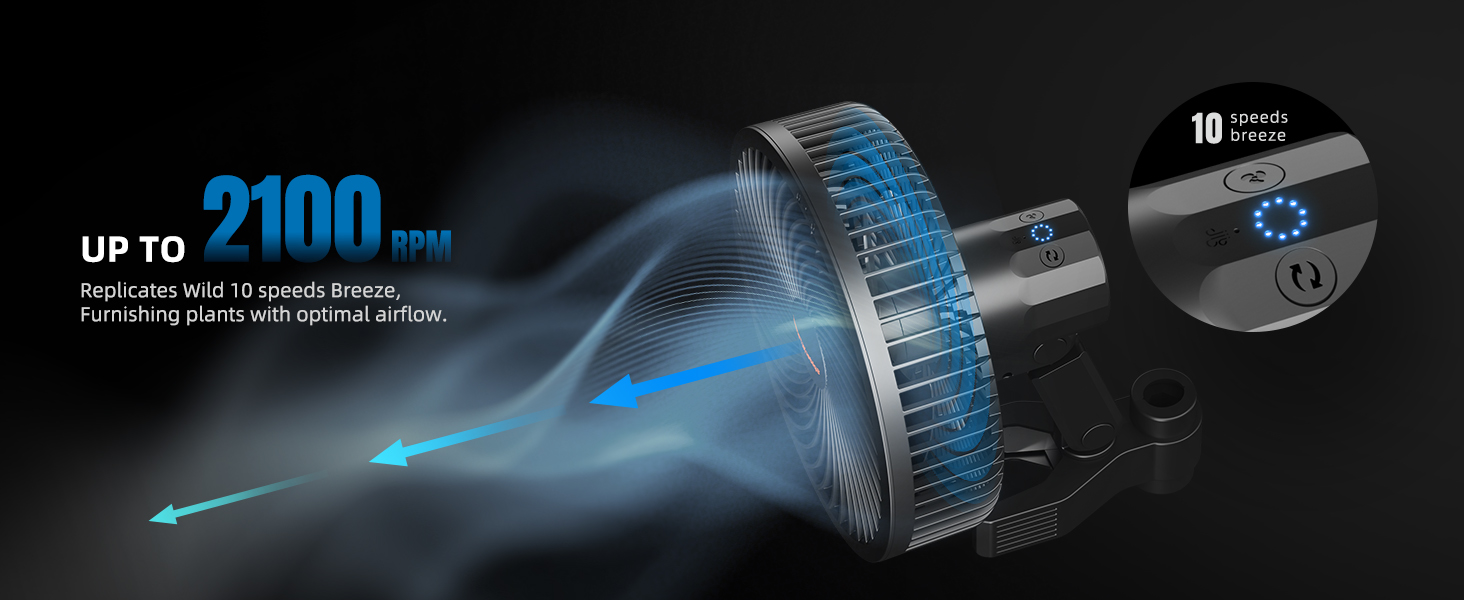
Image: Visual guide demonstrating four different configurations for installing the inline fan and carbon filter for optimal air purification and circulation.
4. GGS Smart Controller Connection
- Mount the GGS Smart Controller to a convenient location on the tent exterior or interior.
- Connect the inline fan to the controller using the provided RJ12 cord.
- Connect the Temp/Humid/Light Sensor to the controller. Position the sensor near your plants for accurate readings.
- Connect the Light & Fan Adapter to the controller, then connect your SF-2000 LED light and clip fan to this adapter.
- Plug the controller's power adapter into a power outlet.

Image: A detailed diagram illustrating how to connect the inline fan, temperature/humidity/light sensor, and the light/fan adapter to the GGS Smart Controller.
5. Additional Accessories
- Place the removable leak-proof floor tray at the bottom of the tent.
- Install the clip fan at a suitable height to provide air circulation around your plants.
- Utilize the trellis netting and grow bags as needed for your cultivation method.
Operating Instructions
1. GGS Smart Controller Operation
The GGS Smart Controller allows for precise control of your grow environment. It can be managed manually or via the Spider Farmer app.
- App Integration: Download the Spider Farmer app to connect and control your system remotely. The app provides real-time data from the temp/humidity/light sensors.
- Light Control: Adjust the SF-2000 LED light intensity from 0% to 100% using the dimming knob or app. Set grow cycle timers for automated on/off schedules.
- Fan Control: Adjust the inline fan speed and clip fan running speed. The controller can automate fan operation based on temperature and humidity setpoints.
- Temperature and Humidity Priority Modes: Configure the controller to prioritize temperature or humidity control. For example, in Temperature Priority Mode, cooling/dehumidifying devices activate if temperature exceeds the set range, regardless of humidity. In Humidity Priority Mode, devices activate if humidity exceeds the set range, regardless of temperature.

Image: Explanations of Temperature Priority Mode and Humidity Priority Mode for the GGS Smart Controller, detailing how cooling/dehumidifying devices are activated based on set ranges.
2. SF-2000 LED Grow Light Usage
The SF-2000 LED grow light provides optimal spectrum and intensity for various plant growth stages. Adjust the light height and dimming level according to the plant's needs:
| Plant Stage | Recommended Distance (Light to Canopy) | Dimming Level | Light Cycle |
|---|---|---|---|
| Germination | 24" - 30" | 50% | 18 hr ON / 6 hr OFF |
| Seedling | 24" | 50% - 75% | 18 hr ON / 6 hr OFF |
| Vegetative (VEG) | 18" - 24" | 75% - 100% | 18 hr ON / 6 hr OFF |
| Flowering | 12" - 18" | 100% | 12 hr ON / 12 hr OFF |

Image: A table providing recommended light distances, dimming levels, and light cycles for different plant growth stages: Germination, Seedling, VEG, and Flower.
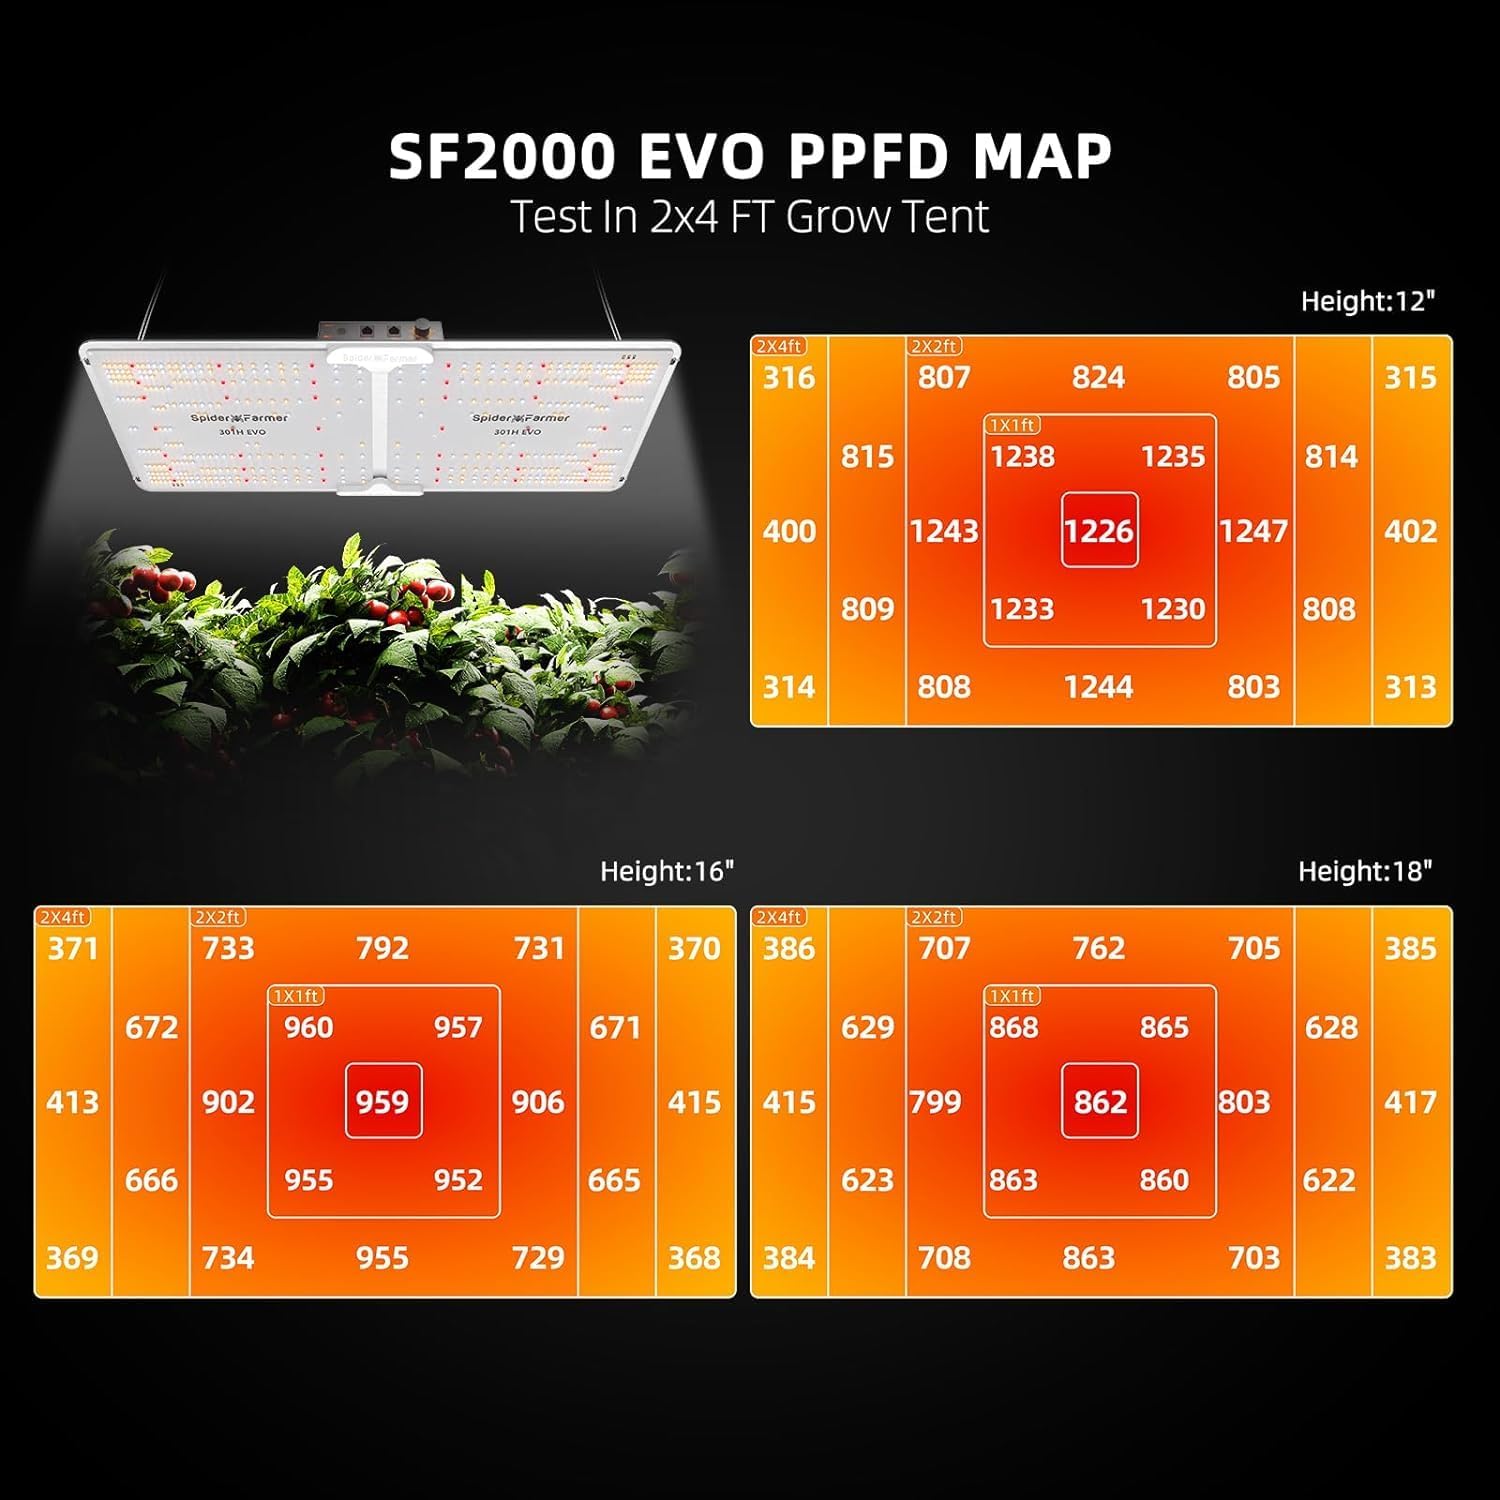
Image: PPFD (Photosynthetic Photon Flux Density) maps for the SF2000 light in a 2x4 ft grow tent at 12, 16, and 18 inches height, showing light distribution and intensity.
Maintenance
Regular maintenance ensures the longevity and optimal performance of your grow tent system.
1. Grow Tent Cleaning
- Wipe down the interior Mylar lining with a damp cloth and mild, non-abrasive cleaner as needed to maintain reflectivity.
- Clean the exterior 1680D Oxford fabric with a damp cloth.
- The removable floor tray can be easily taken out and cleaned to prevent spills and maintain hygiene.
- Inspect zippers regularly for smooth operation. Keep them free of debris.
2. LED Grow Light Care
- Ensure the light is unplugged before cleaning.
- Gently wipe the LED board and heatsink with a dry, soft cloth to remove dust and debris. Avoid using liquids directly on the diodes.
3. Ventilation System Maintenance
- Inline Fan: Periodically check the fan blades for dust buildup. Disconnect power and use a soft brush or compressed air to clean.
- Carbon Filter: The activated carbon filter has a limited lifespan (typically 6-12 months depending on usage and environment). Replace the carbon filter when odors are no longer effectively eliminated.
- Ducting: Inspect flexible ducting for any tears or blockages.
- Clip Fan: The clip fan has a detachable front frame for easier cleaning of the blades.
Troubleshooting
This section addresses common issues you might encounter with your Spider Farmer Grow Tent System.
1. Light Not Turning On
- Check Power: Ensure the power cord is securely plugged into the wall outlet and the controller.
- Controller Connection: Verify the light is properly connected to the Light & Fan Adapter and the adapter is connected to the GGS Smart Controller.
- Dimming Knob: Ensure the dimming knob on the light or controller is not set to 0%.
- Timer Settings: Check the timer settings on the GGS Smart Controller or app to ensure the light is scheduled to be on.
2. Fan Not Operating or Loud Noise
- Power/Connection: Confirm the inline fan and clip fan are properly connected to the controller/adapter and receiving power.
- Controller Settings: Check the fan speed settings on the GGS Smart Controller or app. Ensure no temperature/humidity triggers are preventing operation.
- Obstructions: Inspect fan blades for any obstructions or debris.
- Ducting: Ensure ducting is not kinked or collapsed, which can restrict airflow and cause noise.
- Vibration: If the fan is making excessive noise, ensure it is securely mounted and not vibrating against the tent frame.
3. Odor Leakage
- Filter Lifespan: The carbon filter may need replacement if it has exceeded its operational lifespan.
- Connections: Check all ducting connections and tent ports for air leaks. Ensure hose clamps are tight.
- Negative Pressure: Ensure your inline fan is creating sufficient negative pressure within the tent to prevent odors from escaping.
4. Light Leaks from Tent
- Zippers: Ensure all zippers are fully closed and the double-stitching is intact.
- Ports: Verify that all unused access ports are securely closed.
- Fabric Integrity: Inspect the tent fabric for any small tears or punctures.
Specifications
| Feature | Specification |
|---|---|
| Brand | Spider Farmer |
| Model Number | SF |
| Product Dimensions (Tent) | 47"L x 24"W x 71"H |
| Chamber Volume | 46.37 Cubic Feet |
| Frame Material | Alloy Steel |
| Inner Tent Material | Mylar (100% Reflective Diamond Mylar) |
| Outer Tent Material | 1680D Oxford cloth |
| LED Light Wattage | 200 Watts (SF-2000) |
| LED Diodes | Samsung LM301H EVO |
| LED Efficacy | Up to 3.14 µmol/J PPE |
| Inline Fan Duct Size | 4 Inch |
| Inline Fan Airflow | 205 CFM |
| Inline Fan Noise Level | 26.8 dB(A) |
| Inline Fan Power | 27W ± 5% |
| Inline Fan Speed | 3000 RPM |
| Clip Fan Speeds | 10 speeds (0-2500 RPM) |
| Item Weight | 49.9 pounds |

Image: Technical specifications and dimensions for the 4-inch inline fan, including duct size, power, fan speed, airflow, noise level, and voltage.
Warranty and Support
Spider Farmer products are designed for durability and performance. The complete grow tent kit comes with after-sales service. For specific warranty details and to access customer support, please refer to the documentation included with your product or visit the official Spider Farmer website. Many components, including the LED light, often come with a multi-year warranty (e.g., 5-year after-service as indicated in some product information).
If you encounter any issues or have questions regarding your system, please contact Spider Farmer customer support for assistance.