
Tribesigns HOGA-HL060
Tribesigns 7-Tier Shoe Cabinet Instruction Manual
Model: HOGA-HL060 | Brand: Tribesigns
1. Introduction
Thank you for choosing the Tribesigns 7-Tier Shoe Cabinet. This versatile and durable storage solution is designed to help organize your footwear and enhance the aesthetic of your living space. With adjustable shelves and a compact design, it offers ample storage while fitting seamlessly into various rooms.

Figure 1: The Tribesigns 7-Tier Shoe Cabinet, showcasing its sleek grey finish and functional design in an entryway setting.
Please read this manual thoroughly before assembly and use to ensure proper installation, safe operation, and optimal performance of your new shoe cabinet.
2. Important Safety Information
- Always assemble the unit on a soft, clean surface to prevent scratches or damage to the product and your floor.
- Ensure all parts are present and undamaged before beginning assembly. Do not proceed with assembly if any parts are missing or defective.
- Exercise caution when handling and installing removable shelves to avoid injury or damage.
- Anti-Tipping Warning: For safety, especially in households with children or pets, it is highly recommended to secure the cabinet to a wall using appropriate anti-tipping hardware (not included). Furniture can tip over, causing serious injury or death. Always use wall anchor devices.
- Do not overload the shelves. Distribute weight evenly to maintain stability. The maximum weight limit for the entire unit is 220 pounds.
- Keep small parts and packaging materials away from children.
- Periodically check all connections and fasteners to ensure they remain tight and secure.
3. Parts List
Before assembly, verify that all components listed below are included in your package. If any parts are missing or damaged, please contact Tribesigns customer service for assistance.
| Part | Description | Quantity |
|---|---|---|
| A | Top Panel | 1 |
| B | Side Panels | 2 |
| C | Bottom Panel | 1 |
| D | Fixed Shelves | 2 |
| E | Adjustable Shelves | 4 |
| F | Back Panels | 2 |
| G | Doors | 2 |
| H | Legs | 4 |
| I | Door Handles | 2 |
| J | Hardware Pack | 1 (screws, cam locks, hinges, shelf pins, etc.) |
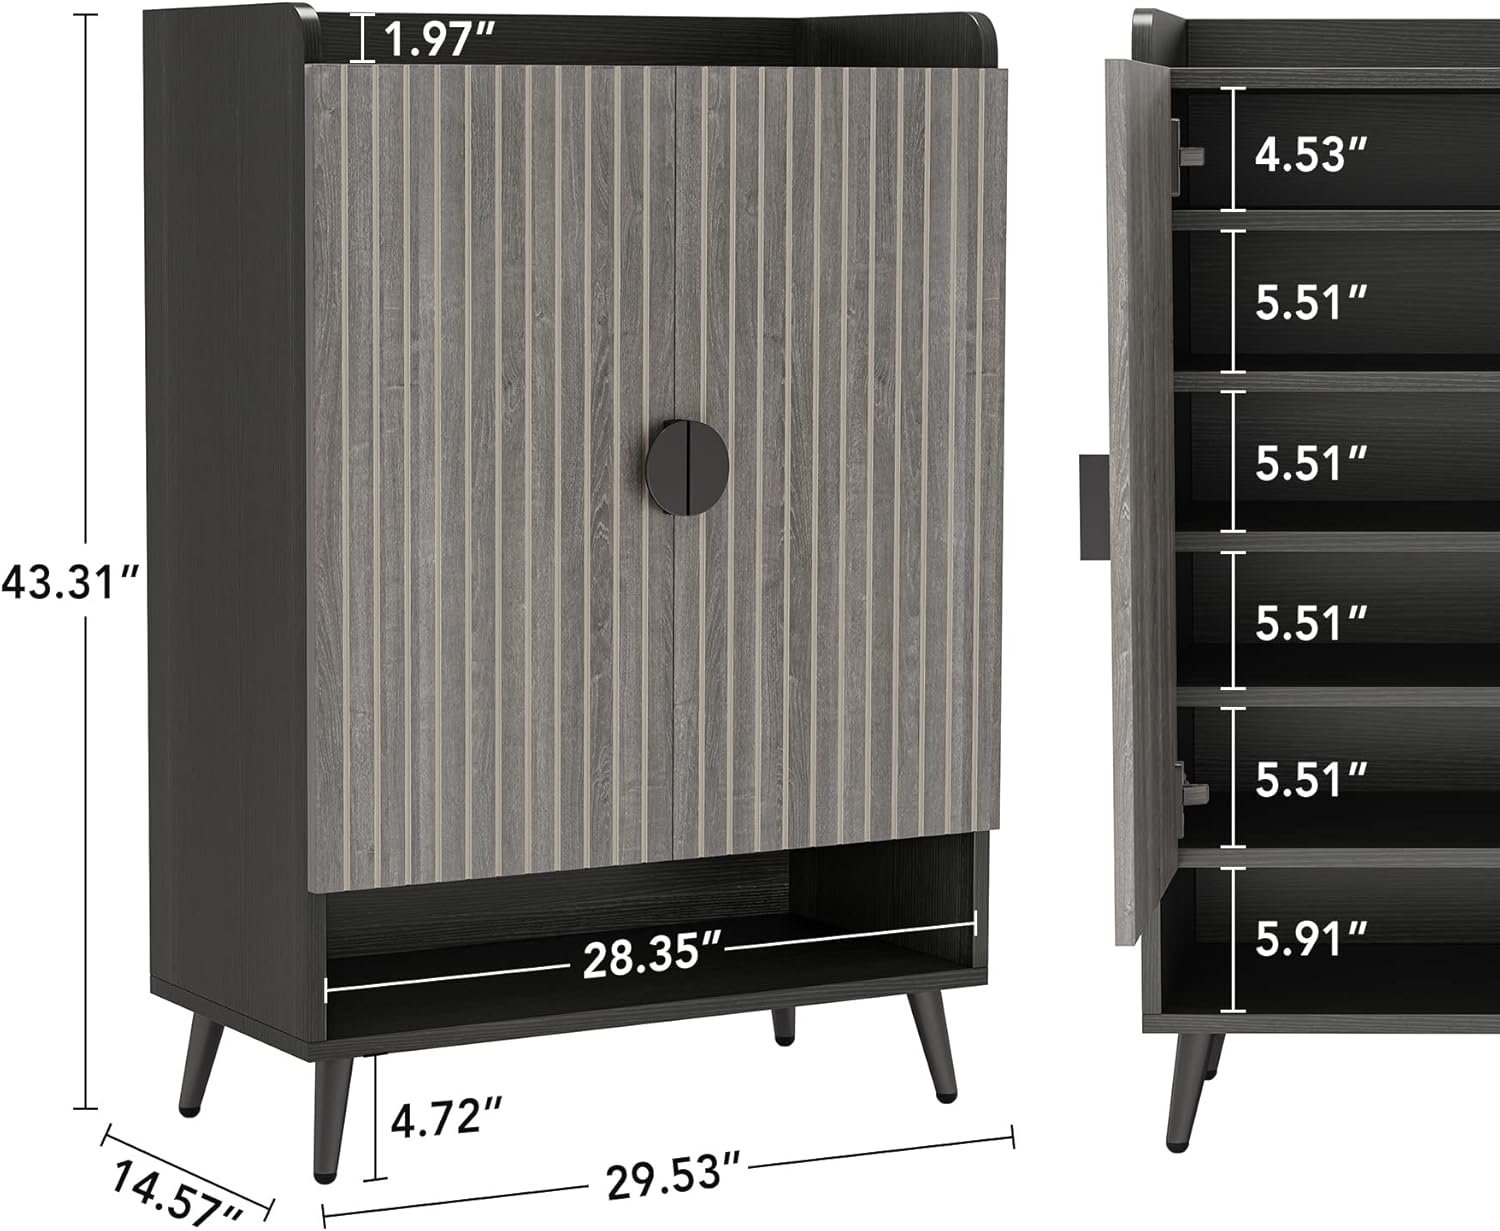
Figure 2: Product dimensions, providing a visual guide for assembly and placement.
4. Assembly Instructions
Follow these steps carefully for a smooth assembly process. It is recommended to have two people for assembly.
- Prepare the Base: Attach the four legs (H) to the bottom panel (C) using the provided screws from the hardware pack (J). Ensure they are securely fastened.
- Assemble the Frame: Connect the side panels (B) to the bottom panel (C) and one fixed shelf (D) using cam locks and screws. Ensure the grooves for the back panels are facing the correct direction.
- Install Shelves: Insert shelf pins into the desired holes on the side panels for the adjustable shelves (E). You can customize the height of these shelves to accommodate different shoe sizes, including boots.

Figure 3: The adjustable shelf feature allows for flexible storage configurations, including space for taller boots by removing shelves.
- Attach Top Panel: Secure the top panel (A) to the assembled frame using cam locks and screws.
- Insert Back Panels: Slide the back panels (F) into the grooves on the rear of the cabinet frame. Secure them with small nails or screws as indicated in the hardware pack.
- Install Doors: Attach the hinges from the hardware pack (J) to the doors (G) and then to the side panels of the cabinet. Adjust hinges as needed to ensure proper door alignment.

Figure 4: The cabinet with its doors open, demonstrating the internal shelving system and storage capacity.
- Attach Handles: Secure the door handles (I) to the front of the doors (G).
- Final Check: Ensure all screws and fasteners are tightened. Carefully move the assembled cabinet to its desired location.
5. Operating and Usage
The Tribesigns Shoe Cabinet is designed for efficient and flexible storage. Here’s how to make the most of its features:
- Shoe Storage: The cabinet can store up to 24 pairs of shoes, depending on their size and type. Utilize the adjustable shelves to create optimal spacing for different footwear, from flats to boots.
- Adjustable Shelves: To adjust a shelf, simply remove the shelf and reposition the shelf pins to the desired height. This allows you to customize compartments for taller items like boots or to maximize space for smaller shoes.

Figure 5: Example of how adjustable shelves can be configured to accommodate taller items like boots.
- Top Surface: The sturdy top surface can be used to display decorative items, potted plants, or to hold everyday essentials like keys and bags.
- Versatile Placement: This cabinet is suitable for various rooms, including entryways, hallways, closets, living rooms, bedrooms, and even garages or dormitories. Its compact design helps save space while providing ample storage.

Figure 6: Cabinet in an entryway.

Figure 7: Cabinet in a bedroom.
- Hidden Storage: The two swinging doors provide concealed storage, helping to keep your home clutter-free and organized.
6. Care and Maintenance
- Cleaning: Wipe the cabinet surfaces with a soft, damp cloth. Avoid using harsh chemicals, abrasive cleaners, or polishes that may damage the finish.
- Spills: Promptly wipe up any spills to prevent water damage or staining. The cabinet features a water-proof and wear-resistant paint finish, but prolonged exposure to moisture should be avoided.
- Sunlight Exposure: Avoid placing the cabinet in direct sunlight for extended periods, as this may cause fading or discoloration of the finish.
- Stability Check: Periodically check all screws and fasteners to ensure they are tight. Re-tighten if necessary to maintain the cabinet's stability.
7. Troubleshooting
| Problem | Possible Cause | Solution |
|---|---|---|
| Cabinet is wobbly/unstable. | Loose fasteners; uneven floor. | Ensure all screws and cam locks are fully tightened. If the floor is uneven, place shims under the legs to level the cabinet. Consider securing to a wall with anti-tipping hardware. |
| Doors do not align properly. | Hinges not adjusted correctly; cabinet not level. | Adjust the screws on the hinges to align the doors. Refer to hinge adjustment guides if needed. Ensure the cabinet is on a level surface. |
| Missing or damaged parts. | Packaging error; transit damage. | Do not proceed with assembly. Contact Tribesigns customer service immediately with your purchase details and a list of affected parts. |
| Difficulty inserting screws/cam locks. | Misalignment; debris in holes. | Ensure parts are correctly aligned before attempting to insert fasteners. Clear any debris from the holes. Do not force parts. |
8. Product Specifications
| Feature | Detail |
|---|---|
| Brand | Tribesigns |
| Model Number | HOGA-HL060 |
| Color | Grey |
| Product Dimensions | 29.6" W x 14.6" D x 43.3" H |
| Item Weight | 82.5 pounds (37.5 kg) |
| Material | Engineered Wood (E0 Particle Board) |
| Number of Shelves | 6 (4 adjustable, 2 fixed) |
| Weight Limit | 220 Pounds |
| Special Features | Adjustable, Waterproof, Scratch Resistant, Water Resistant, Heavy Duty |
| Assembly Required | Yes |
| UPC | 036659404203 |
9. Warranty and Customer Support
Tribesigns stands behind the quality of its products. Your Tribesigns 7-Tier Shoe Cabinet comes with a 12-month warranty from the date of purchase, covering manufacturing defects.
If you encounter any issues during assembly or use, have questions about the product, or require replacement parts, please do not hesitate to contact our friendly customer service team. We are committed to providing a satisfactory answer within 24 hours.
For support, please visit the official Tribesigns website or contact us through your purchase platform.
Thank you for choosing Tribesigns.
Related documentsHOGA-HL060


Ask a question about this manual
Ask about setup, troubleshooting, compatibility, parts, safety, or missing instructions. Manuals+ will review the question and use this page’s manual context to help answer it.