Introduction
This manual provides detailed instructions for the installation, operation, and maintenance of your EVERSECU Outdoor WiFi Security Camera. Please read this manual thoroughly before using the product to ensure proper setup and functionality. Keep this manual for future reference.
Product Overview
The EVERSECU Outdoor WiFi Security Camera is a 1080P HD IP bullet camera designed for outdoor surveillance. It features night vision, two-way audio, motion detection, and supports both Wi-Fi and Ethernet connectivity. The camera is compatible with the Tuya Smart APP and ONVIF standards, offering flexible monitoring and integration options.

Figure 1: EVERSECU Outdoor WiFi Security Camera. This image displays the camera's main unit with its antenna and adjustable mounting bracket.
Key Features:
- Full HD 1080P Resolution: Provides clear and crisp video recordings.
- 60 Feet Night Vision: Equipped with infrared LEDs for clear video in low-light conditions.
- 2.4GHz Wi-Fi & Ethernet Connectivity: Flexible network connection options.
- Two-Way Audio: Allows for real-time communication through the camera.
- Smart Motion Detection & AI Human Detection: Reduces false alarms and sends real-time alerts.
- Cloud Storage & MicroSD Card Support: Offers secure storage options (up to 128GB, not included).
- IP66 Weatherproof: Designed to withstand various outdoor weather conditions.
- ONVIF Conformant: Ensures compatibility with various network video recorders (NVRs) and software.
Component Identification:

Figure 2: Camera Component Diagram. This diagram labels the key parts of the camera including the universal support, IP66 waterproof housing, white light LEDs, HD lens, infrared lamp, power input, RJ45 port, waterproof speaker, TF card slot, and reset button.
- Universal Support: For mounting the camera.
- IP66 Waterproof Housing: Protects internal components from water and dust.
- White Light LEDs: For enhanced night vision or deterrence.
- HD Lens: Captures 1080P video.
- Infrared Lamp: Provides illumination for night vision.
- Power In: Connects to the power adapter.
- RJ45 Port: For wired Ethernet connection.
- Waterproof Speaker: For two-way audio functionality.
- TF Card Slot: For MicroSD card storage (built inside, waterproof).
- Reset Button: For factory reset (located near the TF card slot).
Setup
1. Physical Installation
Choose a suitable outdoor location for your camera, ensuring it has a clear field of view and is within range of your 2.4GHz Wi-Fi network or an Ethernet cable connection. The camera is designed for wall mounting.
- Secure the mounting bracket to a wall or suitable surface using appropriate screws and anchors (not included).
- Attach the camera to the mounting bracket and adjust the angle for optimal coverage.
- Connect the power adapter to the camera's power input port and plug it into a power outlet.
2. App Installation & Configuration (Tuya Smart App)
The camera uses the Tuya Smart App for initial setup and remote monitoring.
- Download the Tuya Smart app from your mobile device's app store (iOS or Android).
- Register or log in to your Tuya Smart account.
- Tap the "+" icon in the top right corner of the app to add a device.
- Select "Security & Video Surveillance" and then "Smart Camera (Wi-Fi)".
- Follow the in-app instructions to connect the camera to your 2.4GHz Wi-Fi network. When prompted, scan the QR code generated by the app with the camera lens. The camera will emit audio prompts during this process.
- Once connected, you can rename your camera and access its live feed and settings.
3. SD Card Installation
The camera supports MicroSD cards up to 128GB for local storage.
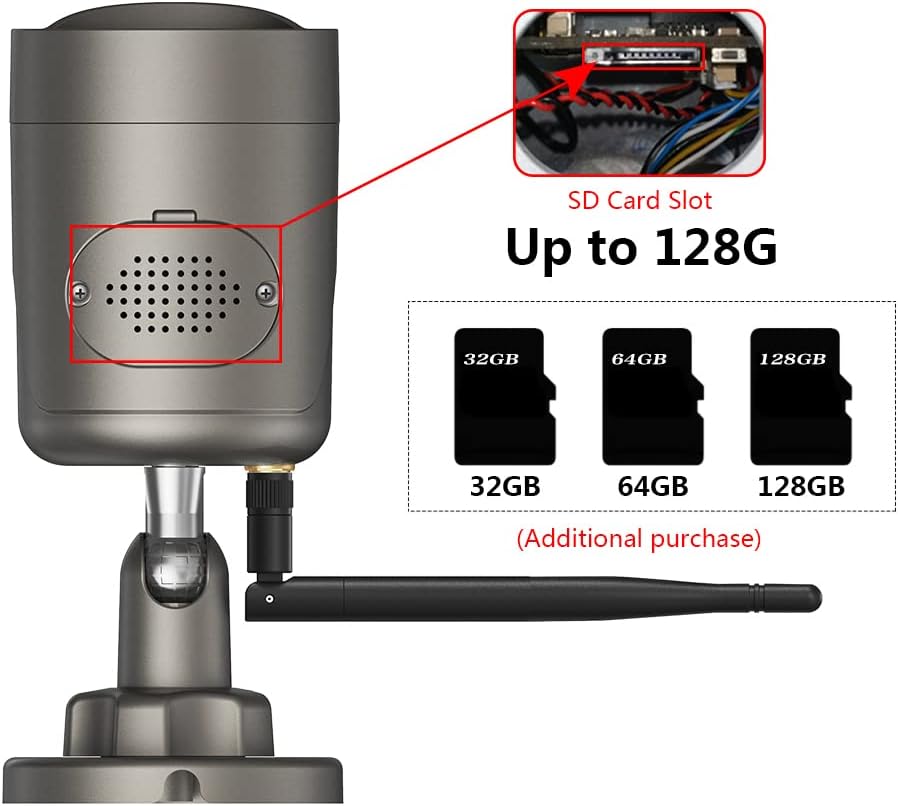
Figure 3: SD Card Slot. The MicroSD card slot is located internally, accessible by removing the waterproof cover on the underside of the camera.
- Ensure the camera is powered off before installing or removing the MicroSD card.
- Locate the waterproof cover on the underside of the camera (refer to Figure 3).
- Carefully remove the screws to open the cover.
- Insert the MicroSD card into the slot with the gold contacts facing down.
- Replace the waterproof cover and tighten the screws securely to maintain IP66 rating.
- Power on the camera. Format the SD card via the Tuya Smart App settings if prompted or if recording issues occur.
Operating the Camera
1. Live View and Remote Access
Access the live video feed from your camera anytime, anywhere using the Tuya Smart App.
- Open the Tuya Smart App and select your camera from the device list.
- The live video stream will appear. You can switch between HD and SD resolution.
2. Two-Way Audio
Communicate with individuals near the camera using the two-way audio feature.

Figure 4: Two-Way Audio in Use. This image illustrates a user communicating through the camera via the mobile app.
- While in live view, tap the microphone icon in the app to speak. Your voice will be transmitted through the camera's speaker.
- Tap the speaker icon to listen to audio from the camera's surroundings.
3. Motion Detection & Alerts
The camera can detect motion and send alerts to your mobile device.

Figure 5: Motion Detection and AI Human Detection. This image shows the camera detecting movement and a person, triggering an alert on the mobile app.
- In the app, navigate to the camera settings and enable "Motion Detection."
- Adjust sensitivity levels and set detection zones as needed.
- Enable "AI Human Detection" to reduce false alarms caused by pets or environmental factors.
- You will receive real-time alerts, snapshots, and video clips on your phone when motion is detected.
4. Night Vision
The camera automatically switches to night vision mode in low-light conditions.

Figure 6: Day and Night Vision Comparison. This image demonstrates the clear visibility provided by the camera during both daytime and nighttime conditions.
- The camera's infrared LEDs provide clear black-and-white video up to 60 feet in complete darkness.
- The camera may also utilize its white light LEDs for color night vision or to deter intruders, depending on settings.
5. Recording & Playback
Recordings can be stored on a MicroSD card or via cloud storage (subscription may be required).
- MicroSD Card: Continuous recording or motion-triggered recording can be configured in the app. Playback is available directly through the app.
- Cloud Storage: The camera supports AWS Cloud for up to 30 days of storage. Access and manage cloud recordings through the Tuya Smart App.
6. RTSP/ONVIF Integration
For advanced users, the camera supports RTSP and ONVIF for integration with third-party NVRs or surveillance software.
- RTSP Streams:
Main Stream (1080p): rtsp://[IPOFYOURCAMERA]/stream1
Sub Stream (640x380): rtsp://[IPOFYOURCAMERA]/stream2
Replace [IPOFYOURCAMERA] with the actual IP address of your camera on your local network. - ONVIF: The camera is ONVIF conformant. You can use ONVIF Device Manager software to discover the camera, change advanced settings like FPS, and manage user credentials. The default ONVIF credentials are: Username: admin, Password: 123456. It is highly recommended to change these default credentials immediately after setup for security purposes.
Maintenance
1. Cleaning
- Regularly clean the camera lens with a soft, dry cloth to ensure clear image quality.
- Wipe the camera body with a damp cloth as needed. Do not use harsh chemicals or abrasive cleaners.
2. Firmware Updates
- Check the Tuya Smart App periodically for available firmware updates.
- Follow the in-app instructions to update the camera's firmware to ensure optimal performance and access to new features.
Troubleshooting
- Camera not connecting to Wi-Fi:
Ensure your Wi-Fi network is 2.4GHz (5.0GHz is not supported).
Check Wi-Fi signal strength at the camera's location.
Verify the Wi-Fi password is entered correctly in the app.
Ensure the camera is close enough to the router during initial setup. - Loud audio prompts during setup:
The camera emits loud beeps during the QR code scanning process. This is normal. Position your phone's screen approximately 6 inches from the camera lens for successful scanning. - Camera goes offline frequently:
Check your Wi-Fi connection stability.
Ensure the camera has a consistent power supply.
Try power cycling the camera (unplug and replug). - False motion detection alerts:
Adjust the motion detection sensitivity in the Tuya Smart App.
Enable AI Human Detection to filter out non-human movements.
Define specific detection zones to exclude areas with frequent irrelevant movement (e.g., trees swaying). - Cannot access RTSP stream:
Ensure you have the correct IP address for your camera.
Verify that your network allows RTSP traffic.
Use the default ONVIF credentials (admin/123456) if prompted, and change them immediately. - SD card not recording:
Ensure the SD card is correctly inserted and formatted via the app.
Check if the SD card is full; consider enabling loop recording or upgrading to a larger capacity card.
Verify recording settings (continuous, motion-triggered) in the app.
Specifications
| Resolution | 1080P Full HD (1920x1080) |
| Lens | 36mm, 100° viewing angle |
| Night Vision Range | Up to 60 feet (Infrared LEDs) |
| Connectivity | 2.4GHz Wi-Fi, Ethernet (RJ45) |
| Storage Options | MicroSD Card (up to 128GB, not included), Cloud Storage (AWS) |
| Audio | Two-Way Audio |
| Motion Detection | Smart Motion Detect, AI Human Detection |
| Weather Resistance | IP66 Waterproof |
| Operating Temperature | -4°F to 122°F (-20°C to 50°C) |
| Power Source | Corded Electric |
| Compatible Apps | Tuya Smart App |
| ONVIF Support | Yes |
| Dimensions | 7.72 x 4.17 x 3.7 inches |
| Weight | 1.08 pounds |
Warranty and Support
For warranty information and technical support, please refer to the official EVERSECU website or contact their customer service directly. Details are typically provided with your product packaging or on the manufacturer's website.
Manufacturer: EVERSECU
Date First Available: July 8, 2022
