
1. Introduction
This manual provides detailed instructions for the installation and use of the GWNOWZZET M22 x 1.5 Soot Sensor Repair Fitting/Mount/Weld Bung. This high-quality stainless steel component is designed to facilitate the repair and replacement of diesel particulate/soot sensors, particularly when the original mounting point is damaged or corroded. Its robust construction ensures a durable and reliable solution for exhaust system repairs.
2. Product Features
- High-Quality Material: Constructed from durable stainless steel, ensuring resistance to corrosion and high temperatures.
- Standard Thread Size: Features an M22 x 1.5 thread, compatible with many 22mm x 1.50 diesel particulate/soot sensors.
- Easy to Weld: Designed for straightforward welding into exhaust systems, providing a secure and permanent mount.
- Repair Solution: Ideal for repairing damaged or stripped sensor mounting points, avoiding costly exhaust pipe replacement.

Figure 2.1: The mounting plug is made of stainless steel and is designed for easy welding.
3. Specifications
| Model Number | 22PRTCL |
| Thread Size | M22 x 1.5 |
| Material | Stainless Steel |
| Mounting Type | Weld Mount |
| Package Dimensions | 2.44 x 2.44 x 1.26 inches |
| Item Weight | 1.76 ounces |
| Country of Origin | China |
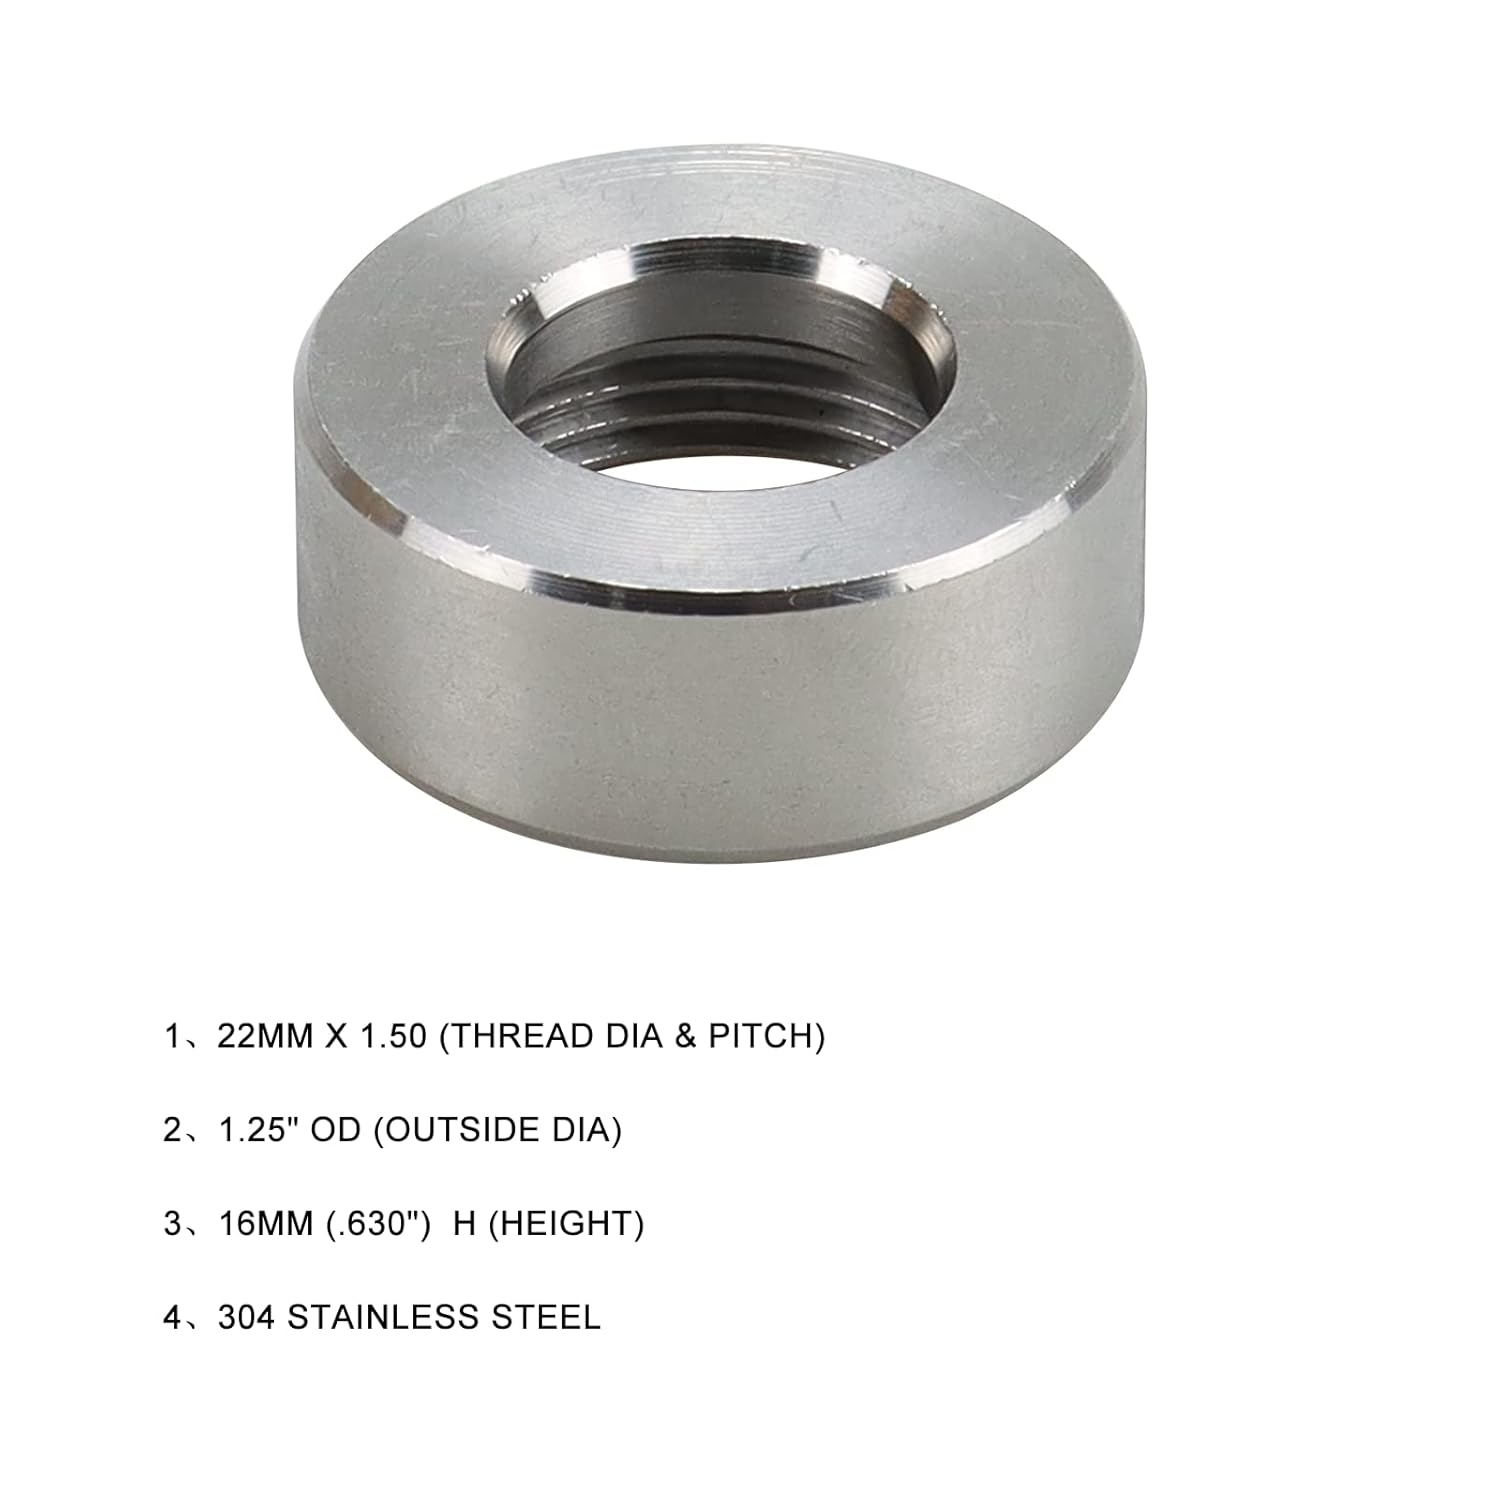
Figure 3.1: Detailed dimensions of the M22 x 1.5 Soot Sensor Repair Fitting.
4. Package Contents
The package includes the following item:
- 1 x M22 x 1.5 Soot Sensor Repair Fitting/Mount/Weld Bung

Figure 4.1: Contents of the product package.
5. Installation and Setup
This repair fitting is designed to replace a damaged or corroded sensor bung on an exhaust system. Professional installation by a qualified technician with welding experience is highly recommended.
Required Tools (Not Included):
- Angle grinder with cutting/grinding wheel
- Welding equipment (MIG/TIG welder)
- Safety gear (welding mask, gloves, protective clothing)
- 22mm hole saw (if creating a new mounting point)
- Cleaning tools (wire brush, solvent)
Installation Steps:
- Preparation: Ensure the vehicle's exhaust system is cool. Disconnect the battery if necessary. Identify the damaged soot sensor mounting point.
- Remove Old Sensor/Bung: Carefully remove the old soot sensor. If the existing bung is damaged, use a grinding wheel to grind out the old bung from the exhaust pipe. Ensure the area is clean and free of debris.
- Prepare Mounting Area: Clean the area on the exhaust pipe where the new bung will be welded. The surface must be free of rust, paint, and grease to ensure a strong weld. If creating a new mounting point, use a 22mm hole saw to create the opening.

Figure 5.1: Preparing the exhaust pipe for the new weld bung by drilling and cleaning.
- Position the New Bung: Place the M22 x 1.5 Soot Sensor Repair Fitting into the prepared opening. Ensure it sits flush and is properly aligned for the sensor.

Figure 5.2: Proper positioning of the repair fitting on the exhaust pipe.
- Weld the Bung: Securely weld the new fitting in place. Ensure a complete and airtight weld around the entire circumference of the bung to prevent exhaust leaks.

Figure 5.3: Welding the M22 x 1.5 Soot Sensor Repair Fitting into the exhaust system.
- Install New Sensor: Once the weld has cooled, install the new M22 x 1.5 soot sensor into the newly welded bung. Tighten to the manufacturer's specifications.
- Final Check: Reconnect the battery. Start the vehicle and check for any exhaust leaks around the newly installed bung.

Figure 5.4: The repair process can typically be completed within 10-15 minutes by a skilled professional.
6. Maintenance
The GWNOWZZET M22 x 1.5 Soot Sensor Repair Fitting is constructed from durable stainless steel and is designed for long-term performance. Once properly welded and installed, it requires minimal maintenance. Periodically inspect the weld area during routine vehicle maintenance for any signs of corrosion or cracking, especially in harsh operating environments.
7. Troubleshooting
Common Issues and Solutions:
- Exhaust Leak at Weld Site:
Cause: Incomplete or poor-quality weld. Insufficient surface preparation before welding.
Solution: Re-inspect the weld. Clean the area thoroughly and re-weld any porous or incomplete sections. Ensure proper welding techniques are used.
- Sensor Not Threading Correctly:
Cause: Cross-threading during sensor installation or debris in the bung threads.
Solution: Carefully remove the sensor. Inspect the threads of both the sensor and the bung for damage or debris. Clean the threads and attempt to re-thread carefully. Do not force the sensor.
- Bung Not Sitting Flush:
Cause: Improperly prepared hole in the exhaust pipe or uneven surface.
Solution: Ensure the hole is clean, round, and the surrounding surface is flat. Grind down any high spots on the exhaust pipe to allow the bung to sit flush before welding.
8. Warranty and Support
For information regarding product warranty, returns, or technical support, please refer to the seller's policy on the original purchase platform or contact GWNOWZZET customer service directly. Keep your purchase receipt as proof of purchase.