Lenovo ThinkVision P24q-30 24-inch WQHD LED Monitor User Manual
Model: P24q-30
Introduction
This manual provides detailed instructions for setting up, operating, maintaining, and troubleshooting your Lenovo ThinkVision P24q-30 24-inch WQHD LED Monitor. Please read this manual thoroughly before using your monitor to ensure proper and safe operation.
Carefully remove the monitor and stand components from the packaging. Attach the stand base to the stand column, then attach the assembled stand to the back of the monitor. Ensure all connections are secure.
Image: Front view of the Lenovo ThinkVision P24q-30 monitor, showing the display and the attached stand.
2. Connecting Cables
Connect the necessary cables to the monitor and your computer. The monitor supports DisplayPort and HDMI for video input, and USB for the integrated hub.
Video Cable: Connect one end of the provided DisplayPort (DP) cable to the DP port on your computer and the other end to the DP input on the monitor. Alternatively, use an HDMI cable if your computer supports it.
USB Upstream Cable: Connect the USB Type-A end of the provided USB cable to your computer and the USB Type-B end to the upstream USB port on the monitor. This enables the monitor's USB hub.
Power Cable: Connect the power cable to the monitor's power input and then to a grounded electrical outlet.
Image: Rear view of the monitor, highlighting the input ports for DisplayPort, HDMI, USB, and power connection.
3. Initial Power On
Press the power button on the monitor to turn it on. Ensure your computer is also powered on. The monitor should automatically detect the input signal. If not, you may need to select the input source using the monitor's OSD (On-Screen Display) menu.
Operating the Monitor
1. Power On/Off
Press the power button, usually located on the front or side of the monitor, to turn the display on or off.
2. Adjusting Display Settings (OSD Menu)
The monitor features an On-Screen Display (OSD) menu for adjusting various settings. The physical menu buttons are located on the back-right of the monitor. Use these buttons to navigate and select options.
Brightness/Contrast: Adjust the overall luminance and difference between light and dark areas.
Color Settings: Modify color temperature, gamma, and color space (sRGB). The monitor features factory calibrated color accuracy and HDR10 support.
Input Selection: Manually switch between DisplayPort and HDMI inputs.
Picture Quality Enhancement: Utilize features like Eye Comfort Technology, Natural Low Blue Light, and Flicker-Free to reduce eye strain.
Resolution: The native resolution is 2560 x 1440 (WQHD). Ensure your computer's display settings match this for optimal clarity.
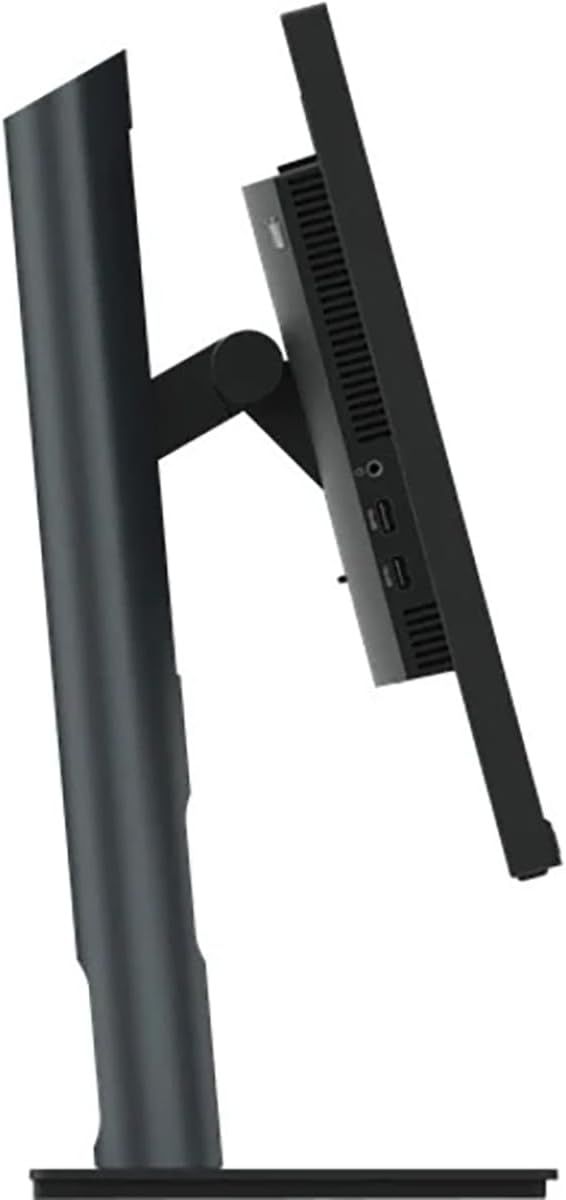
Image: Side view of the monitor, illustrating its thin profile and the stand's connection point, where OSD buttons are typically located on the rear.
3. Adjusting the Monitor Stand
The monitor stand allows for ergonomic adjustments:
Height Adjustment: Gently push or pull the monitor up or down to your desired viewing height.
Tilt Adjustment: Tilt the monitor screen forward or backward to find the optimal viewing angle.
Swivel Adjustment: Rotate the monitor left or right on its base.
Image: Side view demonstrating the monitor's tilt capability on its stand.
4. Using the USB Hub
With the USB upstream cable connected to your computer, the monitor's integrated USB hub becomes active. You can connect up to 4 USB devices (e.g., keyboard, mouse, USB drive) to the downstream USB ports on the monitor.
Maintenance
Proper maintenance ensures the longevity and optimal performance of your monitor.
Cleaning the Screen: Gently wipe the screen with a soft, lint-free cloth. For stubborn marks, slightly dampen the cloth with water or a non-abrasive, monitor-safe cleaning solution. Do not spray liquid directly onto the screen.
Cleaning the Casing: Use a soft, dry cloth to wipe the monitor casing. Avoid using strong detergents or abrasive cleaners.
Ventilation: Ensure the ventilation openings on the monitor are not blocked to prevent overheating.
Power Off: Always turn off the monitor when not in use for extended periods.
Troubleshooting
If you encounter issues with your monitor, refer to the following common troubleshooting steps:
Problem
Possible Solution
No image on screen
Ensure the power cable is securely connected to the monitor and a power outlet.
Verify the video cable (DP or HDMI) is firmly connected to both the monitor and your computer.
Check if the monitor is powered on.
Select the correct input source using the OSD menu.
Image is dim or washed out
Adjust the brightness and contrast settings via the OSD menu.
Ensure the monitor's display resolution is set to its native 2560 x 1440 in your computer's display settings.
Check color settings in the OSD menu.
Flickering or unstable image
Ensure the video cable is securely connected.
Try a different video cable.
Verify the refresh rate is set to 60 Hz in your computer's display settings.
USB ports not working
Ensure the USB Type-A to Type-B upstream cable is connected from the monitor to your computer.
Check if the computer's USB drivers are up to date.
Specifications
Feature
Detail
Brand
Lenovo
Model Number
P24q-30
Screen Size
23.8 Inches
Resolution
QHD Wide 1440p (2560 x 1440 Pixels)
Aspect Ratio
16:9
Display Type
LED, In-plane Switching (IPS) Technology
Refresh Rate
60 Hz
Response Time
4 Milliseconds
Brightness
300 Nit
Contrast Ratio
3,000,000:1
Viewing Angle
178 Degrees
Color Gamut
99% sRGB
Connectivity
1x HDMI, 1x DisplayPort, 5x USB (1 upstream, 4 downstream)
Special Features
Eye Comfort Technology, Natural Low Blue Light, Flicker-Free, Height Adjustment, Tilt Adjustment, Swivel Adjustment, HDR10 Support, Factory Calibrated Color Accuracy, USB Hub
Power Consumption
25 Watts
Item Dimensions (D x W x H)
1.8"D x 21.2"W x 12.7"H
Item Weight
18 Pounds
Warranty Information
The Lenovo ThinkVision P24q-30 monitor comes with a 3-year Manufacturer Warranty. For detailed terms and conditions, please refer to the warranty documentation included with your product or visit the official Lenovo support website.
Support
For further assistance, technical support, or service inquiries, please contact Lenovo customer support. You can find contact information and additional resources on the official Lenovo website.
Ask about setup, troubleshooting, compatibility, parts, safety, or missing instructions. Manuals+ will review the question and use this page’s manual context to help answer it.