
Hikvision DS-2CD2387G2P-LSU/SL
Contents
HIKVISION DS-2CD2387G2P-LSU/SL ColorVu 8MP Panoramic Turret IP Camera User Manual
Model: DS-2CD2387G2P-LSU/SL | Brand: Hikvision
1. Introduction
The Hikvision DS-2CD2387G2P-LSU/SL ColorVu 8MP Network Turret Camera is designed for comprehensive indoor and outdoor surveillance. This advanced unit integrates two 1/1.8" progressive scan CMOS sensors to deliver high-resolution video at 5120 x 1440 pixels, ensuring clear and detailed imagery. Its dual 4mm fixed lenses provide an expansive 180° (±10°) horizontal field of view, capturing a wide panoramic scene.
Equipped with ColorVu technology, the camera provides vivid, full-color video even in low-light conditions, supported by a supplemental white light with an effective range of up to 131 feet. For enhanced security, it includes a built-in speaker and microphone for two-way audio communication, along with an active strobe light and audio alarm to deter intruders. The camera supports local storage via a microSD card slot (up to 256GB, sold separately) and simplifies installation with Power over Ethernet (PoE) technology, allowing power and data transmission over a single cable. It is compliant with ONVIF profiles G, S, and T, ensuring broad compatibility with various surveillance systems, and features an IP67-rated metal enclosure for robust outdoor performance.

Figure 1.1: Front view of the Hikvision DS-2CD2387G2P-LSU/SL ColorVu 8MP Panoramic Turret IP Camera.
2. Key Features
- High Quality Imaging: 8 MP resolution for clear and detailed video, providing a single panoramic image covering the entire scene.
- 24/7 Colorful Imaging: ColorVu technology ensures vivid and colorful images around the clock, even in low-light conditions.
- Efficient Compression: Utilizes H.265+ compression technology to optimize storage and bandwidth usage without compromising video quality.
- Wide Dynamic Range (WDR): 130 dB WDR technology provides clear imaging against strong backlight, balancing exposure in challenging lighting environments.
- Smart Classification: Advanced deep learning algorithms enable accurate human and vehicle classification, reducing false alarms.
- Active Deterrence: Features an active strobe light and audio alarm to effectively warn off intruders.
- Durable Design: Water and dust resistant with an IP67 rating, suitable for various outdoor environments.

Figure 2.1: Overview of key features including 8MP resolution, 24/7 color, 130dB WDR, and IP67 rating.
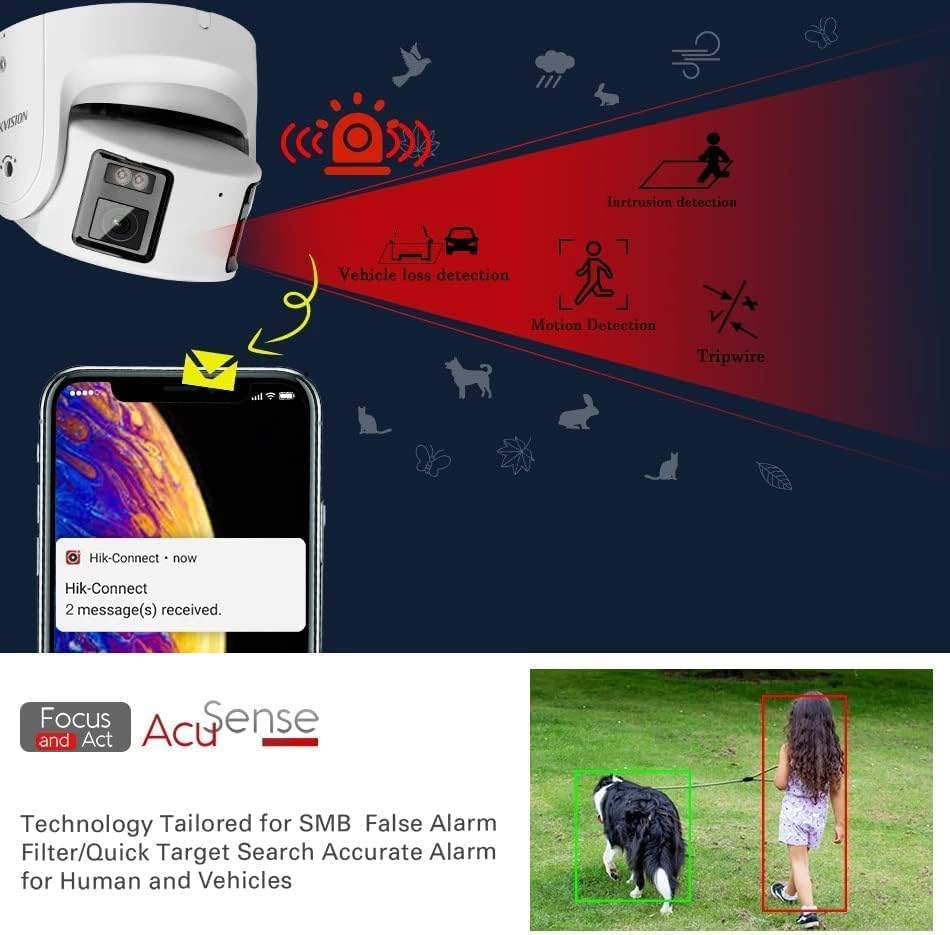
Figure 2.2: Illustration of smart detection capabilities including intrusion, vehicle loss, motion, and tripwire detection, with mobile app notification example.

Figure 2.3: Comparison of full-color night vision provided by ColorVu technology versus traditional infrared night vision.
3. Setup Guide
This section provides instructions for the physical installation and initial setup of your Hikvision Panoramic Turret IP Camera.
3.1 Package Contents
Before beginning installation, verify that all components are present in the package.
- Hikvision DS-2CD2387G2P-LSU/SL Camera Unit
- Mounting Screws and Wall Plugs
- Drill Template
- Quick Start Guide
- Waterproof Connector (for Ethernet cable)

Figure 3.1: Contents of the product package and general installation notes.
3.2 Mounting the Camera
The camera is designed for ceiling mount installation.
- Prepare the Mounting Surface: Choose a suitable location for installation, ensuring it is a stable surface capable of supporting the camera's weight. Use the provided drill template to mark the screw holes.
- Drill Holes: Drill pilot holes at the marked positions. Insert wall plugs if mounting on masonry or drywall.
- Secure the Camera Base: Align the camera base with the drilled holes and secure it using the provided mounting screws. Ensure the camera is firmly attached.
- Adjust Viewing Angle: Loosen the tilt locking screw to adjust the camera's vertical angle from -75° to 75°. Once the desired angle is achieved, tighten the locking screw. Similarly, adjust the horizontal rotation if needed.
3.3 Powering On and Connectivity
The camera supports Power over Ethernet (PoE) for simplified installation, or can be powered via a 12V DC power adapter (not included).
- PoE Connection: Connect an Ethernet cable from a PoE-enabled switch or NVR directly to the camera's Ethernet port. This will provide both power and data connectivity.
- 12V DC Power: If not using PoE, connect a 12V DC power adapter (6 watts minimum) to the camera's power input port. Then, connect an Ethernet cable to the camera's Ethernet port for network connectivity.
- Network Configuration: Once powered, the camera will attempt to obtain an IP address via DHCP. For initial setup and advanced configuration, use Hikvision's SADP (Search Active Devices Protocol) tool or access the camera's web interface via its IP address.
4. Operation
This section details the operational aspects of your Hikvision camera, including video recording, panoramic viewing, and smart features.
4.1 Initial Configuration and Access
After physical installation and power-up, access the camera's web interface for full configuration.
- Discover the Camera: Use the Hikvision SADP tool on a computer connected to the same network to find the camera's IP address.
- Activate the Camera: If it's a new camera, you will need to set up a strong password for the admin account.
- Access Web Interface: Open a web browser and enter the camera's IP address. Log in with the credentials you set.
- Network Settings: Configure static IP address, DNS, and port forwarding if necessary for remote access.
4.2 Video Recording Options
The camera offers flexible recording solutions to suit various needs.
- MicroSD Card: Insert a microSD card (up to 256GB, not included) into the camera's slot for local storage. Configure recording schedules and event-triggered recording via the web interface.
- Network Video Recorder (NVR): Integrate the camera with a Hikvision NVR for centralized recording and management. The camera is compatible with ONVIF profiles G, S, and T.
- FTP Server: Configure the camera to upload recorded video clips or snapshots to an FTP server for remote storage and backup.

Figure 4.1: Various recording options including Micro SD card, Hikvision NVR, and FTP server.
4.3 180° Panoramic View
The camera's dual-lens design provides a seamless 180-degree panoramic view, effectively covering large areas with a single device.

Figure 4.2: Illustration of the 180° panoramic view created by stitching images from the left and right lenses.
4.4 Smart Features and Alarms
Leverage the camera's intelligent features for enhanced security monitoring.
- Motion Detection: Configure specific areas for motion detection and set sensitivity levels.
- Intrusion Detection: Define virtual tripwires or intrusion areas to trigger alarms when objects cross or enter.
- Human and Vehicle Classification: Utilize deep learning algorithms to differentiate between humans, vehicles, and other moving objects, significantly reducing false alarms.
- Active Deterrence: Enable the built-in strobe light and audio alarm to automatically activate upon detection of suspicious activity, deterring potential intruders.
- Two-Way Audio: Use the integrated microphone and speaker for real-time audio communication through the camera.
5. Maintenance
Regular maintenance ensures optimal performance and longevity of your camera.
- Cleaning: Periodically clean the camera lens and housing with a soft, damp cloth. Avoid abrasive cleaners or solvents that could damage the surface. Ensure the lens is free of dust, dirt, or water spots for clear imaging.
- Firmware Updates: Check the official Hikvision website regularly for firmware updates. Keeping the firmware updated ensures access to the latest features, security patches, and performance improvements. Follow the provided instructions carefully when performing updates.
- Cable Inspection: Inspect all cables (Ethernet, power) for any signs of wear, damage, or corrosion, especially in outdoor installations. Replace damaged cables promptly to prevent connectivity issues.
- Environmental Checks: Ensure the camera's mounting remains secure and that there are no obstructions to its field of view. Clear any vegetation or debris that might interfere with the camera's operation.
6. Troubleshooting
This section addresses common issues you might encounter with your camera.
| Problem | Possible Cause | Solution |
|---|---|---|
| No image/video feed | No power; Network connectivity issue; Incorrect IP address. | Check power supply (PoE or 12V DC). Verify Ethernet cable connection. Use SADP tool to find and verify IP address. Ensure camera is activated. |
| Poor image quality | Dirty lens; Insufficient lighting; Incorrect camera settings (e.g., exposure, WDR). | Clean the lens. Ensure adequate lighting or enable supplemental white light. Adjust image settings in the web interface. |
| Cannot access web interface | Incorrect IP address; Network firewall blocking access; Browser compatibility. | Confirm IP address with SADP. Temporarily disable firewall. Try a different web browser. |
| False alarms from motion detection | Sensitivity too high; Environmental factors (e.g., moving branches, shadows). | Adjust motion detection sensitivity. Define detection zones to exclude irrelevant areas. Utilize human/vehicle classification. |
| MicroSD card not recording | Card not formatted; Card full; Incorrect recording schedule. | Format the microSD card via the camera's web interface. Check available storage. Verify recording schedule and event triggers. |
7. Technical Specifications
| Feature | Specification |
|---|---|
| Model Number | DS-2CD2387G2P-LSU/SL |
| Image Sensor | Dual 1/1.8" Progressive Scan CMOS |
| Max. Resolution | 5120 x 1440 (8 MP) |
| Lens | 4mm Fixed Dual Lens |
| Field of View | 180° (±10°) Horizontal |
| Frame Rate | Up to 20 fps |
| Illumination | ColorVu (24/7 Color), Supplemental White Light (up to 131 ft) |
| Wide Dynamic Range (WDR) | 130 dB |
| Audio | Built-in Speaker & Microphone, Audio Input/Output |
| Alarm | Active Strobe Light, Audio Alarm |
| Storage | MicroSD card slot (up to 256GB) |
| Network Interface | 1x RJ45 10M/100M self-adaptive Ethernet port |
| Power Supply | 12 VDC, PoE (802.3af) |
| Power Consumption | Max. 6 W |
| Ingress Protection | IP67 (Water and Dust Resistant) |
| Material | Metal |
| Operating Conditions | -30 °C to 60 °C (-22 °F to 140 °F) |
| Dimensions | Approx. 9 x 9 x 9 inches (Package) |
| Weight | Approx. 3.69 pounds |
| Connectivity Protocol | ONVIF (Profile G, S, T) |
| UPC | 842571143966 |
8. Warranty and Support
8.1 Warranty Information
Hikvision products typically come with a limited manufacturer's warranty. The standard warranty period for this camera may vary by region and distributor. Please refer to your purchase documentation or contact your local Hikvision distributor for specific warranty terms and conditions applicable to your product. Keep your proof of purchase for warranty claims.
Note: Warranty support may be dependent on the region of purchase. Products not purchased through authorized local distributors may have limited or no local warranty support.
8.2 Technical Support
For technical assistance, troubleshooting, or advanced configuration guidance, please contact Hikvision technical support.
- Online Resources: Visit the official Hikvision website for product documentation, FAQs, and software downloads.
- Contact Support: Refer to the contact information provided in your product's quick start guide or on the Hikvision regional website for phone numbers and email addresses for technical support.
- Authorized Dealers: Your authorized Hikvision dealer or installer may also provide direct support and service.
Ask a question about this manual
Ask about setup, troubleshooting, compatibility, parts, safety, or missing instructions. Manuals+ will review the question and use this page’s manual context to help answer it.