1. Introduction
The ASUSTOR AS-T10G3 is an advanced expansion card designed to significantly upgrade the network and storage capabilities of compatible ASUSTOR Network Attached Storage (NAS) devices. This card integrates a 10 Gigabit Ethernet port with two M.2 NVMe SSD slots, providing a robust solution for high-speed data transfer and enhanced system performance through SSD caching or storage pools.
2. Key Features
- 10 Gigabit Ethernet Connectivity: Utilizes the Marvell AQC113 10GbE controller for ultra-fast network speeds.
- Dual M.2 NVMe SSD Support: Features two M.2 NVMe SSD slots for flexible storage expansion or caching.
- PCIe 3.0 x4 Interface: Ensures high bandwidth for both network and SSD operations.
- Multi-Gigabit Compatibility: Supports a wide range of Ethernet speeds including 10/100/1000/2500/5000/10000 Mbps.
- Jumbo Frame Support: Compatible with 16K jumbo frames for improved network efficiency.
- Checksum Offloading: Supports IP, TCP, and UDP checksum offloading to reduce CPU utilization.
- VLAN ID Tagging & QoS: Provides support for Virtual Local Area Network (VLAN) identification and Quality of Service (QoS).
- Standard RJ-45 Connector: Uses an 8P8C RJ-45 connection for broad compatibility with existing networking equipment.
- Integrated Heatsinks: Equipped with heatsinks to maintain optimal performance and thermal efficiency.
3. Setup and Installation
This section outlines the general steps for installing the AS-T10G3 network card into your compatible ASUSTOR NAS device. Always refer to your specific NAS model's user manual for detailed instructions on opening the chassis and accessing internal expansion slots.
3.1 Package Contents
Verify that your package contains the following items:
- AS-T10G3 Network Card x1
- Full-Height Bracket x1
- Low-Profile Bracket x1

Image: AS-T10G3 network card with its dimensions and included full-height and low-profile brackets.
3.2 Hardware Installation
- Power Off NAS: Ensure your ASUSTOR NAS is completely powered off and disconnected from the power source.
- Open NAS Chassis: Carefully open the NAS chassis according to your model's instructions to access the internal PCIe expansion slot.
- Select Bracket: Choose the appropriate bracket (full-height or low-profile) for your NAS model and attach it to the AS-T10G3 card if necessary.
- Insert Card: Align the AS-T10G3 card with an available PCIe 3.0 x4 slot (or higher) and firmly press it down until it is securely seated.
- Install M.2 NVMe SSDs (Optional): If you plan to use M.2 NVMe SSDs for caching or storage, carefully insert them into the designated M.2 slots on the AS-T10G3 card and secure them with the provided screws or retention mechanisms.
- Close Chassis & Reconnect: Close the NAS chassis, reconnect the power cable, and power on the device.
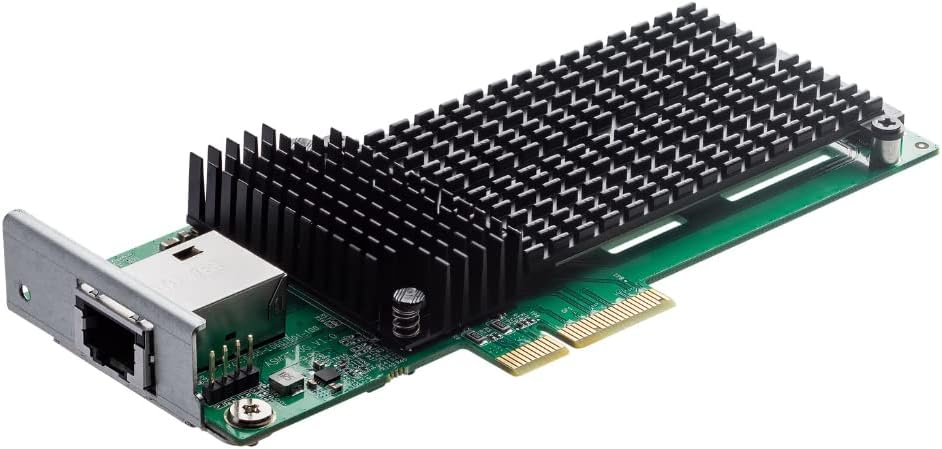
Image: Angled view of the ASUSTOR AS-T10G3 Network Card, showing the 10GbE port and heatsink.

Image: Angled view of the ASUSTOR AS-T10G3 Network Card, highlighting the two M.2 NVMe SSD slots beneath the heatsinks.

Image: Diagram illustrating the installation process of the AS-T10G3 card into an ASUSTOR NAS device, showing the 10GbE port and dual M.2 SSD slots.
4. Operating Instructions
Once the AS-T10G3 card is physically installed, the NAS operating system (ADM) will typically detect the new hardware. Follow these steps to configure and utilize the card's features.
4.1 Network Configuration
- Access ADM: Log in to your ASUSTOR NAS's ADM (ASUSTOR Data Master) interface via a web browser.
- Verify Detection: Navigate to Settings > Network. The new 10GbE interface should be listed.
- Configure IP Settings: Configure the IP address, subnet mask, gateway, and DNS settings for the 10GbE interface as required by your network environment.
- Connect 10GbE Cable: Connect a Cat6a or Cat7 Ethernet cable from the AS-T10G3's RJ-45 port to your 10GbE-compatible switch or router.

Image: Representation of a network cable connected to the 10GbE port of the network card.
4.2 M.2 NVMe SSD Configuration
The M.2 NVMe SSDs installed on the AS-T10G3 can be configured for SSD caching or as a dedicated storage volume, depending on your NAS model and ADM version.
- Access Storage Manager: In ADM, navigate to Storage Manager.
- Detect SSDs: The newly installed M.2 NVMe SSDs should be detected and listed.
- Configure SSD Cache: To set up SSD caching, follow the wizard to select the SSDs for read-only or read-write cache. This can significantly improve I/O performance for frequently accessed data.
- Create Storage Volume (if supported): If your NAS model supports M.2 SSDs as a standalone storage volume, you can create a new volume or add them to an existing storage pool.

Image: Icon representing high data transfer speeds and performance, achievable with the AS-T10G3.
5. Maintenance
Proper maintenance ensures the longevity and optimal performance of your AS-T10G3 network card and NAS system.
- Firmware Updates: Regularly update your ASUSTOR NAS ADM firmware to ensure compatibility and access to the latest features and bug fixes for the AS-T10G3.
- Ventilation: Ensure your NAS device has adequate ventilation. The AS-T10G3 includes heatsinks, but proper airflow within the NAS chassis is crucial to prevent overheating, especially under heavy load.
- Cable Integrity: Periodically check the 10GbE Ethernet cable for any damage or loose connections. A damaged cable can lead to reduced performance or connectivity issues.
- Dust Removal: If comfortable, and following NAS manufacturer guidelines, occasionally power down and open your NAS to gently remove any accumulated dust from the AS-T10G3 card and surrounding components using compressed air.
6. Troubleshooting
If you encounter issues with your AS-T10G3 network card, consider the following troubleshooting steps:
- Card Not Detected:
- Ensure the NAS is powered off before installation.
- Reseat the AS-T10G3 card firmly into the PCIe slot.
- Verify that your NAS model is listed as compatible with the AS-T10G3.
- Try a different PCIe slot if available.
- Slow Network Speeds:
- Confirm you are using Cat6a or Cat7 Ethernet cables for 10GbE connections.
- Ensure your network switch or router supports 10GbE speeds.
- Check network settings in ADM for correct IP configuration and jumbo frame settings (if enabled).
- Update NAS firmware and network card drivers (if applicable via ADM updates).
- M.2 NVMe SSDs Not Recognized:
- Ensure the SSDs are correctly seated in the M.2 slots on the AS-T10G3.
- Verify the SSDs are compatible with your NAS model and the AS-T10G3.
- Check Storage Manager in ADM to initialize or format the new SSDs.
- General Issues:
- Restart the NAS device.
- Consult the ASUSTOR official website or support forums for specific model-related issues.
7. Specifications
| Feature | Specification |
|---|---|
| Model Number | AS-T10G3 |
| Controller | Marvell AQC113 |
| Interface | PCIe 3.0 x4 |
| M.2 SSD Slots | 2 (NVMe compatible) |
| Ethernet Speeds | 10/100/1000/2500/5000/10000 Mbps |
| Jumbo Frame Support | 16K |
| Connector | 8P8C RJ-45 |
| Dimensions (L x W x H) | 153.1 mm x 68.9 mm x 20.6 mm (approx. 6.03 x 2.71 x 0.81 inches) |
| Weight | 92.6 g (approx. 0.20 lbs) |
| Compatible Devices | ASUSTOR NAS models (e.g., AS6704T/AS6706T/AS6504RD/AS6504RS/AS6512RD/AS7112RDX/AS7116RDX) |
8. Warranty and Support
ASUSTOR products are designed for reliability and performance. For specific warranty terms and conditions, please refer to the warranty information provided with your ASUSTOR NAS device or visit the official ASUSTOR website.
For technical support, driver updates, or further assistance, please visit the official ASUSTOR support page or contact their customer service directly. You can find more information and resources at the ASUSTOR Brand Store.


