1. Introduction
This manual provides essential information for the safe and effective operation, maintenance, and troubleshooting of your Ingco 9-inch 3000W Angle Grinder, model AG30008. Please read these instructions carefully before using the tool and keep this manual for future reference. Proper use and maintenance will ensure optimal performance and extend the lifespan of your angle grinder.
2. General Safety Instructions
Always follow basic safety precautions to reduce the risk of fire, electric shock, and personal injury when operating power tools. Keep this information accessible to all users.
- Work Area Safety: Keep the work area clean and well-lit. Cluttered or dark areas invite accidents. Do not operate power tools in explosive atmospheres, such as in the presence of flammable liquids, gases, or dust.
- Electrical Safety: Power tool plugs must match the outlet. Never modify the plug in any way. Avoid body contact with earthed or grounded surfaces such as pipes, radiators, ranges, and refrigerators.
- Personal Safety: Always wear appropriate personal protective equipment (PPE), including safety glasses, hearing protection, dust mask, and heavy-duty gloves. Dress properly; avoid loose clothing or jewelry that can get caught in moving parts.
- Tool Use and Care: Do not force the power tool. Use the correct power tool for your application. Disconnect the plug from the power source before making any adjustments, changing accessories, or storing power tools.
- Specific Grinder Safety:
- Always ensure the guard is properly installed and adjusted before operation.
- Use only grinding discs that are rated for the speed of the grinder and suitable for the material being worked on.
- Never operate the grinder without a properly secured grinding disc.
- Maintain a firm grip on the tool with both hands during operation.
- Avoid applying excessive pressure, which can cause the disc to bind or break.
- Be aware of sparks and debris generated during grinding; ensure no flammable materials are nearby.
- Allow the disc to come to a complete stop before setting the tool down.
3. Components Overview
Familiarize yourself with the various parts of your Ingco Angle Grinder AG30008 to ensure safe and efficient operation.
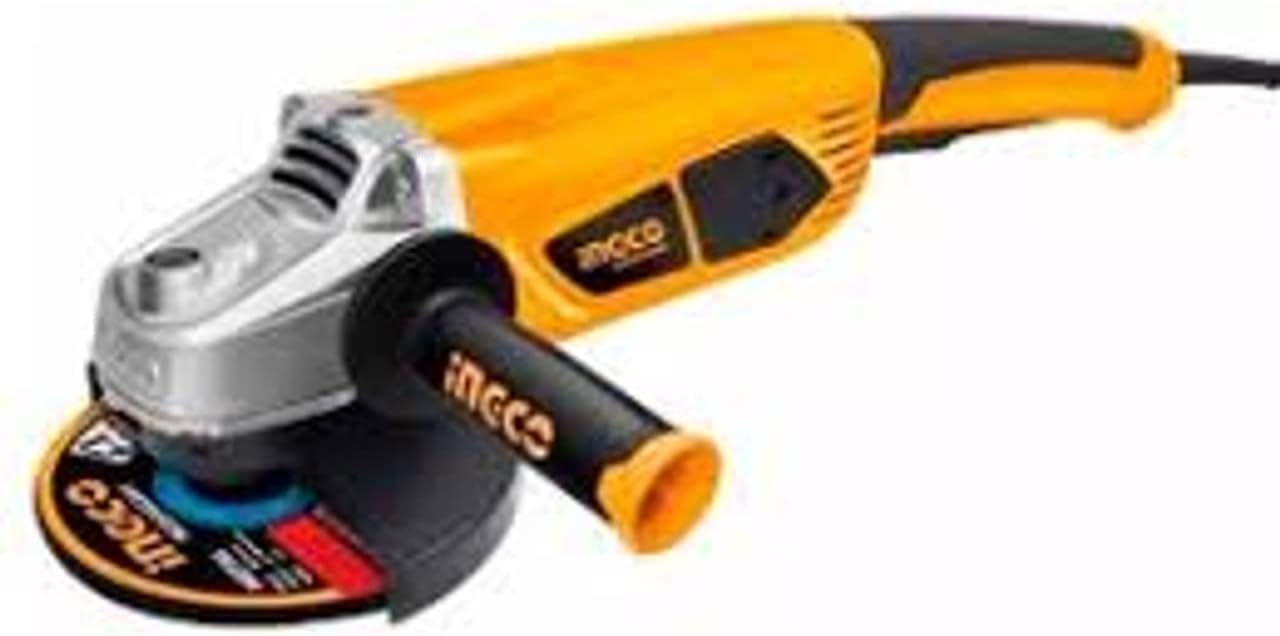
Image 1: Ingco 9-inch 3000W Angle Grinder AG30008. This image displays the complete angle grinder, highlighting its main body, auxiliary handle, disc guard, and a grinding disc. The tool features a yellow and black casing with a silver-colored gear housing. The auxiliary handle is positioned for optimal control during operation.
- Main Handle: Provides primary grip and control for the user.
- Auxiliary Handle: Offers additional grip for two-handed operation, enhancing stability and control.
- Spindle Lock Button: Used to lock the spindle for easy disc changes.
- Disc Guard: Protects the user from sparks, debris, and accidental contact with the rotating disc.
- Power Switch: Activates and deactivates the motor.
- Ventilation Slots: Ensures proper airflow to cool the motor during operation.
- Grinding Disc: The abrasive accessory used for cutting or grinding materials.
4. Setup Instructions
Before operating your angle grinder, ensure it is properly assembled and all safety components are in place.
4.1 Attaching the Auxiliary Handle
- Unscrew the auxiliary handle from its packaging.
- Locate the threaded holes on the gear housing of the grinder. There are typically multiple positions for left or right-handed use.
- Screw the auxiliary handle firmly into the desired position. Ensure it is tightened securely to prevent movement during operation.
4.2 Installing the Grinding Disc
- Disconnect Power: Always unplug the grinder from the power source before installing or changing discs.
- Position the Guard: Ensure the disc guard is in place and adjusted to cover the maximum possible area of the disc.
- Press Spindle Lock: Press and hold the spindle lock button to prevent the spindle from rotating.
- Remove Outer Flange Nut: Use the provided spanner wrench to loosen and remove the outer flange nut.
- Place Disc: Position the grinding disc onto the inner flange, ensuring it sits flat and centered. The disc should be rated for the grinder's speed and application.
- Secure Outer Flange Nut: Replace the outer flange nut and tighten it firmly with the spanner wrench while still holding the spindle lock button. Do not overtighten.
- Check Rotation: Release the spindle lock and manually rotate the disc to ensure it spins freely and is properly secured.
4.3 Adjusting the Disc Guard
The disc guard should always be adjusted to provide maximum protection for the user, directing sparks and debris away from the operator.
- Loosen the guard clamping screw or lever (if applicable).
- Rotate the guard to the desired position, ensuring it covers the exposed part of the disc not actively engaged in grinding.
- Tighten the clamping screw or lever securely.
5. Operating Instructions
Follow these steps for safe and effective operation of your Ingco Angle Grinder.
5.1 Before Starting
- Ensure all safety precautions are understood and followed.
- Wear all necessary PPE (safety glasses, hearing protection, gloves, dust mask).
- Secure the workpiece firmly to prevent movement during grinding.
- Inspect the grinding disc for any damage or cracks. Replace damaged discs immediately.
- Check that the power cord is in good condition and positioned to avoid accidental cutting.
5.2 Starting and Stopping the Grinder
- Starting: With a firm two-handed grip on the main and auxiliary handles, plug the tool into a suitable power outlet. Press the power switch to the "ON" position. Allow the disc to reach full speed before contacting the workpiece.
- Stopping: Release or press the power switch to the "OFF" position. Wait for the disc to come to a complete stop before setting the tool down.
5.3 Grinding Techniques
- Angle of Approach: For general grinding, hold the disc at an angle of approximately 15-30 degrees to the workpiece surface. For cutting, hold the disc perpendicular to the surface.
- Light Pressure: Allow the weight of the tool and the abrasive action of the disc to do the work. Excessive pressure can reduce efficiency, damage the disc, and overload the motor.
- Even Movement: Move the grinder smoothly and evenly across the workpiece to achieve a consistent finish and prevent gouging.
- Avoid Kickback: Be aware of potential kickback, especially when cutting. Avoid pinching the disc in the cut.
6. Maintenance
Regular maintenance ensures the longevity and safe operation of your angle grinder. Always disconnect the tool from the power supply before performing any maintenance.
6.1 Cleaning
- Regularly clean the ventilation slots to prevent overheating. Use compressed air to blow out dust and debris.
- Wipe the exterior of the tool with a soft, damp cloth. Do not use harsh chemicals or abrasive cleaners.
- Inspect the power cord for cuts, fraying, or damage. Replace if necessary.
6.2 Carbon Brush Replacement
The carbon brushes are wear items and will need replacement over time. Your grinder comes with a spare set of carbon brushes.
- Unplug the tool from the power source.
- Locate the brush caps on the sides of the motor housing.
- Unscrew the brush caps using a screwdriver or coin.
- Carefully remove the old carbon brushes.
- Insert the new carbon brushes, ensuring they slide in smoothly.
- Replace and tighten the brush caps.
- After replacement, run the grinder without load for a few minutes to allow the new brushes to seat properly.
7. Troubleshooting
Refer to the table below for common issues and their potential solutions. If the problem persists, contact qualified service personnel.
| Problem | Possible Cause | Solution |
|---|---|---|
| Grinder does not start. | No power supply; faulty switch; worn carbon brushes. | Check power connection and outlet. Ensure switch is "ON". Inspect and replace carbon brushes if worn. |
| Excessive vibration during operation. | Damaged or improperly installed disc; loose auxiliary handle. | Inspect disc for damage and replace if necessary. Reinstall disc correctly. Tighten auxiliary handle. |
| Motor overheats. | Blocked ventilation slots; continuous heavy load. | Clean ventilation slots. Reduce load and allow the tool to cool. |
| Reduced performance or sparking from motor. | Worn carbon brushes. | Replace carbon brushes as per maintenance instructions. |
8. Technical Specifications
The following are the technical specifications for the Ingco 9-inch 3000W Angle Grinder AG30008:
| Feature | Specification |
|---|---|
| Brand | Ingco |
| Model | AG30008 |
| Power Input | 3000 Watts |
| Voltage | 220-240V~50/60Hz |
| No Load Speed | 6300 rpm |
| Spindle Thread | M14 |
| Disk Diameter | 220mm (9 inches) |
| Item Weight | 3.99 Kilograms (approx. 8.8 Pounds) |
| Product Dimensions | 30 x 20 x 10 cm |
| Material | Metal |
| Color | Yellow And Black |
| Included Accessories | 1 Auxiliary Handle, 1 set of Carbon Brushes |
9. Warranty and Support
Ingco products are manufactured to high-quality standards. For warranty information, please refer to the warranty card included with your purchase or consult your retailer. Keep your proof of purchase for any warranty claims.
For technical support, spare parts, or service inquiries, please contact your local Ingco authorized service center or the retailer where the product was purchased. Provide the model number (AG30008) and serial number (if applicable) when seeking assistance.


