1. Introduction
This user manual provides comprehensive instructions for the installation, operation, and maintenance of your ASUS Prime H510M-K R2.0 motherboard. Designed for Intel LGA 1200 socket processors (10th and 11th Gen Intel Core), this Micro ATX motherboard offers essential features for building a reliable personal computer system, including PCIe 4.0 support, an M.2 slot, and robust connectivity options.
Please read this manual thoroughly before installing or using the motherboard to ensure proper setup and to avoid any potential damage.

Image: The ASUS Prime H510M-K R2.0 motherboard displayed alongside its retail box, showcasing the product's design and branding.
2. Safety Information
Adhering to safety precautions is crucial when handling computer components to prevent personal injury and damage to the hardware. Always follow these guidelines:
- Power Disconnection: Before performing any installation or maintenance, ensure your computer is completely powered off and unplugged from the wall outlet.
- Electrostatic Discharge (ESD) Prevention: ESD can damage sensitive electronic components. Always use an anti-static wrist strap or frequently touch a grounded metal object (like an unpainted part of your computer case) before handling the motherboard or other components.
- Proper Handling: Hold the motherboard by its edges and avoid touching integrated circuits, pins, or connectors directly.
- Ventilation: Ensure adequate airflow within your PC case to prevent overheating of components.
- Environmental Conditions: Do not expose the motherboard to moisture, dust, or extreme temperatures. Operate it within recommended environmental specifications.
- Component Compatibility: Always verify the compatibility of all components (CPU, RAM, GPU, PSU) with your motherboard before installation.
3. Package Contents
Upon opening your ASUS Prime H510M-K R2.0 motherboard package, please verify that all the following items are included. If any item is missing or damaged, contact your point of purchase immediately.
- ASUS Prime H510M-K R2.0 Motherboard
- User Guide / Manual
- I/O Shield (Rear Input/Output Panel Shield)
- SATA 6Gb/s Data Cables (typically two cables)
- M.2 Anchor/Screw Package (for securing M.2 SSDs)

Image: The ASUS Prime H510M-K R2.0 motherboard displayed with its retail box, user guide, two SATA cables, and an M.2 anchor. This image provides a visual representation of the typical contents found within the product packaging.
4. Setup and Installation
4.1 Motherboard Layout and Components
Familiarize yourself with the various components and connectors on your motherboard before beginning installation.
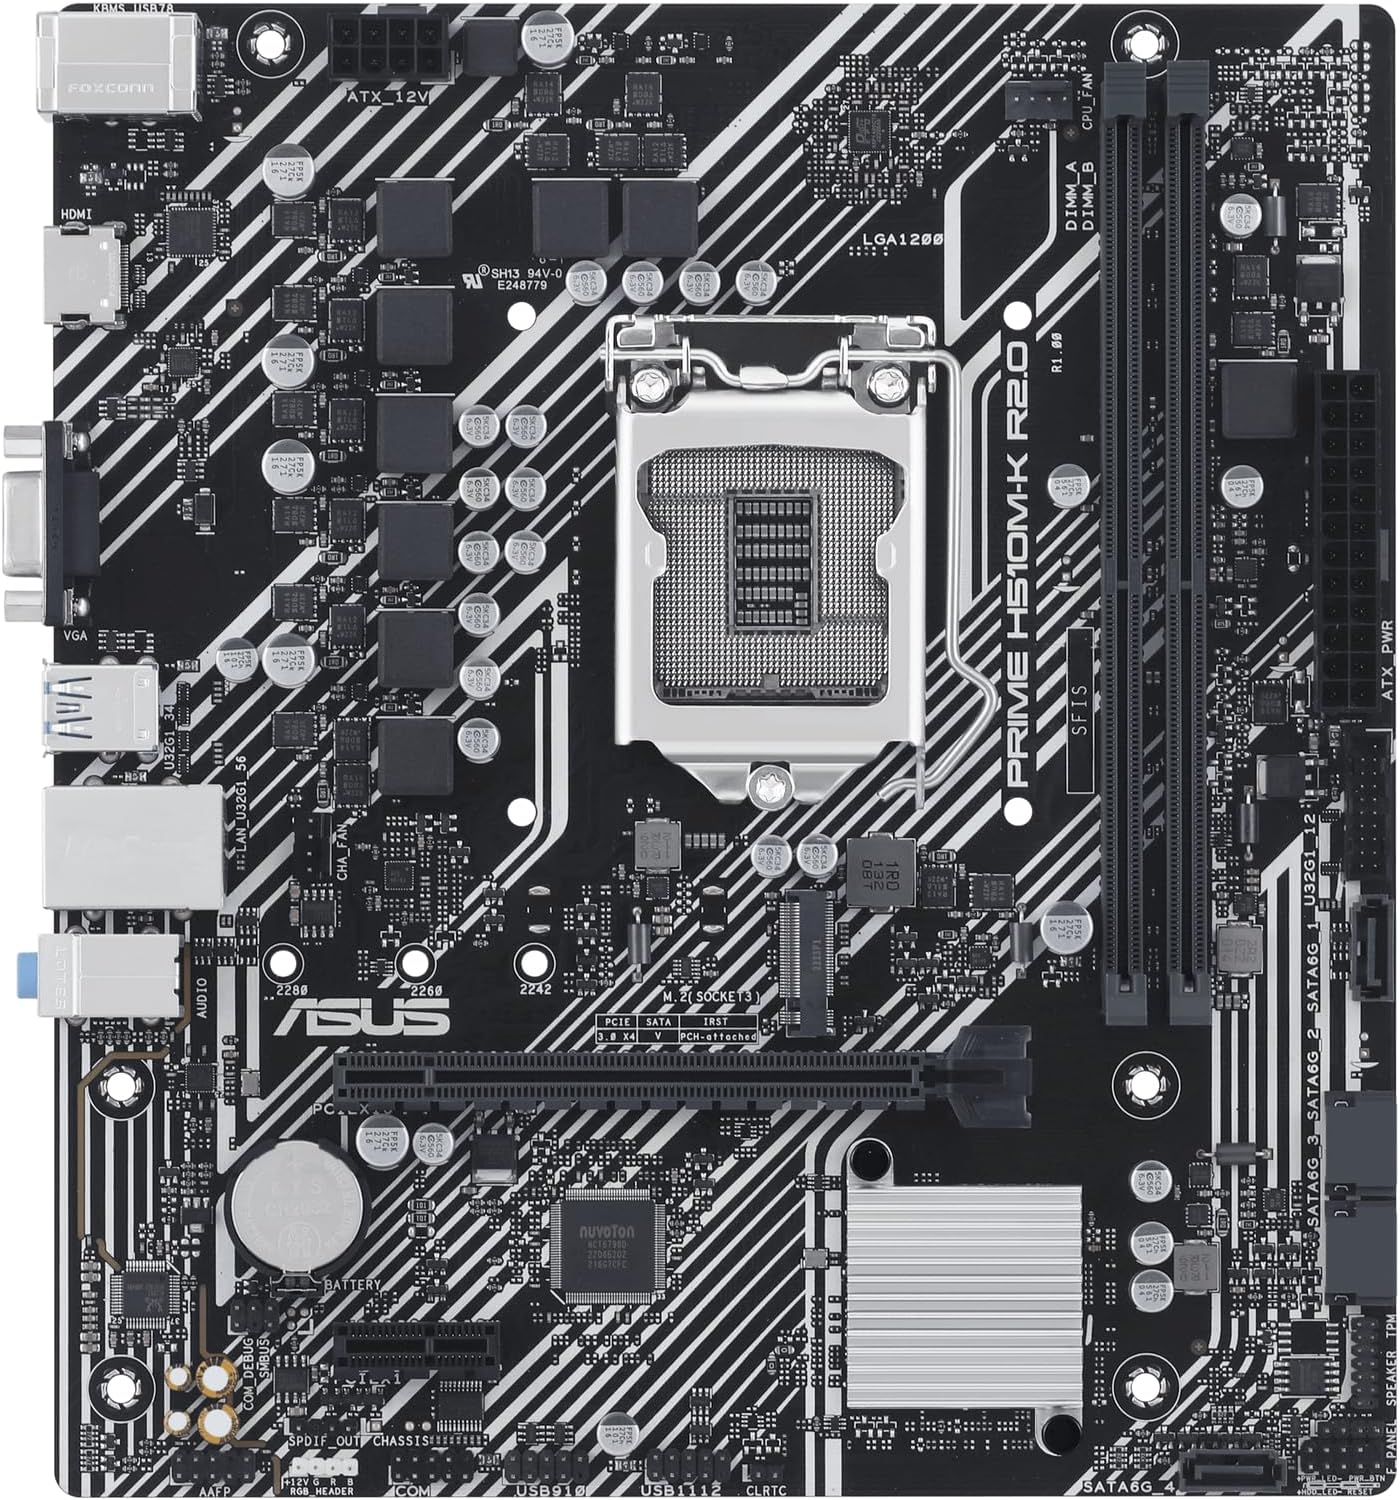
Image: A detailed top-down view of the ASUS Prime H510M-K R2.0 motherboard, highlighting key components such as the LGA 1200 CPU socket, two DDR4 memory slots, the PCIe x16 slot, and various onboard headers and chips.
4.2 Installing the CPU (Processor)
The ASUS Prime H510M-K R2.0 supports Intel LGA 1200 socket processors (10th and 11th Generation Intel Core, Pentium Gold, and Celeron processors).
- Locate the LGA 1200 CPU socket on the motherboard.
- Gently push down the load lever located next to the socket and pull it outwards to release the socket's metal load plate.
- Carefully remove the plastic protective cover from the socket.
- Align the triangular mark (or arrow) on your CPU with the corresponding mark on the CPU socket. Ensure the two notches on the sides of the CPU align with the keys on the socket.
- Gently place the CPU into the socket. Do not force it; the CPU should sit flat without resistance.
- Close the metal load plate over the CPU and push the load lever back into its original position until it clicks securely.
- Apply a thin, even layer of thermal paste to the top of the CPU (if not pre-applied to your cooler) and install your CPU cooler according to its manufacturer's instructions.
4.3 Installing System Memory (RAM Modules)
This motherboard supports DDR4 memory modules. For optimal performance, refer to the motherboard's Qualified Vendor List (QVL) for compatible memory kits on the ASUS support website.
- Open the clips at both ends of the DIMM slot(s) you intend to use.
- Align the notch on the memory module with the key in the DIMM slot.
- Insert the memory module firmly into the slot with even pressure on both ends until the clips snap into place, securing the module.
4.4 Installing M.2 Storage Device
The motherboard features one M.2 slot that supports PCIe 3.0 x4 and SATA M.2 SSDs.
- Locate the M.2 slot. If a pre-installed M.2 screw or standoff is present, remove it.
- Insert the M.2 SSD into the slot at approximately a 30-degree angle, ensuring the gold contacts are fully seated.
- Gently push down the M.2 SSD until it lies flat, and secure it with the M.2 screw/anchor provided in your package.
4.5 Connecting Peripherals and Power Supply
Connect your power supply unit (PSU), storage drives, and front panel connectors to the motherboard.
- ATX Power Connectors: Connect the 24-pin ATX main power cable and the 8-pin ATX 12V CPU power cable from your PSU to the corresponding connectors on the motherboard. Ensure they are fully seated.
- SATA Devices: Connect SATA data cables from your storage drives (HDDs/SSDs) to the SATA 6Gb/s ports on the motherboard. Connect power cables from your PSU to the drives.
- Front Panel Connectors: Connect the power switch, reset switch, HDD LED, and power LED cables from your PC case to the front panel header (F_PANEL). Refer to the detailed pin assignments in the full user manual for correct orientation.
- USB Headers: Connect front panel USB 2.0 and USB 3.2 Gen 1 cables from your case to the respective USB headers on the motherboard.
- Audio Header: Connect the front panel audio cable from your case to the AAFP (Front Panel Audio) header.
- Rear I/O Panel: Install the I/O shield into your PC case's rear opening before installing the motherboard. Connect your monitor, keyboard, mouse, and other peripherals to the appropriate ports on the rear I/O panel.
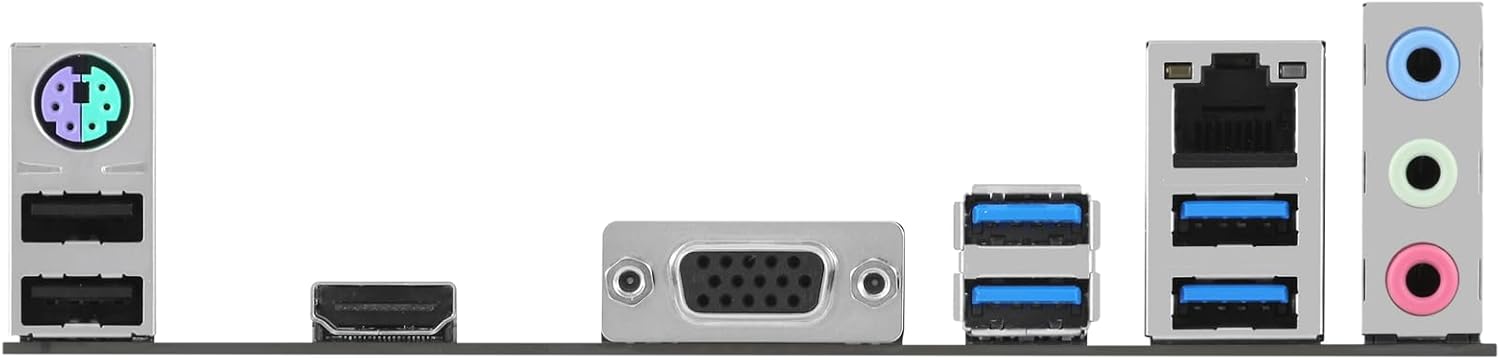
Image: The rear input/output (I/O) panel of the ASUS Prime H510M-K R2.0 motherboard, displaying various connectivity ports including PS/2 ports for keyboard/mouse, multiple USB ports, VGA, HDMI, an Ethernet port, and audio jacks.
5. Operating Instructions
5.1 Initial Boot-up and BIOS/UEFI Setup
- After completing all hardware installations, connect your monitor, keyboard, and mouse to the appropriate ports.
- Connect the power cord to your PSU and turn on the power switch on the PSU.
- Press the power button on your PC case.
- During the Power-On Self-Test (POST) process, repeatedly press the DEL key or F2 key on your keyboard to enter the BIOS/UEFI setup utility.
- In the BIOS/UEFI, you can configure various system settings such as boot order, system time, enable/disable integrated peripherals, and monitor system status (temperatures, voltages).
- After making any desired changes, save your settings and exit the BIOS/UEFI to continue booting.
5.2 Operating System Installation
Once the BIOS/UEFI is configured, you can proceed with installing your preferred operating system (e.g., Windows 10, Windows 11) from a bootable USB drive or DVD. Ensure your boot device is set as the primary boot option in the BIOS/UEFI.
5.3 Driver Installation
After the operating system is installed, it is crucial to install the necessary drivers for your motherboard's components. These include chipset drivers, audio drivers, LAN (Ethernet) drivers, and any integrated graphics drivers (if applicable). Drivers ensure optimal performance, stability, and functionality of your hardware.
You can obtain the latest drivers and utilities from the official ASUS support website for the PRIME H510M-K R2.0 model. It is recommended to download drivers directly from the manufacturer's website for the most up-to-date and compatible versions.
Official ASUS Support Page: https://www.asus.com/support/download/1/45/PRIME_H510M-K_R2.0/
6. Maintenance
Regular maintenance helps ensure the longevity and stable operation of your motherboard and overall system.
- Dust Cleaning: Periodically clean dust from inside your PC case, especially from fans, heatsinks, and motherboard surfaces. Use compressed air or a soft brush. Always power off and unplug your system before cleaning.
- BIOS Updates: Check the ASUS support website for BIOS (Basic Input/Output System) or UEFI (Unified Extensible Firmware Interface) updates. BIOS updates can improve system stability, compatibility with new hardware, and performance. Follow ASUS's instructions carefully when performing a BIOS update to avoid potential issues.
- Driver Updates: Keep your operating system and hardware drivers updated. Outdated drivers can lead to performance issues or instability.
- Cable Management: Ensure internal cables are neatly managed to improve airflow and prevent obstruction of components.
7. Troubleshooting
This section provides solutions to common issues you might encounter. For more complex problems, refer to the comprehensive user manual on the ASUS support website or contact technical support.
- No Power / System Not Turning On:
- Verify that the 24-pin ATX and 8-pin CPU power cables are securely connected to the motherboard and the power supply unit.
- Ensure the power supply unit's main switch is in the "ON" position.
- Check the front panel power button connection to the motherboard's F_PANEL header.
- Test the power supply with another system or a PSU tester if available.
- No Display Output:
- Ensure your monitor is connected to the correct video output port (either on the motherboard for integrated graphics or on your discrete graphics card).
- Reseat the RAM modules firmly in their slots. Try booting with only one RAM stick.
- If using a discrete graphics card, ensure it is properly seated in the PCIe slot and any required PCIe power cables are connected from the PSU.
- Clear the CMOS (Complementary Metal-Oxide-Semiconductor) by removing the motherboard battery for a few minutes or using the CLRTC jumper (refer to full manual).
- System Instability / Random Crashes:
- Check CPU and GPU temperatures using monitoring software. Ensure cooling solutions are properly installed and fans are spinning.
- Run memory diagnostic tools (e.g., Windows Memory Diagnostic) to check for faulty RAM modules.
- Ensure all drivers and the BIOS are updated to the latest stable versions.
- Verify that your power supply unit provides sufficient wattage for all your components.
- Device Not Detected (e.g., SSD, HDD, USB device):
- Ensure the device is properly connected (data and power cables for SATA, fully seated for M.2).
- Check BIOS settings to ensure the relevant SATA ports or M.2 slot are enabled.
- Install or update the necessary drivers for the device.
8. Specifications
Below are the key technical specifications for the ASUS Prime H510M-K R2.0 motherboard:
| Feature | Specification |
|---|---|
| Brand | ASUS |
| Model Name | PRIME H510M-K R2.0 |
| CPU Socket | LGA 1200 |
| Compatible Processors | 10th and 11th Gen Intel Core, Pentium Gold, Celeron Processors |
| Chipset Type | Intel H510 |
| RAM Memory Technology | DDR4 |
| Memory Slots | 2 x DIMM, Max. 64GB, DDR4 3200(OC)/2933/2800/2666/2400/2133 MHz Non-ECC, Un-buffered Memory |
| Expansion Slots | 1 x PCIe 4.0/3.0 x16 (11th Gen Intel CPUs support PCIe 4.0 x16, 10th Gen support PCIe 3.0 x16), 2 x PCIe 3.0 x1 |
| Storage | 1 x M.2 slot (Key M, type 2242/2260/2280, supports PCIe 3.0 x4 & SATA modes), 4 x SATA 6Gb/s ports |
| Video Output | 1 x D-Sub (VGA), 1 x HDMI 1.4/2.1 |
| USB Ports (Rear) | 2 x USB 3.2 Gen 1 ports, 4 x USB 2.0 ports |
| USB Ports (Internal) | 1 x USB 3.2 Gen 1 header (supports 2 additional USB 3.2 Gen 1 ports), 2 x USB 2.0 headers (supports 4 additional USB 2.0 ports) |
| Ethernet | 1 x Realtek 1Gb Ethernet |
| Audio | Realtek ALC887/897 7.1-Channel High Definition Audio CODEC |
| Form Factor | Micro ATX (8.9 inch x 8.0 inch / 22.6 cm x 20.3 cm) |
| Platform | Windows 10 64-bit, Windows 11 64-bit |
Note: Specifications are subject to change without notice. For the most accurate and up-to-date information, please refer to the official ASUS product page.
9. Warranty and Support
ASUS provides a limited warranty for its products. The specific terms, conditions, and duration of the warranty period may vary based on your region and local regulations. It is highly recommended to review the warranty card included with your product or visit the official ASUS website for detailed warranty information applicable to your purchase.
For technical assistance, driver downloads, frequently asked questions (FAQs), and other support resources, please visit the comprehensive ASUS support website:
When contacting ASUS customer service or technical support, please have your product's full model name (ASUS Prime H510M-K R2.0) and serial number readily available to expedite the support process.