Introduction
This manual provides detailed instructions for the safe and efficient operation, maintenance, and troubleshooting of your Singer 1120 sewing machine. Please read this manual thoroughly before using the machine to ensure proper setup and to maximize your sewing experience.
Important Safety Instructions
When using an electrical appliance, basic safety precautions should always be followed, including the following:
- Read all instructions before using this sewing machine.
- Keep fingers away from all moving parts. Special care is required around the sewing machine needle.
- Always use the proper needle plate. The wrong plate can cause the needle to break.
- Do not pull or push fabric while stitching. It may deflect the needle, causing it to break.
- Turn the power switch to 'O' (off) when making any adjustments in the needle area, such as threading the needle, changing the needle, threading the bobbin, or changing the presser foot.
- Always unplug the sewing machine from the electrical outlet when removing covers, lubricating, or when making any other user servicing adjustments mentioned in the instruction manual.
- Never operate this sewing machine if it has a damaged cord or plug, if it is not working properly, or if it has been dropped or damaged.
Setup
Accessories
Your Singer 1120 sewing machine comes with standard accessories and may have optional accessories available.
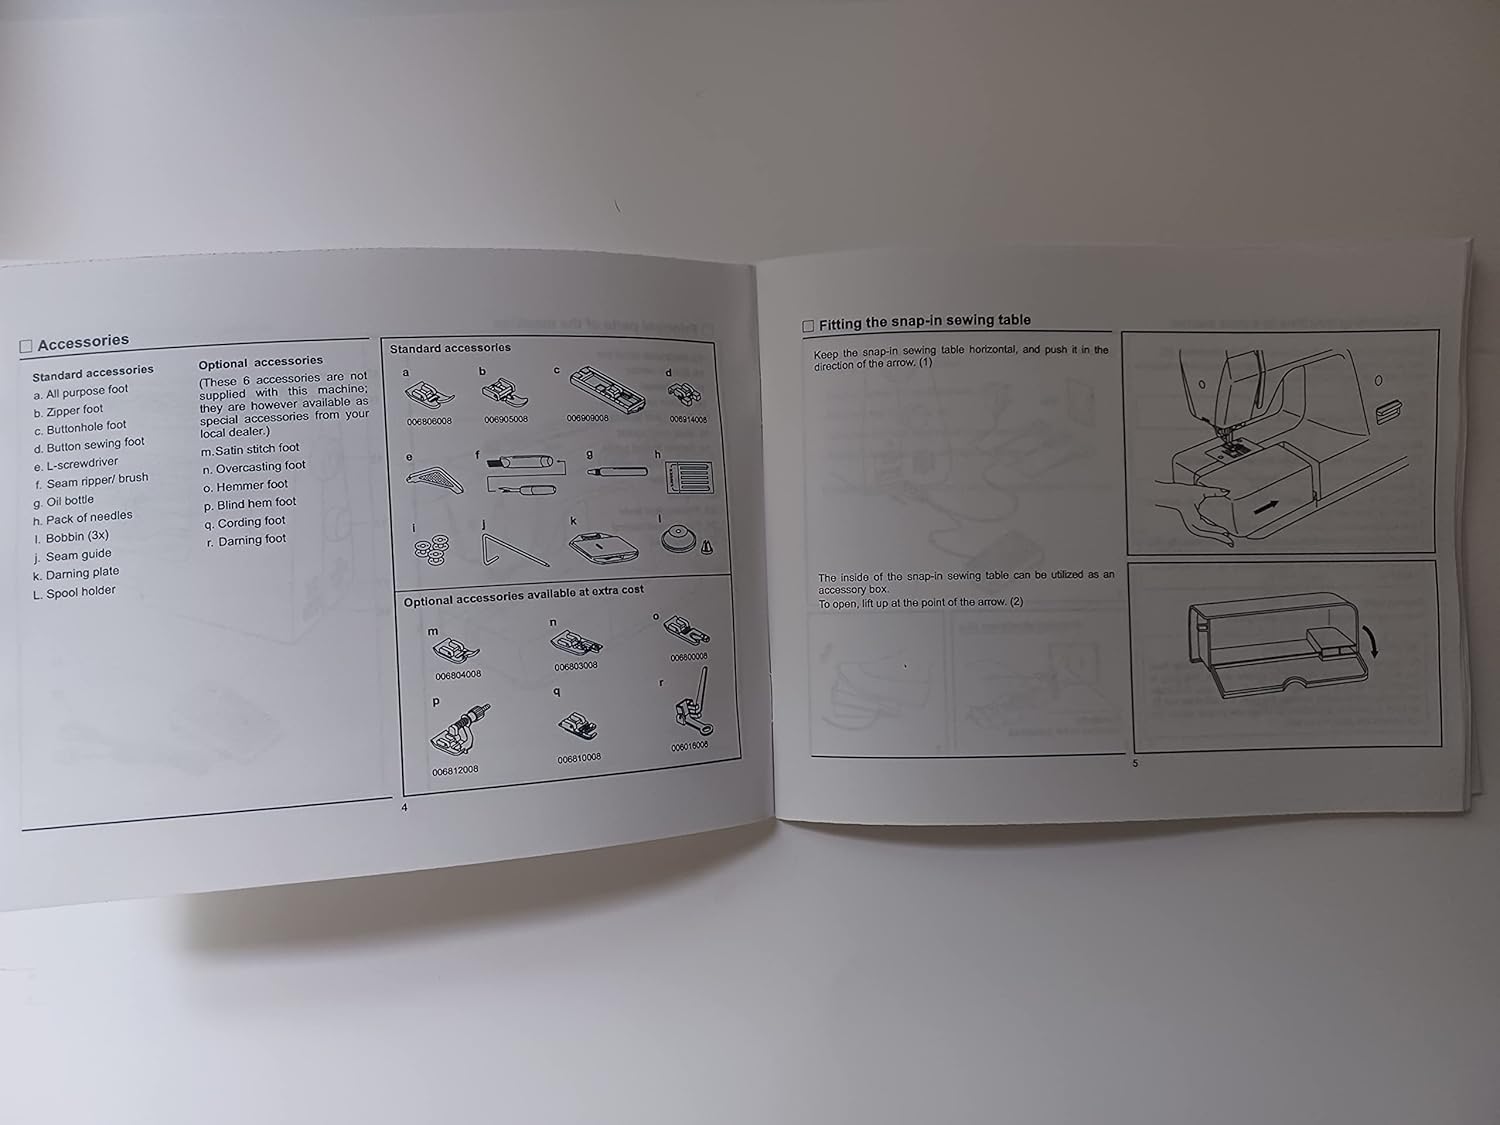
Standard Accessories
- All purpose foot
- Zipper foot
- Buttonhole foot
- Button sewing foot
- Screwdriver
- Seam ripper/brush
- Oil bottle
- Pack of needles
- Bobbin (3x)
- Seam guide
- Darning plate
- Spool holder
Optional Accessories (available at extra cost)
- Cording foot
- Blind hem foot
- Gathering foot
- Darning foot
Attaching the Presser Foot Holder
- Raise the needle to its highest position.
- Attach the presser foot holder (h) to the presser bar (k) as illustrated.
Attaching the Presser Foot
- Raise the presser foot.
- Line up the presser foot (a) with the slot in the presser foot holder (h).
- Lower the presser foot lever (g) and the presser foot (a) will engage automatically.
Removing the Presser Foot
- Raise the presser foot.
- Press the lever (e) and the presser foot (a) will disengage.
Fitting the Snap-in Sewing Table
Keep the snap-in sewing table horizontal, and push it in the direction of the arrow (1). The inside of this snap-in sewing table can be utilized as an accessory box. To open, pull up at the point of the arrow (2).
Operation
Automatic Needle Threader
The automatic needle threader is a factory-installed option. If your machine has this option, use the following instructions:
- Raise the needle to its highest position.
- Press lever (A) down as far as it will go.
- The threader automatically swings to the threading position (B).
- Pass thread around guide (C).
- Pass the thread in front of the needle around the hook (D) from bottom to top.
- Release lever (A).
- Pull the thread through the needle eye.
Attention: Turn power switch to 'O' (off) when carrying out any of the above operations.

Thread Tension
Upper Thread Tension
Basic thread tension setting: "4". To increase tension, turn the dial to the next number up. To reduce tension, turn the dial to the next number down. A. Thread tension too loose for straight stitch sewing. B. Thread tension too loose for straight stitch sewing. Turn dial to a higher number. C. Thread tension too tight for straight stitch sewing. Turn dial to a lower number. D. Normal thread tension for zig zag and decorative sewing. The upper thread tension should be just visible on the bottom side of the fabric.
Lower Thread Tension
To check lower thread tension, remove the bobbin case and bobbin and hold it by suspending by the thread. Jerk it once or twice. If the tension is correct, the thread will unwind about an inch or two. If the tension is too tight, it does not unwind. If the tension is too loose, it unwinds too freely. Adjust the screw on the side of the bobbin case.
Important Note:
- Proper setting of tension is important for good sewing.
- Normal upper thread tension setting is appropriate for all stitch functions. Thread on bobbin.
- The same type and weight of thread (both top and bottom) is usually only desirable for straight stitch sewing.
- 90% of all sewing will be between "3" and "5". "4" is basic setting.
- For zig zag and decorative sewing stitch functions, thread tension should be just visible on the bottom side of the fabric.
- For decorative sewing you will always obtain a nicer stitch and less fabric puckering when the upper thread appears on the bottom side of your fabric.
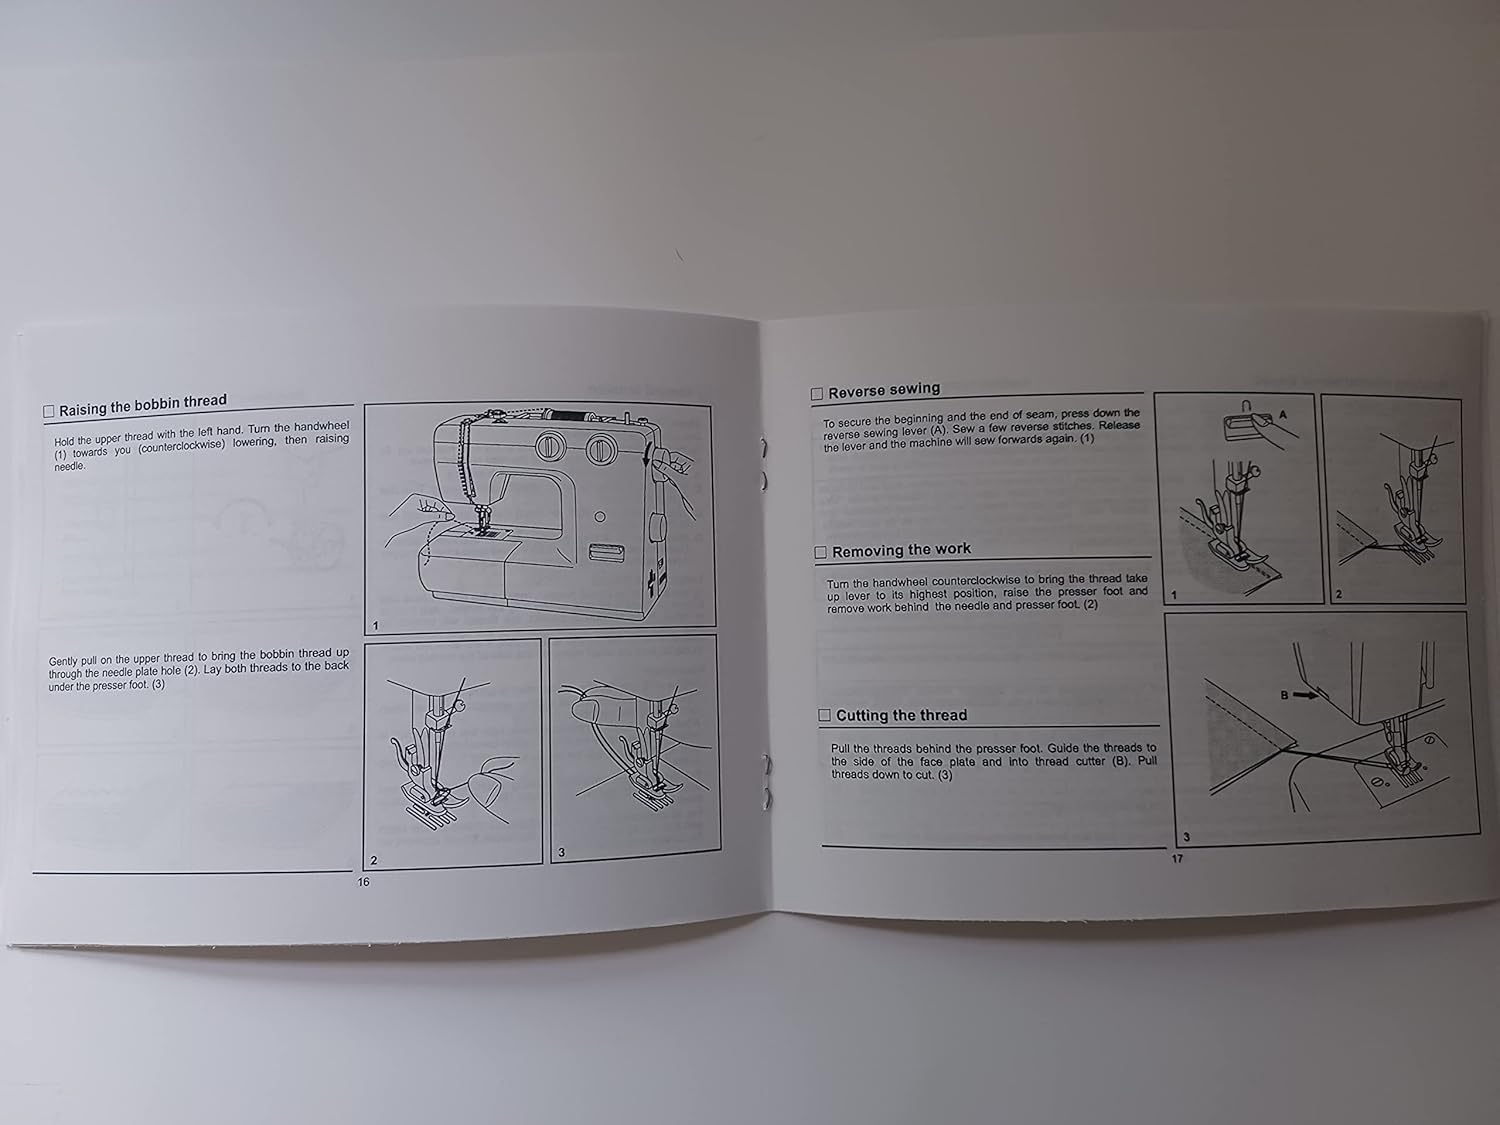
Raising the Bobbin Thread
- Hold the upper thread with the left hand. Turn the handwheel (1) towards you (counterclockwise), lowering then raising needle.
- Gently pull on the upper thread to bring the bobbin thread up through the needle plate hole (2).
- Lay both threads to the back under the presser foot (3).
Reverse Sewing
To secure the beginning and the end of seam, press down the reverse sewing lever (A). Sew a few reverse stitches. Release the lever and the machine will sew forwards again (1).
Removing the Work
Turn the handwheel counterclockwise to bring the thread take up lever to its highest position, raise the presser foot and remove work behind the needle and presser foot (2).
Cutting the Thread
Pull the threads behind the presser foot. Guide the threads to the side of the face plate and into thread cutter (B). Pull threads down to cut (3).
Matching Needle, Fabric, and Thread Selection Guide
Selecting the correct needle, fabric, and thread combination is crucial for optimal sewing results. Refer to the table below for guidance.
| Needle Size | Fabric | Thread |
|---|---|---|
| 9-11 (70-80) | Lightweight fabrics (tricot, chiffon, voile, organdy, jersey, crepe, cotton wrapped polyester, shirt & blouse fabrics) | Light-duty thread (cotton, nylon, polyester, cotton wrapped polyester) |
| 11-14 (80-90) | Medium weight fabrics (cotton, satin, knitwear, double knits, lightweight woolens) | Most threads sold are medium size and suitable for these fabrics and needle sizes. Use polyester or cotton wrapped polyester or cotton on natural woven fabrics for best results. Always use the same thread on top and bobbin. |
| 14 (90) | Medium weight fabrics (cotton duck, woolens, heavier knits, corduroy, denim) | |
| 16 (100) | Heavyweight fabrics (canvas, woolens, outdoor tent and quilted fabrics, drapery, upholstery, leatherette (right to left)) | Heavy duty thread, carpet thread. (Use heavy foot/pressure-large numbers.) |
| 18 (110) | Heavyweight fabrics (canvas, upholstery fabrics, some leathers and vinyls) |
IMPORTANT: Match needle size to thread size and weight of fabric.
Needle Details
| Needles | Explanation | Type of Fabric |
|---|---|---|
| SINGER 2020 | Standard sharp needle. Sizes range from 9 (70) to 18 (110). | Natural woven fabrics (wool, cotton, silk, etc.). General purpose. |
| SINGER 2045 | Stretch/ball point needle. Sizes 9 (70) to 18 (110). | Natural and synthetic woven fabrics, polyester blends, knits, interlock, tricot, single and double knits. Avoid sweater knits, lycra, stretch terry. |
| SINGER 2025 | Twin Needle. | Woven fabrics and knits. |
| SINGER 2032 | Leather Needle. Sizes 12 (80) to 18 (110). | Leather, vinyl, upholstery. (Leaves smaller hole than standard large needle.) |
Note twin needles:
- Twin needles can be purchased for utility and decorative work.
- When using twin needles, the stitch width dial should be set at less than "3".
- For best sewing results always use genuine SINGER needles.
- Replace needle often (approximately every other garment) and/or at first thread breakage or skipped stitches.
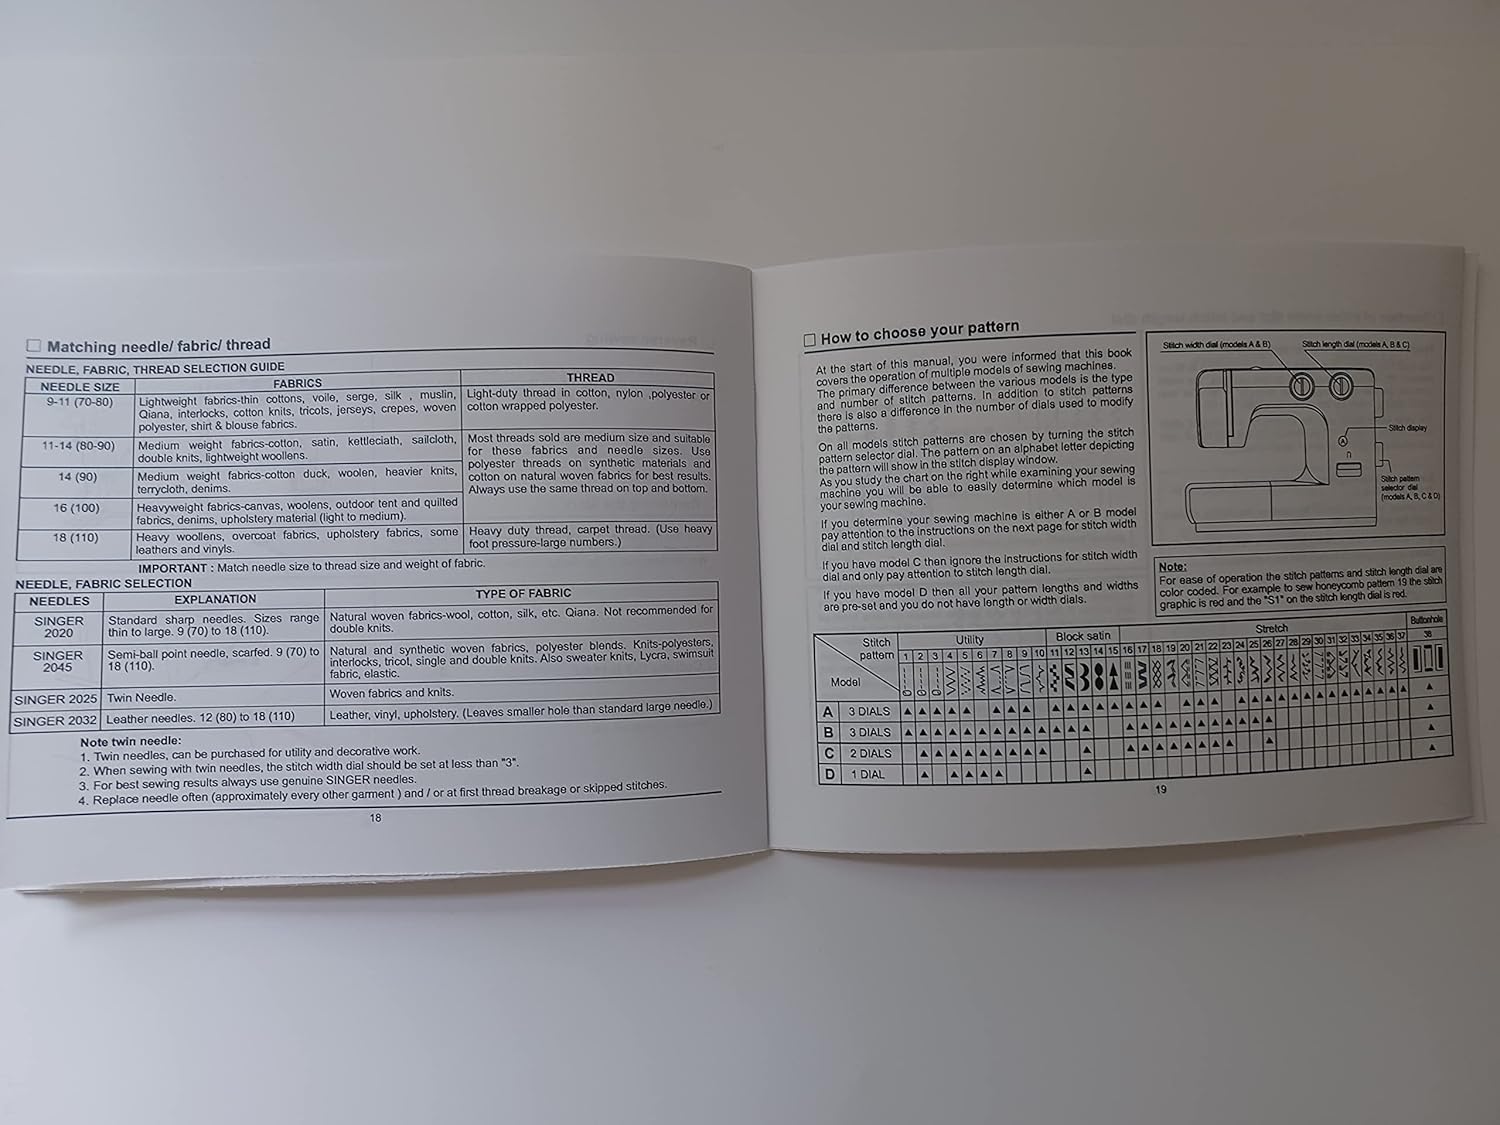
How to Choose Your Pattern
At the start of this manual, you were informed that this book covers the models A, B, C, and D sewing machines. The main difference between the various models is the type and number of stitch patterns available. The stitch pattern is selected by turning the stitch pattern selector dial. As you study the chart on the right while examining your machine, you will be able to determine which model is your sewing machine.
If you determine your sewing machine is either A or B model, you will find the instructions on the next page for stitch width and dial. If you determine your sewing machine is C or D model, you will find the instructions for stitch width dial and only pay attention to stitch length dial. If you have model D then all your patterns on the right are provided and do not have stitch width dials.
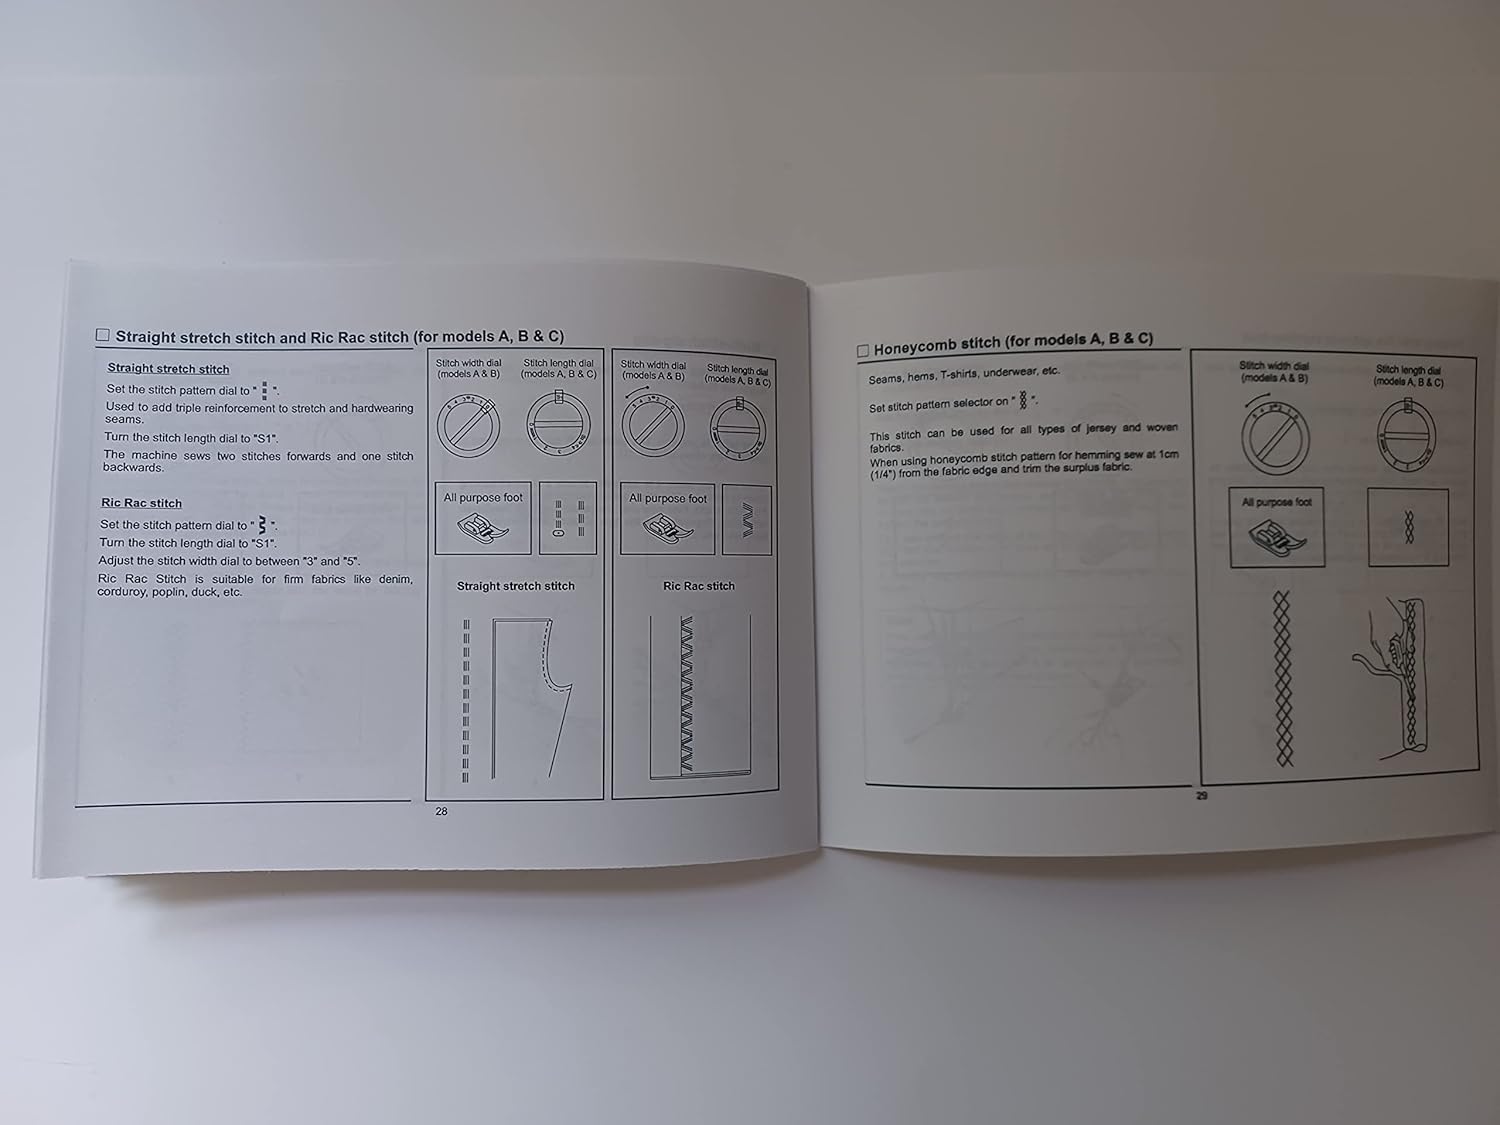
Straight Stitch and Ric Rac Stitch (for models A, B & C)
Straight Stitch
- Set the stitch pattern dial to straight stitch symbol.
- Used to add triple reinforcement to stitch and hardwearing seams.
- Turn the stitch length dial to "S1".
- The machine sews two stitches forwards and one stitch backwards.
Ric Rac Stitch
- Set the stitch pattern dial to Ric Rac symbol.
- Turn the stitch length dial to "2".
- The stitch width dial should be between "2" and "5".
- Ric Rac stitch is suitable for firm fabrics like denim, corduroy, poplin, duck, etc.
Honeycomb Stitch (for models A, B & C)
- Seams, hems, T-shirts, underwear, etc.
- Set stitch pattern selector to honeycomb symbol.
- This stitch can be used for all types of jersey and woven fabrics.
- When using honeycomb stitch pattern for hemming, sew at 1cm (1/4") from the fabric edge and trim the surplus fabric.
Maintenance
Regular maintenance ensures the longevity and optimal performance of your Singer 1120 sewing machine.
Cleaning
- Always unplug the machine before cleaning.
- Remove the needle plate and clean out any lint or dust accumulation in the bobbin area with a brush.
- Wipe the exterior of the machine with a soft, dry cloth. Do not use harsh chemicals or abrasive cleaners.
Lubrication
Your Singer 1120 sewing machine is designed to require minimal lubrication. Refer to the original manual for specific oiling points if necessary. Over-oiling can attract dust and lint, leading to machine issues.
Troubleshooting
This section addresses common issues you might encounter with your Singer 1120 sewing machine. For more complex problems, consult a qualified service technician.
| Problem | Possible Cause | Solution |
|---|---|---|
| Skipped Stitches | Incorrect needle, bent needle, needle inserted incorrectly, improper threading, wrong needle/fabric combination. | Change needle, re-thread machine, ensure correct needle type for fabric. |
| Thread Breakage (Upper) | Improper threading, tension too tight, poor quality thread, bent needle, burr on needle plate. | Re-thread machine, adjust upper tension, use good quality thread, change needle, check needle plate for damage. |
| Thread Breakage (Lower) | Improper bobbin winding, bobbin inserted incorrectly, lint in bobbin case, tension too tight. | Re-wind bobbin, re-insert bobbin correctly, clean bobbin case, adjust bobbin tension. |
| Fabric Puckering | Tension too tight, incorrect stitch length, wrong needle size for fabric. | Adjust tension, adjust stitch length, use appropriate needle. |
| Machine Not Starting | Power cord not plugged in, foot control not connected, power switch off. | Check power connections, ensure switch is on. |
Specifications
- Product Dimensions: 0.1 x 5.5 x 8.5 inches (Manual dimensions)
- Item Weight: 3 ounces (Manual weight)
- Manufacturer: TabSynth Design Works (Publisher of this reproduction manual)
- Item Model Number: 1120 (Sewing Machine Model this manual is for)
Note: These specifications pertain to the reproduction manual itself, except for the 'Item Model Number' which refers to the sewing machine model.
Warranty and Support
This document is a reproduction of the original Singer 1120 sewing machine instruction manual. For specific warranty information regarding your Singer 1120 sewing machine, please refer to the documentation provided with your original machine or contact Singer customer support directly. For support related to this reproduction manual, please contact TabSynth Design Works.


