1. Introduction
This manual provides detailed instructions for the assembly, operation, and maintenance of your National Geographic Sky View 70mm Refractor Telescope. Designed for both adults and children, this telescope allows for observation of celestial objects such as the Moon, planets, and brighter deep-sky objects, as well as terrestrial viewing. Please read these instructions carefully before using your telescope to ensure proper setup and optimal viewing experience.
The National Geographic Sky View 70mm Refractor Telescope features a 70mm aperture and a 400mm focal length, providing versatile viewing capabilities. It includes multiple magnification options and a smartphone adapter for basic astrophotography.

Image 1.1: The National Geographic Sky View 70mm Refractor Telescope is suitable for observing a variety of subjects, from celestial bodies to terrestrial landscapes and wildlife.
2. Package Contents
Before beginning assembly, please verify that all components listed below are present in your package:
- 70mm Refractor Telescope Optical Tube
- Adjustable Aluminum Tripod with Accessory Tray
- Altazimuth Mount with Panhandle Control
- Straight-Through Viewfinder
- Diagonal Eyepiece Holder (1.25")
- K10mm Eyepiece (1.25")
- K25mm Eyepiece (1.25")
- 3x Barlow Lens (1.25")
- Smartphone Adapter
- Storage / Travel Bag

Image 2.1: All components included in the telescope package, numbered for reference: 1. 70mm refractor telescope, 2. Straight-through viewfinder, 3. Diagonal for comfortable viewing, 4. K10mm eyepiece, 5. K25mm eyepiece, 6. Barlow lens, 7. Smartphone adapter, 8. Storage/travel bag, 9. Accessory tray, 10. Aluminum adjustable tripod.
3. Assembly Instructions
Follow these steps to assemble your telescope:
- Set up the Tripod:
Unfold the tripod legs and extend them to your desired height. Secure the legs using the locking clamps. Attach the accessory tray to the center brace of the tripod. Ensure the tripod is stable on a flat surface.

Image 3.1: The tripod base with the circular accessory tray, designed to hold eyepieces and other small items.

Image 3.2: The adjustable tripod offers a height range of 21 to 48 inches, providing stability and an accessory tray for convenience. The panhandle mount allows for smooth 360-degree horizontal and 180-degree vertical adjustments.
- Attach the Telescope Optical Tube:
Locate the mounting screw on the altazimuth mount head. Align the telescope optical tube with the mount and secure it using the screw. Ensure it is firmly attached but do not overtighten.
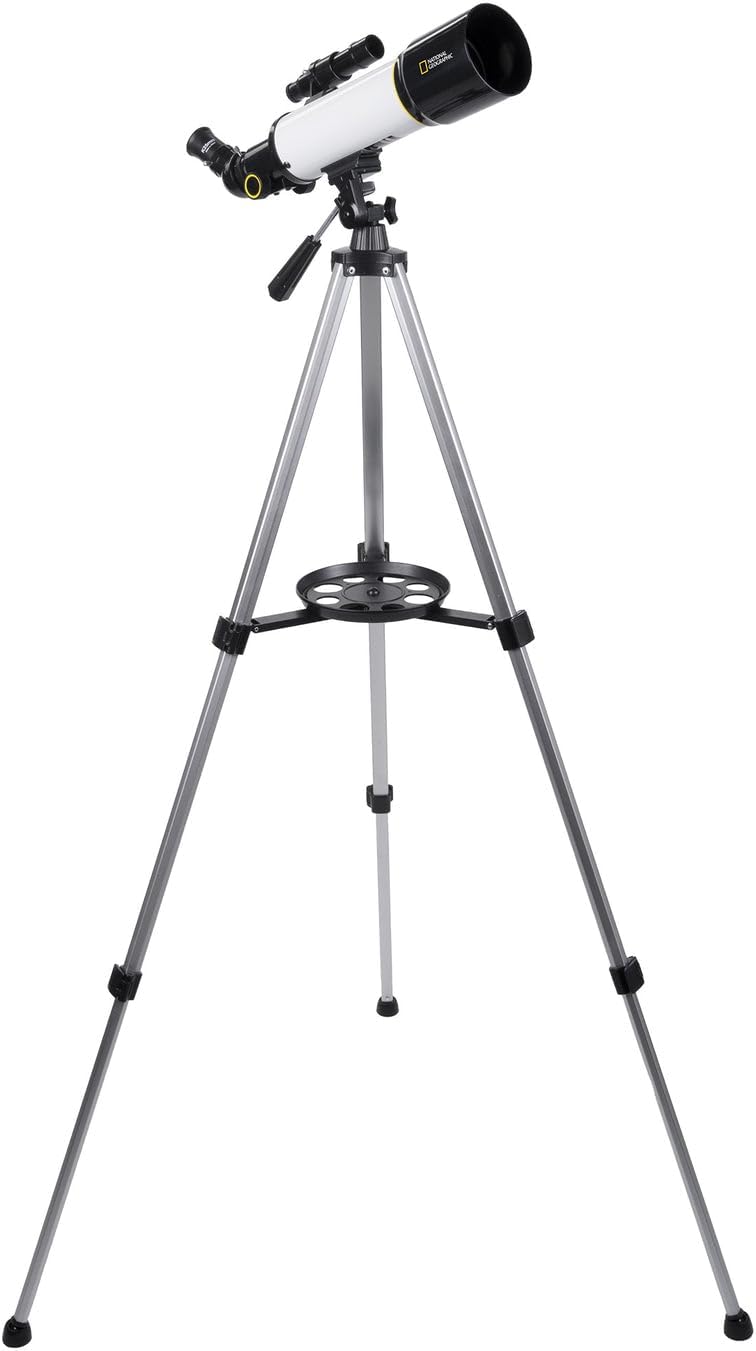
Image 3.3: The telescope optical tube mounted securely on the tripod, demonstrating the complete assembly.
- Install the Viewfinder:
Slide the straight-through viewfinder into its bracket on the telescope tube. Tighten the small screws on the bracket to hold it in place. The viewfinder is crucial for locating objects before observing them through the main telescope.

Image 3.4: The straight-through viewfinder, an essential component for quickly aiming the telescope at desired objects.
- Insert the Diagonal and Eyepiece:
Insert the diagonal eyepiece holder into the focuser tube of the telescope. Secure it with the small thumbscrew. Then, insert your chosen eyepiece (e.g., K25mm or K10mm) into the diagonal and secure it with its thumbscrew. The diagonal provides a more comfortable viewing angle.
- Attach the Smartphone Adapter (Optional):
If you plan to use your smartphone for photography, attach the smartphone adapter to an eyepiece. Then, insert the eyepiece with the adapter into the diagonal. Adjust your phone's camera to align with the eyepiece lens.
4. Operation
4.1 Using the Viewfinder
The viewfinder helps you quickly locate objects in the sky or on land. Before observing, align the viewfinder with the main telescope. To do this, point the main telescope at a distant, stationary object (like a tree or building) during daylight hours. Center the object in the main telescope's eyepiece, then adjust the viewfinder's alignment screws until the same object is centered in the viewfinder's crosshairs.
4.2 Focusing the Telescope
Once an object is located, turn the focus knob on the focuser tube until the image appears sharp and clear. Different eyepieces and observers may require slight adjustments to the focus.
4.3 Changing Magnification (Eyepieces and Barlow Lens)
Your telescope comes with two eyepieces (K25mm and K10mm) and a 3x Barlow lens, offering various magnification levels. To change magnification, simply swap eyepieces or insert the Barlow lens between the diagonal and the eyepiece.
- K25mm Eyepiece: Provides 16x magnification (400mm focal length / 25mm eyepiece = 16x).
- K10mm Eyepiece: Provides 40x magnification (400mm focal length / 10mm eyepiece = 40x).
- K25mm Eyepiece with 3x Barlow: Provides 48x magnification (16x * 3 = 48x).
- K10mm Eyepiece with 3x Barlow: Provides 120x magnification (40x * 3 = 120x).

Image 4.1: The various magnification options provided by the K25mm and K10mm eyepieces, alone and combined with the 3x Barlow lens.

Image 4.2: The K10mm and K25mm eyepieces, used to achieve different magnification levels.
4.4 Using the Panhandle Mount
The panhandle mount allows for smooth, controlled movements of the telescope. Use the panhandle to move the telescope horizontally (azimuth) and vertically (altitude) to track objects. Loosen the tension knobs slightly for smoother movement, and tighten them to hold the telescope in position.
4.5 Smartphone Adapter for Photography
The included smartphone adapter allows you to capture images or videos through the telescope. Attach your smartphone to the adapter, ensuring the phone's camera lens is centered over the eyepiece. Use your phone's camera app to take photos or record videos. Results may vary depending on phone model, lighting conditions, and atmospheric stability.

Image 4.3: Key features of the telescope, including the 70mm aperture, straight-through viewfinder, diagonal eyepiece holder for comfortable viewing, and the smartphone adapter for capturing images.
5. Care and Maintenance
- Cleaning Lenses: Use a soft, lint-free cloth specifically designed for optical lenses. Gently wipe the lens surfaces. For stubborn smudges, use a small amount of optical cleaning fluid on the cloth, not directly on the lens. Avoid touching the lens surfaces with your fingers.
- Storage: When not in use, store the telescope in its provided travel bag in a dry, dust-free environment. Avoid extreme temperatures and humidity.
- General Care: Handle the telescope and its components with care. Avoid dropping or subjecting it to harsh impacts. Keep dust caps on the optical tube and eyepieces when not in use.
6. Troubleshooting
- Image is blurry:
Ensure the focus knob is adjusted correctly. Try refocusing slowly. Also, check if the eyepiece is fully inserted and secured. Atmospheric conditions can also affect image clarity.
- Cannot find objects:
Verify that the viewfinder is properly aligned with the main telescope. Practice using the viewfinder to center objects before looking through the main eyepiece. Start with a low magnification eyepiece (K25mm) for a wider field of view.
- Image is upside down:
This is normal for astronomical telescopes when observing celestial objects. For terrestrial viewing, the diagonal may correct the image orientation, but it might still appear reversed left-to-right. This is not a defect.
- Poor image quality in urban areas:
Light pollution from city lights significantly reduces the visibility of fainter celestial objects. For optimal astronomical viewing, transport your telescope to a dark-sky location away from city lights. Binoculars may offer a better experience in heavily light-polluted areas for some objects.
- Telescope is unstable:
Ensure the tripod legs are fully extended and locked, and placed on a firm, level surface. The accessory tray can add stability when loaded with eyepieces. Avoid extending the tripod to its maximum height if stability is an issue.
7. Specifications
| Feature | Specification |
|---|---|
| Model Name | Sky View 70mm Refractor Telescope |
| Optical Tube Length | 400 Millimeters |
| Objective Lens Diameter | 70 Millimeters |
| Eyepiece Lens Description | Barlow (K10mm, K25mm included) |
| Telescope Mount Description | Altazimuth Mount |
| Focus Type | Manual Focus |
| Finderscope | Reflex (Straight-Through) |
| Product Dimensions | 12"D x 12"W x 36"H (assembled) |
| Item Weight | 3.79 pounds (1.72 Kilograms) |
| Manufacturer | Explore Scientific |
| Item Model Number | 80-00370 |
8. Warranty and Support
For warranty information and technical support, please refer to the documentation included with your purchase or visit the official Explore Scientific website. Keep your proof of purchase for any warranty claims.


