
Introduction
This manual provides detailed instructions for the installation, configuration, and operation of the ASUS Prime Z790M-PLUS Gaming Motherboard. This motherboard is designed for Intel 12th and 13th generation processors, featuring an LGA 1700 socket, DDR5 memory support, PCIe 5.0, and multiple M.2 slots for high-performance computing.
Key features include:
- Intel LGA 1700 Socket: Compatible with Intel 12th and 13th generation processors.
- Enhanced Power Delivery: 10+1 DrMOS power stages, 6-layer PCB, ProCool connectors, and durable capacitors for stable power.
- Next-Generation Connectivity: PCIe 5.0, Intel 1 Gb Ethernet, USB 3.2 Gen2x2 Type-C, and Thunderbolt (USB4) header support.
- ASUS OptiMem II: Optimized memory tracing for improved DDR5 memory overclocking and signal integrity.
- Comprehensive Cooling: Large VRM heatsink, PCH heatsink, hybrid fan headers, and Fan Xpert 4 with AI Cooling II.
What's in the Box
Upon opening the package, verify that all components are present and undamaged. The ASUS Prime Z790M-PLUS motherboard package typically includes the following items:

Image: Contents of the ASUS Prime Z790M-PLUS motherboard box. This includes the motherboard itself, a user guide, a rear I/O panel shield, two SATA data cables, and a package containing M.2 screws for SSD installation.
- ASUS Prime Z790M-PLUS Motherboard
- User Guide
- Rear I/O Panel Shield
- SATA 6Gb/s Data Cables (x2)
- M.2 Screw Package
Setup and Installation
Before beginning installation, ensure your system is powered off and disconnected from the power outlet. Wear an anti-static wrist strap to prevent electrostatic discharge (ESD) damage to components.
1. Motherboard Overview

Image: Overview of the ASUS Prime Z790M-PLUS motherboard, detailing components such as VRM heatsinks, thermal pads, ProCool connector, 10+1 DrMOS power stages, alloy chokes, durable capacitors, CPU/CPU OPT/AIO Pump fan headers, chassis fan headers, and the chipset heatsink.
Familiarize yourself with the layout of the motherboard, including the CPU socket, DIMM slots, PCIe slots, and various connectors.
2. CPU Installation
- Locate the LGA 1700 socket on the motherboard.
- Open the CPU socket lever and remove the protective cover.
- Carefully align the notches on your Intel 12th/13th Gen processor with the socket.
- Gently place the CPU into the socket without forcing it.
- Close the socket lever to secure the CPU.
- Apply thermal paste to the CPU and install your CPU cooler according to its instructions.
3. Memory (RAM) Installation

Image: ASUS Prime Z790M-PLUS motherboard showing 4 DIMM slots for DDR5 memory (up to 7200+ OC), dual-channel support, AEMP II & OptiMem II. Also visible are expansion slots including 1 x PCIe 5.0 x16 SafeSlot Core+, 1 x PCIe 4.0 x16 slot (max @x4), 2 x PCIe 4.0 x1, and 3 x M.2 slots (1 x M.2 2280 PCIe 4.0 x4, 1 x M.2 2280 PCIe 4.0 x4, 1 x M.2 2280 PCIe 4.0 x4 & SATA).
The motherboard supports DDR5 memory. Refer to your motherboard's manual for recommended DIMM slot population for dual-channel configuration.
- Open the clips at both ends of the DIMM slot.
- Align the notch on the DDR5 memory module with the key in the DIMM slot.
- Insert the module firmly into the slot until the clips snap into place.
4. Storage Device Installation (M.2 SSDs and SATA Drives)
The motherboard features three M.2 slots and six SATA 6Gb/s ports.
- M.2 SSD: Locate the M.2 slots. Remove the M.2 heatsink (if present), insert the M.2 SSD into the slot, and secure it with the provided M.2 screw. Reattach the heatsink if applicable.
- SATA Drives: Connect SATA data cables from your SSDs/HDDs to the SATA ports on the motherboard. Connect SATA power cables from your power supply to the drives.
5. Graphics Card and Expansion Cards
The motherboard includes a PCIe 5.0 x16 slot for your primary graphics card and additional PCIe 4.0 slots for other expansion cards.
- Open the retention clip on the desired PCIe slot.
- Align your graphics card or expansion card with the slot and press down firmly until it clicks into place.
- Secure the card to your chassis with a screw.
6. Power Connections
- Connect the 24-pin ATX power cable from your power supply to the motherboard's main power connector.
- Connect the 8-pin (or 4+4-pin) CPU power cable to the motherboard's CPU power connector.
7. Front Panel Connectors and USB Headers
Connect your chassis's front panel cables (power button, reset button, HDD LED, power LED) to the corresponding headers on the motherboard. Connect USB 2.0, USB 3.2 Gen 1, and USB 3.2 Gen 2 Type-C front panel headers as needed.
8. Rear I/O Panel

Image: Rear I/O panel of the ASUS Prime Z790M-PLUS motherboard. Ports include 2 x USB 2.0, HDMI, DisplayPort, USB 3.2 Gen 2 Type-A, USB 3.2 Gen 2x2 Type-C, 4 x USB 3.2 Gen 1 Type-A, Intel 1 Gb Ethernet, and 3 x Audio Jacks.
Install the rear I/O panel shield into your chassis before installing the motherboard. Connect your peripherals (keyboard, mouse, monitor, network cable) to the appropriate ports on the rear I/O panel.
Operating and Features
The ASUS Prime Z790M-PLUS motherboard offers a range of features for optimal performance and customization.
BIOS/UEFI Configuration
Access the UEFI BIOS by pressing the DEL or F2 key during system startup. Here you can configure boot options, overclocking settings, fan speeds, and other system parameters.
Aura Sync RGB Lighting
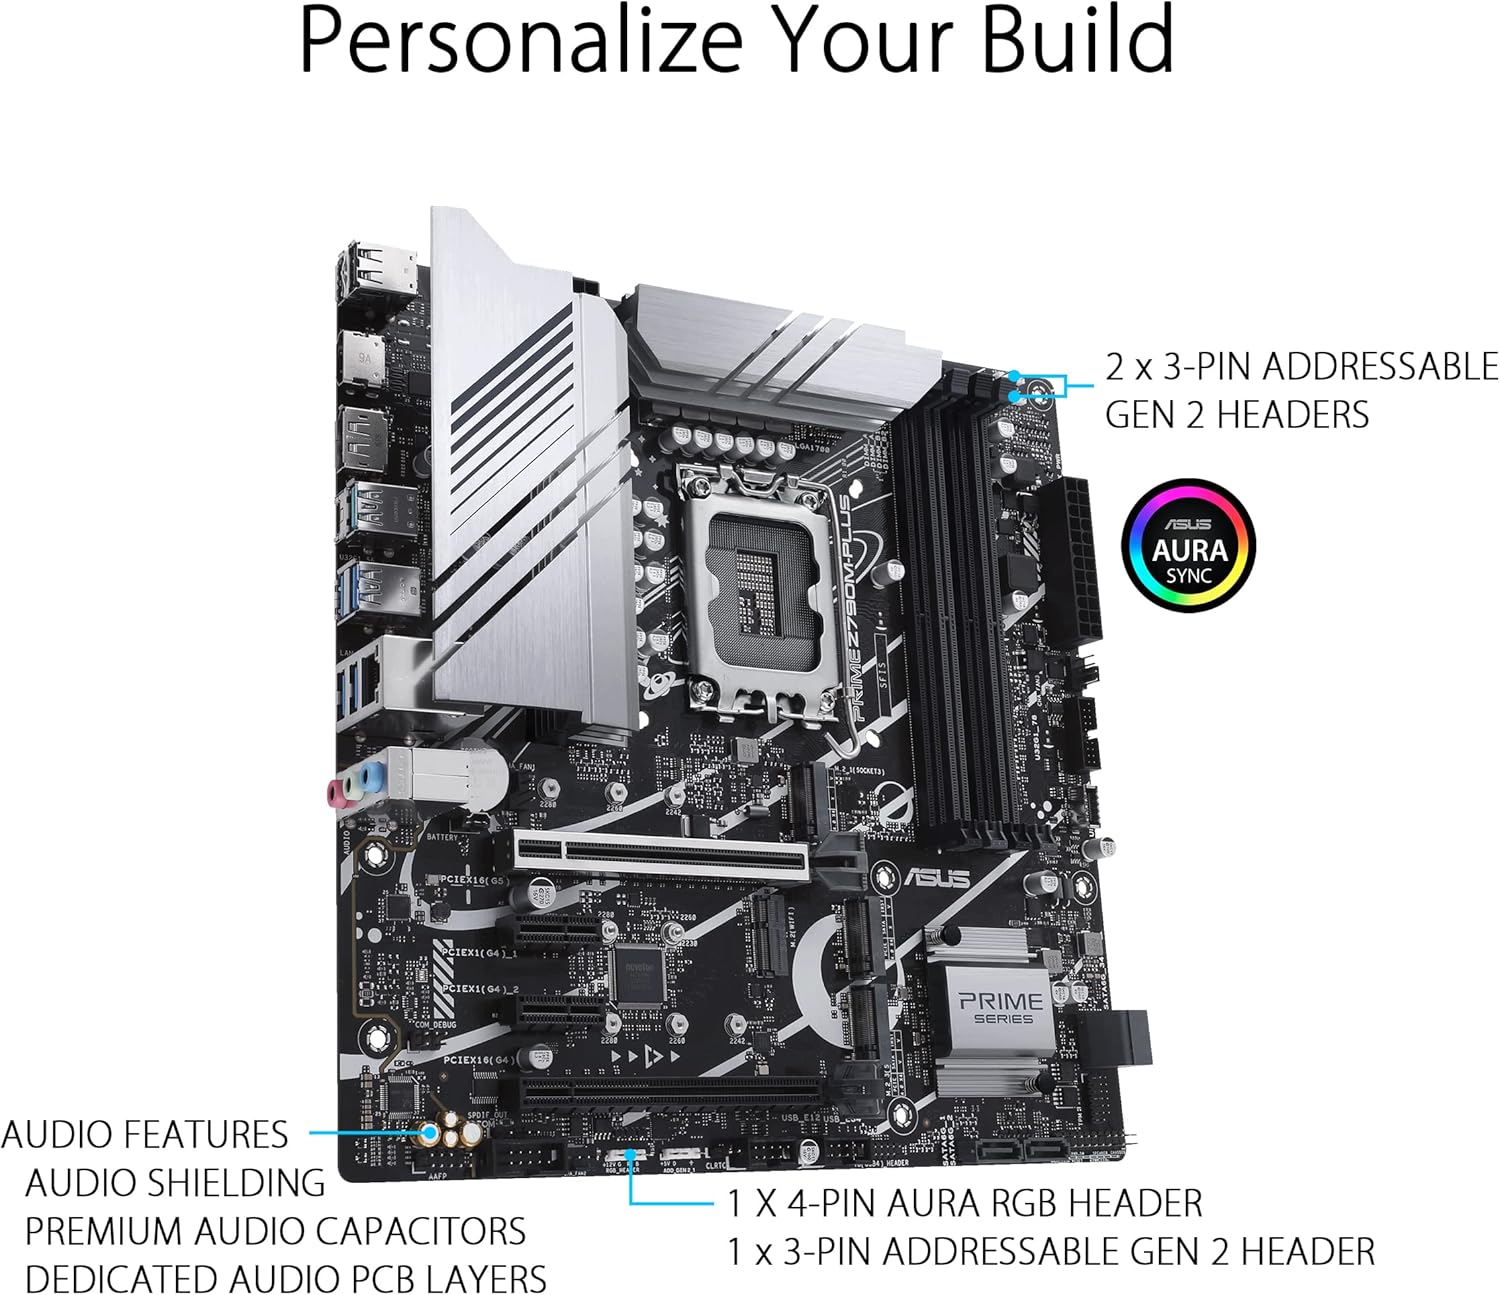
Image: ASUS Prime Z790M-PLUS motherboard showing customization options. This includes 2 x 3-pin Addressable Gen 2 Headers, 1 x 4-pin Aura RGB Header, and 1 x 3-pin Addressable Gen 2 Header. Audio features such as audio shielding, premium audio capacitors, and dedicated audio PCB layers are also indicated.
The motherboard supports ASUS Aura Sync for customizable RGB lighting. Connect compatible RGB devices to the onboard Aura RGB headers (1 x 4-pin) and Addressable Gen 2 headers (3 x 3-pin). Use the ASUS Armoury Crate software to synchronize lighting effects.
Fan Xpert 4 with AI Cooling II
Utilize ASUS Fan Xpert 4 software to control and monitor system fans. AI Cooling II optimizes fan speeds based on system load and temperature, providing efficient cooling with minimal noise.
Networking
The integrated Intel 1 Gb Ethernet provides reliable wired network connectivity. Ensure the latest network drivers are installed for optimal performance.
Maintenance
Regular maintenance helps ensure the longevity and stable operation of your motherboard and PC components.
- Dust Removal: Periodically clean dust from the motherboard, heatsinks, and fan blades using compressed air. Ensure the system is powered off and unplugged before cleaning.
- BIOS/UEFI Updates: Check the ASUS support website for the latest BIOS/UEFI updates. Updating the BIOS can improve compatibility, stability, and performance. Follow the instructions provided by ASUS carefully.
- Driver Updates: Keep all system drivers (chipset, graphics, audio, network) updated to their latest versions. These can be found on the ASUS support website or the component manufacturer's website.
- Cable Management: Ensure all cables are neatly routed to promote better airflow and prevent interference.
Troubleshooting
If you encounter issues with your motherboard, refer to the following common troubleshooting steps:
- No Power/No Boot:
- Verify all power cables (24-pin ATX, 8-pin CPU) are securely connected.
- Ensure the power supply is switched on and functioning correctly.
- Check if the front panel power button cable is correctly connected to the motherboard header.
- No Display:
- Ensure your monitor is connected to the graphics card (not the motherboard's integrated graphics ports, unless using an Intel CPU with integrated graphics).
- Reseat the graphics card in its PCIe slot.
- Try a different display cable or monitor.
- If your CPU has integrated graphics, try removing the discrete GPU and connecting the monitor to the motherboard's video output.
- Memory Issues (e.g., system not booting, incorrect RAM capacity detected):
- Reseat all DDR5 memory modules.
- Try booting with only one memory module installed in the primary DIMM slot (refer to the user manual for specific slot).
- Ensure memory modules are compatible with the motherboard and CPU.
- Check the Q-LED indicators on the motherboard for memory-related errors.
- System Instability/Crashes:
- Ensure all drivers are up to date.
- Check CPU and GPU temperatures to rule out overheating.
- Run memory diagnostic tools to check for faulty RAM.
- Reset BIOS settings to default.
- Peripheral Not Detected:
- Try connecting the peripheral to a different USB port.
- Ensure the peripheral's drivers are installed.
- Check BIOS settings for USB port enablement.
If these steps do not resolve the issue, consult the comprehensive troubleshooting section in the full ASUS user manual or contact ASUS technical support.
Specifications
| Feature | Specification |
|---|---|
| Brand | ASUS |
| Model Name | PRIME Z790M-PLUS |
| CPU Socket | LGA 1700 |
| Compatible Processors | Intel 12th/13th Gen Core, Pentium Gold, Celeron |
| Chipset | Intel Z790 |
| RAM Memory Technology | DDR5 |
| Memory Slots Available | 4 x DIMM |
| Maximum RAM Memory Size | 128 GB |
| Memory Clock Speed | Up to 7200+ MHz (OC) |
| Graphics Card Interface | PCI Express 5.0 |
| Total PCIe Ports | 1 x PCIe 5.0 x16, 1 x PCIe 4.0 x16 (max @x4), 2 x PCIe 4.0 x1 |
| Storage Interfaces | 3 x M.2 slots, 6 x SATA 6Gb/s ports |
| USB Ports (Rear I/O) | 1 x USB 3.2 Gen 2x2 Type-C, 1 x USB 3.2 Gen 2 Type-A, 4 x USB 3.2 Gen 1 Type-A, 2 x USB 2.0 |
| Ethernet | Intel 1 Gb Ethernet |
| Audio | Realtek 7.1 Surround Sound High Definition Audio CODEC |
| Form Factor | mATX |
| Platform | Windows 11 |
| Item Weight | 1 Kilograms |
| Model Number | 90MB1E70-M1EAY0 |
Warranty and Support
The ASUS Prime Z790M-PLUS motherboard comes with a 36-month Manufacturer Guarantee. For warranty claims or technical assistance, please retain your proof of purchase.
For further support, driver downloads, BIOS updates, and detailed product information, please visit the official ASUS support website:
You can also visit the ASUS Store for product information: ASUS Store on Amazon