Introduction
This manual provides detailed instructions for the safe and effective use of your Yato Professional Injector Thread Repair Kit. This 10-piece kit is specifically designed for repairing damaged M6 and M8 injector threads, particularly in CDI motors, without the need for extensive engine disassembly. Following these instructions will ensure optimal performance and longevity of your tools.
Safety Information
General Safety Precautions
- Always wear appropriate personal protective equipment (PPE), including safety glasses and gloves, when using this kit.
- Ensure the work area is well-ventilated and free from obstructions.
- Read and understand all instructions before operating the tools.
- Keep tools clean and in good working condition.
- Store the kit out of reach of children and unauthorized personnel.
- Do not use damaged or modified tools.
- Use only for its intended purpose: repairing injector threads.
Package Contents
Kit Components
Your Yato Professional Injector Thread Repair Kit includes the following items:
- 1 x spiral drill bit 6 mm with adjustment ring for drilling depth
- 1 x step drill 7 to 8 mm with adjustment ring for drilling depth
- 1 x guide sleeve for 6 mm spiral drills
- 1 x M8 x 1 tap
- 1 x mounting tool for thread inserts
- 5 x thread repair sleeves (internal thread M6 x 1, external thread M8 x 1)
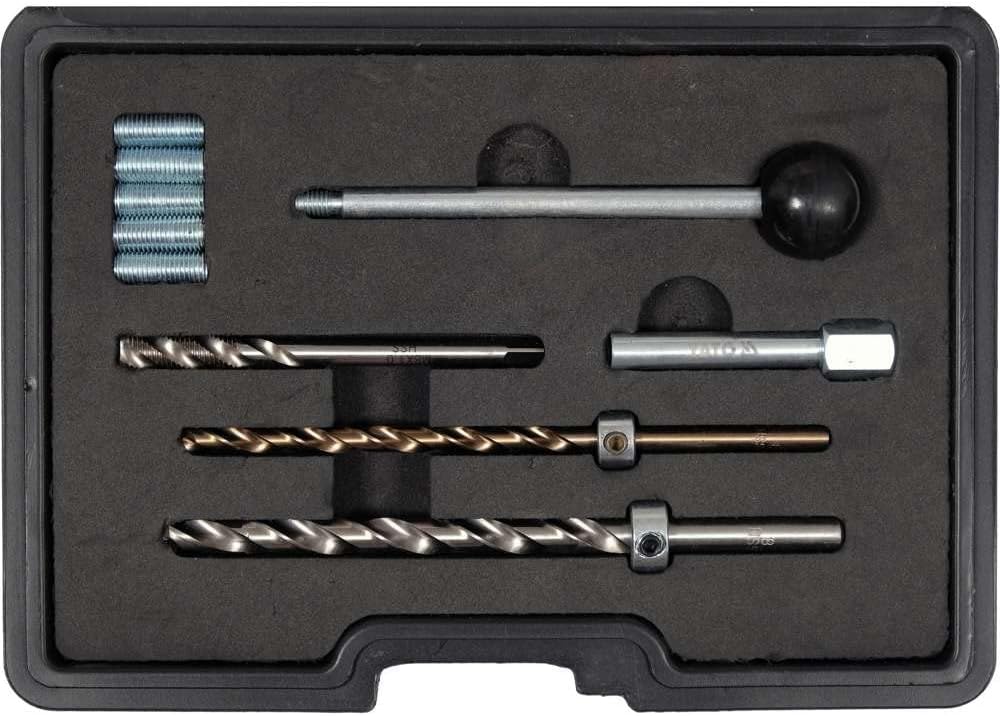
Yato Professional Injector Thread Repair Kit components laid out in their storage case, showing all tools and thread inserts.

The kit opened, displaying the various drill bits, tap, mounting tool, and thread inserts.

The compact and durable storage case for the Yato Professional Injector Thread Repair Kit.
Setup
Preparation
- Ensure the work area is clean, well-lit, and free from debris.
- Identify the specific injector with the damaged thread that requires repair.
- Gather all necessary personal protective equipment (PPE), such as safety glasses and gloves, before beginning work.
- Ensure the engine is cool and disconnected from power sources if working on an active vehicle.
Operating Instructions
Step-by-Step Repair Process
This kit is designed to repair damaged M6 injector threads by first enlarging and re-tapping to M8, then inserting a sleeve to restore the M6 thread.
- Step 1: Initial Drilling (6mm)
Use the 6 mm spiral drill bit. Attach the adjustment ring to control the drilling depth, ensuring you do not drill too deep. Carefully drill out the broken screw or the remnants of the damaged M6 thread. Ensure the drill is perpendicular to the surface to maintain alignment. - Step 2: Enlarging the Hole (7-8mm)
After the initial drilling, switch to the 7 to 8 mm step drill. Use its adjustment ring to set the appropriate depth. This step enlarges the hole to the correct diameter for the new M8 thread. Drill slowly and steadily, applying even pressure. - Step 3: Tapping the New Thread (M8 x 1)
Insert the guide sleeve (if applicable for precise alignment) into the drilled hole. Then, use the M8 x 1 tap to cut a new, larger thread into the enlarged hole. Apply a suitable cutting lubricant to the tap. Turn the tap slowly, one full turn forward, then half a turn back to break chips, repeating until the new M8 thread is fully formed. - Step 4: Inserting the Thread Sleeve
Select one of the provided thread repair sleeves (internal thread M6 x 1, external thread M8 x 1). Place the sleeve onto the mounting tool for thread inserts. Carefully screw the repair sleeve into the newly tapped M8 thread. Ensure the sleeve is fully seated and flush with the surface. The sleeve effectively converts the M8 thread back to the original M6 size, ready for the injector screw. - Step 5: Final Assembly
Once the thread sleeve is securely in place, the original M6 injector screw can be reinstalled. Gently tighten the injector screw to the vehicle manufacturer's specified torque. Verify the repair by ensuring the injector is securely fastened and there are no leaks or issues.
Maintenance
Tool Care
- Clean all tools thoroughly after each use to remove metal shavings, debris, and lubricants. Use a brush and appropriate cleaning solution if necessary.
- Apply a light coat of rust preventative oil to all metal components, especially drill bits and taps, before storage to prevent corrosion.
- Store the kit in its original protective case in a dry, cool environment to prevent damage and maintain tool integrity.
- Inspect tools regularly for wear, damage, or dullness. Replace worn or damaged components as needed to ensure effective and safe operation.
Troubleshooting
Common Issues and Solutions
- Issue: Tap breaks during use.
Solution: This often indicates excessive force, improper alignment, or insufficient lubrication. Ensure the tap is lubricated and turned slowly and steadily, backing off periodically to clear chips. If a tap breaks inside the workpiece, specialized tap extractors or professional assistance may be required for removal. - Issue: Thread sleeve does not seat properly or cross-threads.
Solution: Ensure the M8 thread was tapped cleanly and to the correct depth. Check for any burrs or obstructions in the newly tapped thread. The mounting tool must be used correctly to guide the sleeve straight into the thread. Do not force the sleeve; if resistance is met, back it out and re-align. - Issue: Drill bit becomes dull quickly or struggles to cut.
Solution: Ensure proper drilling speed and pressure for the material being worked on. Use cutting fluid if necessary, especially for harder metals. Replace dull bits promptly, as continued use of dull bits can cause excessive heat, damage to the workpiece, and potential tool breakage. - Issue: Repaired thread feels loose or insecure.
Solution: This could indicate an improperly tapped M8 thread or a damaged thread sleeve. Ensure the M8 thread is clean and fully formed. The thread sleeve should be screwed in until it is flush and secure. If the issue persists, the repair may need to be redone with a new sleeve.
Specifications
Product Specifications
| Attribute | Value |
|---|---|
| Manufacturer | Yato |
| Brand | Yato |
| Model | Injector Thread Repair Kit YT-06036 |
| Item Weight | 1.03 pounds |
| Product Dimensions | 1.77 x 8.27 x 5.91 inches |
| Item Model Number | YT-06036 |
| Manufacturer Part Number | YT-06036 |
| Special Features | High-quality professional design, Easy to use, Extensive box contents |
Warranty and Customer Support
This Yato product is covered by a standard manufacturer's warranty. Please refer to the warranty card included with your purchase for specific terms and conditions regarding coverage, duration, and claims procedures.
For technical assistance, replacement parts, or warranty claims, please contact Yato customer support through their official website or authorized distributors. You can find more information and contact details at www.yato.com.


