
NANLITE Forza 500B II
NANLITE Forza 500B II Bi-Color LED Monolight Instruction Manual
Model: Forza 500B II
Introduction
This manual provides detailed instructions for the safe and effective use of the NANLITE Forza 500B II Bi-Color LED Monolight. Please read this manual thoroughly before operating the product and retain it for future reference. The Forza 500B II is a powerful bi-color LED light designed for professional photography and videography, offering adjustable color temperature and green/magenta shift.
Important Safety Information
- Do not look directly into the light source when the fixture is powered on.
- Do not operate the fixture in wet or damp conditions. Keep it away from water and other liquids.
- Ensure proper ventilation during operation to prevent overheating. Do not block ventilation openings.
- Use only the specified power adapter and cables.
- Keep the fixture out of reach of children.
- Disconnect power before cleaning or performing maintenance.
- Do not attempt to disassemble or modify the fixture. Refer all servicing to qualified personnel.
- Avoid dropping or subjecting the fixture to strong impacts.
Package Contents
Verify that all items are present in the package:
- Forza 500B II LED Monolight Fixture
- Control Unit
- Reflector (Standard)
- Connecting Cable (Head to Control Unit)
- Power Cable (AC)
- Quick Release Clamp
- Carrying Bag
- Instruction Manual (this document)
Product Overview
Forza 500B II Light Fixture

Image: The Forza 500B II LED Monolight, showing the main light head, yoke, and handle.
- LED Light Source: High-output bi-color LED.
- Bowens Mount: For attaching various light modifiers.
- Yoke: Adjustable bracket for mounting and angling the light.
- Yoke Lock: Stepless locking mechanism for secure positioning.
- Connecting Port: For connecting to the control unit.
Control Unit

Image: The front panel of the control unit, displaying the screen, buttons, and dials.
- Display Screen: Shows current settings (CCT, Dim, G/M, Mode).
- CCT Button: Toggles Color Correlated Temperature adjustment.
- Effect Button: Accesses special lighting effects.
- Menu Button: Enters system settings and advanced options.
- Lock Button: Locks current settings to prevent accidental changes.
- Dim/G/M Dial (Left): Adjusts brightness (Dim) and Green/Magenta shift. Press to switch functions.
- CCT/Mode Dial (Right): Adjusts Color Temperature (CCT) and navigates menu options. Press to confirm selections.
- Power Switch: Turns the control unit on/off.
- DC Input: For AC power adapter.
- V-Mount Battery Plates: For attaching V-mount batteries (two required for full power).
- DMX/RDM Ports: For external DMX control.
- USB Port: For firmware updates.
Setup Instructions
1. Mounting the Light Fixture
Attach the Forza 500B II light fixture to a compatible light stand using the integrated yoke. Secure the light stand adapter firmly. Adjust the angle of the light using the yoke lock mechanism. Ensure the light is balanced and stable before proceeding.

Image: Illustration of the light fixture's adjustable yoke, demonstrating various tilt angles.
2. Connecting the Control Unit
Use the provided connecting cable to link the light fixture to the control unit. Ensure the connectors are fully inserted and secured.
Mount the control unit to a light stand or other support using the quick-release clamp. This helps manage cable strain and provides easy access to controls.
3. Powering the Unit
The Forza 500B II can be powered by AC mains or V-mount batteries.
- AC Power: Connect the AC power cable to the control unit's DC input, then plug it into a suitable power outlet.
- Battery Power: Attach one or two V-mount batteries to the V-mount plates on the control unit. Two batteries are recommended for full power output.
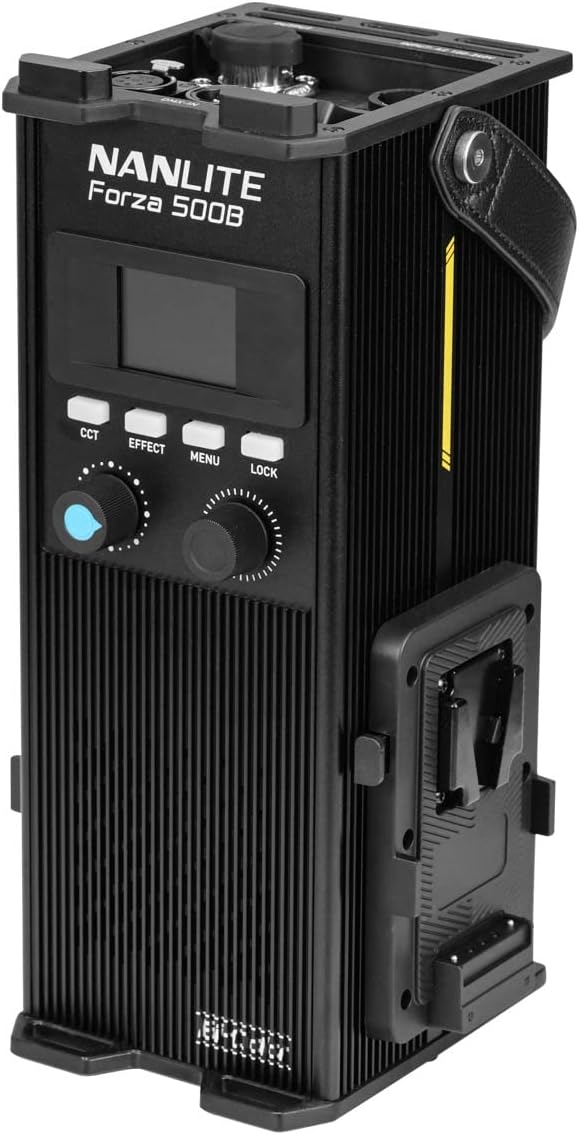
Image: The control unit with two V-mount batteries securely attached, ready for portable operation.
4. Attaching the Reflector
Align the standard reflector with the Bowens mount on the light fixture. Insert and twist clockwise until it locks into place. To remove, press the release button on the Bowens mount and twist counter-clockwise.

Image: The Forza 500B II light fixture with the standard reflector mounted, ready for use.
Operating Instructions
1. Power On/Off
Flip the power switch on the control unit to the "ON" position to power on the light. The display screen will illuminate. To power off, flip the switch to "OFF".
2. Adjusting Color Temperature (CCT)
Press the CCT button. The CCT value on the display will become active. Rotate the CCT/Mode Dial (Right) to adjust the color temperature from 2700K to 6500K. The display will show the current CCT value.
3. Adjusting Brightness (Dimming)
The brightness (DIM) is typically the default adjustable parameter. If not, press the Dim/G/M Dial (Left) until DIM is active. Rotate the Dim/G/M Dial (Left) to adjust the light intensity from 0% to 100%. The display will show the current dimming percentage.
4. Adjusting Green/Magenta (G/M) Shift
Press the Dim/G/M Dial (Left) until G/M is active on the display. Rotate the Dim/G/M Dial (Left) to adjust the green-to-magenta shift from -80 to +80. This allows for fine-tuning of color rendition to match other light sources or camera settings.
5. Special Effects Modes
Press the Effect button to cycle through various special lighting effects. Use the CCT/Mode Dial (Right) to select an effect and adjust its parameters (e.g., speed, intensity). Available effects may include Flash, Pulse, Storm, TV, Paparazzi, etc.
6. Control Methods
- On-Board Controls: Use the buttons and dials on the control unit for direct adjustments.
- Bluetooth (NANLINK App): Download the free NANLINK app for iOS and Android. Pair your device with the Forza 500B II via Bluetooth for remote control of all functions.
- DMX/RDM: Connect to a DMX console via the DMX/RDM ports for professional lighting control setups.
- 2.4G Wireless: The unit supports 2.4G wireless control with optional accessories like the WS-RC-C2 Remote Control and WS-TB-1 Transmitter Box (sold separately).
7. Locking Settings
Press the Lock button to prevent accidental changes to the current settings. Press it again to unlock.
Maintenance
- Cleaning: Use a soft, dry cloth to clean the exterior of the light fixture and control unit. Do not use abrasive cleaners or solvents. For the LED surface, use a lens cleaning cloth if necessary.
- Storage: When not in use, store the Forza 500B II in its carrying bag in a cool, dry place, away from direct sunlight and excessive humidity.
- Ventilation: Regularly check that the ventilation openings on the control unit are clear of dust and debris to ensure proper heat dissipation.
Troubleshooting
| Problem | Possible Cause | Solution |
|---|---|---|
| Light does not turn on. | No power, loose cable, power switch off. | Check power cable connection, ensure batteries are charged and properly inserted, verify power switch is ON. |
| Light flickers or is unstable. | Loose cable connection, low battery power, faulty power source. | Check all cable connections, replace or recharge batteries, try a different power outlet. |
| Cannot adjust settings. | Settings are locked. | Press the Lock button to unlock the controls. |
| Bluetooth connection fails. | Bluetooth not enabled, app issue, interference. | Ensure Bluetooth is enabled on the control unit (via Menu), restart the NANLINK app, try pairing again. |
| Overheating warning. | Blocked ventilation, high ambient temperature. | Ensure ventilation openings are clear. Reduce ambient temperature if possible. Allow the unit to cool down. |
Specifications
| Feature | Detail |
|---|---|
| Model | Forza 500B II |
| Light Type | Bi-Color LED Monolight |
| Color Temperature (CCT) | 2700K - 6500K |
| Green/Magenta Adjustment | +/- 80 |
| CRI | Average 96 |
| TLCI | Average 97 |
| SSI (3200K) | 84 |
| SSI (5600K) | 74 |
| Illuminance (with Reflector, 1m) | 67320 Lux / 6254 fc |
| Dimming | 0 - 100% |
| Control Methods | On-board, Bluetooth (NANLINK App), DMX/RDM, 2.4G |
| Mounting | 5/8" Receiver (Light Stand Mount) |
| Accessory Mount | Bowens Mount |
| Power Source | AC (100-240V 50/60Hz) or 14.8V/26V V-Mount Batteries |
Warranty and Support
For warranty information, technical support, or service inquiries, please refer to the official NANLITE website or contact your local distributor. Keep your proof of purchase for warranty claims.
You can find more information and support resources on the official NANLITE store page: NANLITE Official Store.
Related documentsForza 500B II


Ask a question about this manual
Ask about setup, troubleshooting, compatibility, parts, safety, or missing instructions. Manuals+ will review the question and use this page’s manual context to help answer it.