
DieseRC 2 Buttons
Contents
DieseRC Wireless Remote Control Switch User Manual
Model: 2 Buttons (JJX-KG01 Receiver)
1. Introduction
This manual provides detailed instructions for the installation, operation, and maintenance of your DieseRC AC 110V/120V/220V/240V Wireless Remote Control Switch. This versatile 433Mhz RF 10A 2CH Relay Receiver with 2 Transmitters is designed to provide convenient remote control for various electrical devices such as garage doors, electric curtains, motors, and lighting systems.
2. Package Contents
- 1 x DieseRC 433Mhz RF 10A 2CH Relay Receiver (Model: JJX-KG01)
- 2 x 2-Button Wireless Remote Transmitters
- 1 x CR2032 Battery (pre-installed in each remote)
3. Product Overview
The DieseRC Wireless Remote Control Switch system consists of a compact receiver unit and two handheld remote transmitters. The receiver is designed to be wired into your electrical circuit, allowing the remote transmitters to wirelessly control the connected devices.

Image: The complete DieseRC Wireless Remote Control Switch kit, showing the receiver board, its protective casing, and two remote control key fobs.
4. Product Components
4.1. Receiver Unit (JJX-KG01)
The receiver board features input terminals for power, output terminals for connecting devices, an antenna for signal reception, and a learning button for programming. It has two independent relays.

Image: Close-up view of the receiver board, highlighting the input (N, L) and output (NO, COM, NC) terminals, antenna, indicator light, and learning button. Output volts: 1V~250V 10A. Working volts: AC 85V~250V.
- N, L: Power input terminals (AC 85V-250V).
- NO: Normally Open pin.
- COM: Common pin.
- NC: Normally Closed pin.
- Learning Button: Used for programming operating modes and pairing remotes.
- Indicator Light: Provides feedback during programming and operation.
4.2. Remote Transmitter
Each remote transmitter is a compact key fob with two buttons (A and B) and an indicator light. It is powered by a CR2032 lithium cell battery.

Image: Exploded view of the remote control, detailing its silicone buttons, indicator light, chrome bezel, metal keychain, and the CR2032 battery.
5. Specifications
| Feature | Specification |
|---|---|
| Brand | DieseRC |
| Model Number | 2 Boutons (JJX-KG01 Receiver) |
| Operating Voltage | AC 85V ~ 250V |
| Output Voltage | 1V ~ 250V |
| Current Rating | 10A |
| Max Wattage | 2500 watts |
| RF Frequency | 433Mhz |
| Control Distance | Up to 50 meters (no obstacle) |
| Operating Modes | Momentary, Toggle, Latched |
| Number of Relays | 2 (independent) |
| Remote Battery Type | 1 x CR2032 (included) |
| Material | Aluminum (Contact Material) |
| UPC | 750828380647 |
6. Setup & Installation
6.1. Safety Precautions
- Always disconnect power before performing any wiring or installation.
- Ensure all connections are secure to prevent short circuits or electrical hazards.
- If you are unsure about electrical wiring, consult a qualified electrician.
- Do not exceed the maximum current (10A) or wattage (2500W) ratings.
6.2. Wiring Diagrams
The receiver supports various wiring configurations for AC and DC devices, as well as motors. Ensure you select the correct wiring mode for your application.

Image: Illustrations of four common wiring modes: connecting to an AC lamp, a DC lamp, an AC motor (for up/down control), and a DC motor. The receiver operates on AC 85V-250V, while controlled devices can be AC 85V-250V or DC 1V-250V.
6.3. Programming Instructions (Pairing Remote)
The receiver supports three operating modes: Momentary, Toggle, and Latched. Follow these steps to program your remote control to the desired mode.

Image: Visual guide for programming the remote. For Momentary mode, press the learning button once. For Toggle mode, press twice. For Latched mode, press three times. Then, press the 'A' and 'B' buttons on the remote to complete pairing.
- Select Mode: Press the learning button on the receiver unit a specific number of times to select the desired operating mode:
- 1 Time: Momentary Mode
- 2 Times: Toggle Mode
- 3 Times: Latched Mode
- Pair Remote: After pressing the learning button, the indicator light on the receiver will blink. Within approximately 3 seconds, press the 'A' button on your remote control. The indicator light will blink again.
- Confirm Pairing: Then, press the 'B' button on your remote control. The indicator light will blink rapidly and then turn off, indicating successful pairing.
- Reset (Clear All Paired Remotes): To clear all paired remotes from the receiver, press the learning button 8 times. The indicator light will blink rapidly and then turn off, confirming all remotes have been cleared.
6.4. Programming Demonstration Video
Watch this video for a visual demonstration of how to program the remote control switch to different operating modes.
Video: A demonstration of programming the DieseRC remote control switch for momentary, toggle, and latched modes, including how to reset the receiver.
7. Operating Modes
The DieseRC Wireless Remote Control Switch offers three distinct operating modes to suit various control needs:

Image: Visual explanation of the three operating modes: Momentary (output active only while button is pressed), Toggle (press once for ON, press again for OFF), and Latched (press 'A' for ON, press 'B' for OFF, requires a remote with at least 3 buttons for full functionality).
7.1. Momentary Mode (Mode 1)
- Function: The relay remains activated only as long as the remote button is pressed. Releasing the button deactivates the relay.
- Use Case: Ideal for applications requiring temporary activation, such as garage door openers or electric door strikes.
7.2. Toggle Mode (Mode 2)
- Function: Pressing the remote button once activates the relay (ON). Pressing the same button again deactivates the relay (OFF).
- Use Case: Suitable for controlling lights or fans where a simple ON/OFF function is desired.
7.3. Latched Mode (Mode 3)
- Function: Pressing button 'A' activates Relay 1 and deactivates Relay 2. Pressing button 'B' activates Relay 2 and deactivates Relay 1. This mode requires a remote with at least 3 buttons for full independent control of both relays, or specific button assignments for 2-button remotes.
- Use Case: Useful for controlling devices that require alternating states, such as motor direction (forward/reverse) or selecting between two different circuits.
8. Applications
The DieseRC Wireless Remote Control Switch is highly versatile and can be used in a wide range of applications:
- Garage Doors: Control opening and closing of garage doors.
- Lighting Systems: Remotely turn lights ON/OFF in homes, offices, or outdoor areas.
- Electric Curtains/Blinds: Control the opening and closing of electric curtains or projection screens.
- Motors: Control small motors for various DIY projects or automated systems.
- Other Devices: Fans, ventilation devices, signal transmission, and more.
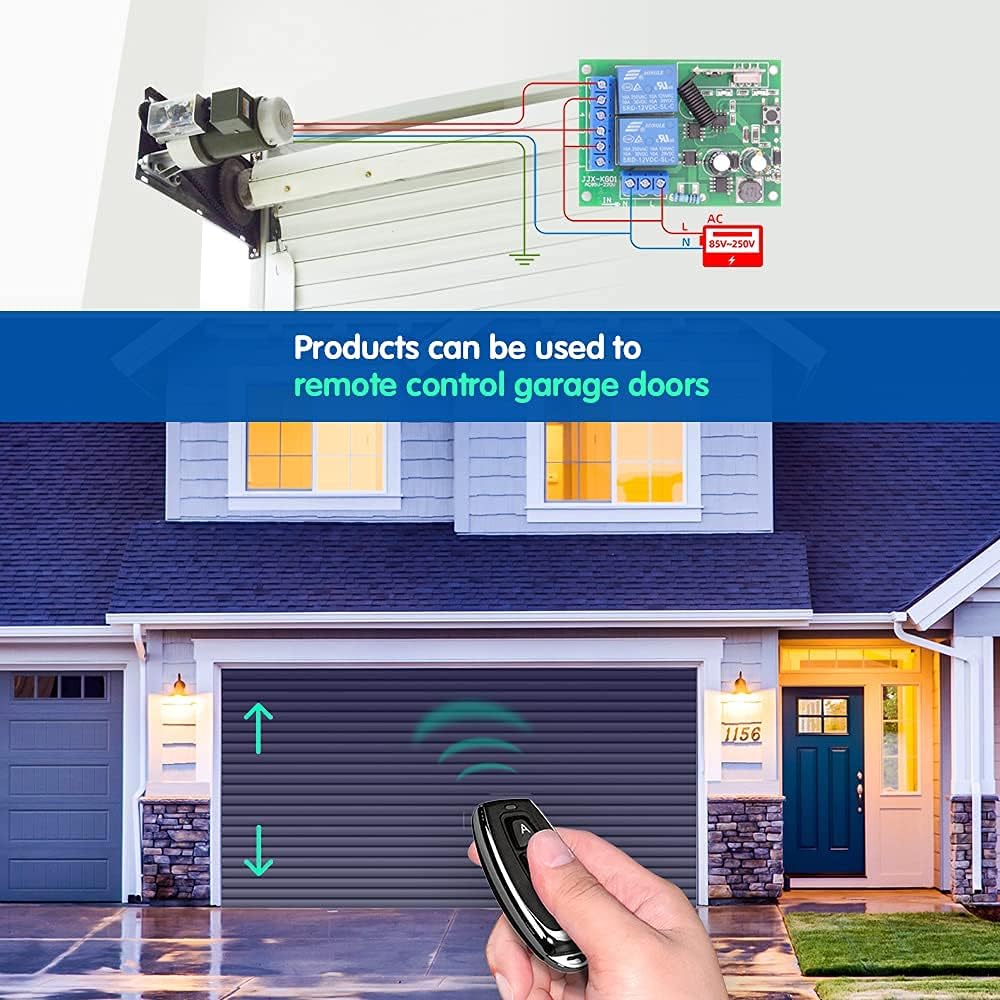
Image: The remote control switch being used to operate a garage door, illustrating its application in home automation.

Image: The remote control switch being used to operate indoor and outdoor lighting, demonstrating its convenience for various lighting setups.

Image: The remote control switch being used to operate a projection curtain, highlighting its use in controlling automated window treatments or screens.
9. Troubleshooting
If you encounter issues with your DieseRC Wireless Remote Control Switch, try the following solutions:
- No Response from Remote:
- Check if the remote control battery (CR2032) is installed correctly and has sufficient charge. Replace if necessary.
- Ensure the remote is paired correctly to the receiver. Follow the programming instructions in Section 6.3.
- Verify that the receiver is powered ON.
- Limited Range:
- Obstacles like thick walls or metal structures can reduce signal range. Try operating the remote closer to the receiver.
- Ensure the receiver's antenna is extended and not obstructed.
- Interference from other 433Mhz devices might affect performance.
- Incorrect Operation Mode:
- If the device is not behaving as expected (e.g., momentary instead of toggle), the receiver might be programmed to the wrong mode.
- Reset the receiver by pressing the learning button 8 times (Section 6.3) and then re-program it to the desired mode.
- Receiver Not Powering On:
- Check the power input connections (N, L) to ensure they are secure and receiving the correct voltage (AC 85V-250V).
- Verify the power source is active.
10. Maintenance
To ensure the longevity and optimal performance of your DieseRC Wireless Remote Control Switch:
- Keep the receiver and remotes in a dry environment, away from moisture and extreme temperatures.
- Clean the devices with a soft, dry cloth. Avoid using harsh chemicals or abrasive cleaners.
- Replace remote control batteries annually or when the indicator light dims.
- Avoid dropping the remote controls or subjecting them to strong impacts.
11. Warranty & Support
DieseRC is committed to providing high-quality products and excellent customer service. Our products undergo rigorous testing to ensure reliability and performance.
For any questions, technical assistance, or after-sales support regarding your Wireless Remote Control Switch, please contact the manufacturer/seller directly. They are dedicated to resolving any issues you may encounter.
Manufacturer/Importer: Huizhou Wenqiao Electronic Technology Co., Ltd.
Service Email: dieseelectronic@163.com
Please retain your purchase receipt as proof of purchase for any warranty claims.
Ask a question about this manual
Ask about setup, troubleshooting, compatibility, parts, safety, or missing instructions. Manuals+ will review the question and use this page’s manual context to help answer it.