1. Introduction
Thank you for choosing the MONDAWE 9-Inch Wall Mounted Shower System. This manual provides essential information for the safe installation, proper operation, and effective maintenance of your new shower system. Please read these instructions thoroughly before beginning installation or use, and retain them for future reference.
This shower system features an elegant oil rubbed bronze finish, a wide rainfall shower head, and a versatile 3-setting handheld spray, all controlled by a pressure balance valve designed for safety and comfort.
2. Product Features
- Anti-Scald Pressure Balance Valve: Equipped with a pressure balance shower valve to protect against sudden changes in hot or cold water pressure, ensuring safety, especially for children and the elderly.
- 3-Function Handheld Shower: Offers three distinct spray patterns: rainfall, massage, and a mixed mode, catering to various showering preferences.
- Height Adjustable Slide Bar: The handheld shower is mounted on a slide bar that can be adjusted in height for convenience and to suit different user heights.
- Easy Operation: Effortlessly switch between the rainfall shower head and handheld shower using the diverter. The single handle controls both water flow and temperature. Only one function can be used at a time.
- Durable Oil Rubbed Bronze Finish: The unique oil rubbed bronze finish provides a sleek aesthetic, along with corrosion resistance and long-lasting durability.
- High Pressure Technology: Designed to deliver a consistent and powerful rain shower experience, even in conditions of low water pressure.
- American Standard Compatibility: Adopts American standard 1/2 inch NPT thread, compatible with most standard U.S. plumbing connections.
3. Package Contents
Please verify that all components are present and undamaged before beginning installation. If any parts are missing or damaged, please contact customer support.

Image 3.1: All components included in the MONDAWE 9-Inch Wall Mounted Shower System package.
- Rainfall Shower Head
- Shower Arm
- Handheld Shower Spray
- Shower Hose
- Slide Bar with Holder
- Pressure Balance Valve Body
- Control Panel with Handle and Diverter Knob
- Mounting Hardware (screws, anchors)
- Installation Manual / Service Card
4. Specifications
| Brand | MONDAWE |
| Model Number | MD-A3816-ORB |
| Color | Oil Rubbed Bronze |
| Material | Acrylonitrile Butadiene Styrene (ABS) for certain components, Brass for valve body |
| Finish Type | Oil Rubbed |
| Number of Handles | 1 |
| Mounting Type | Wall Mount |
| Head Size | 9 inches (Rainfall Shower Head) |
| Product Dimensions | 9 x 9 x 16 inches (overall, approximate) |
| Item Weight | 11.28 pounds |
| Included Components | Valve, Rainfall Shower Head, Handheld Spray, Hose, Slide Bar, Trim Kit |
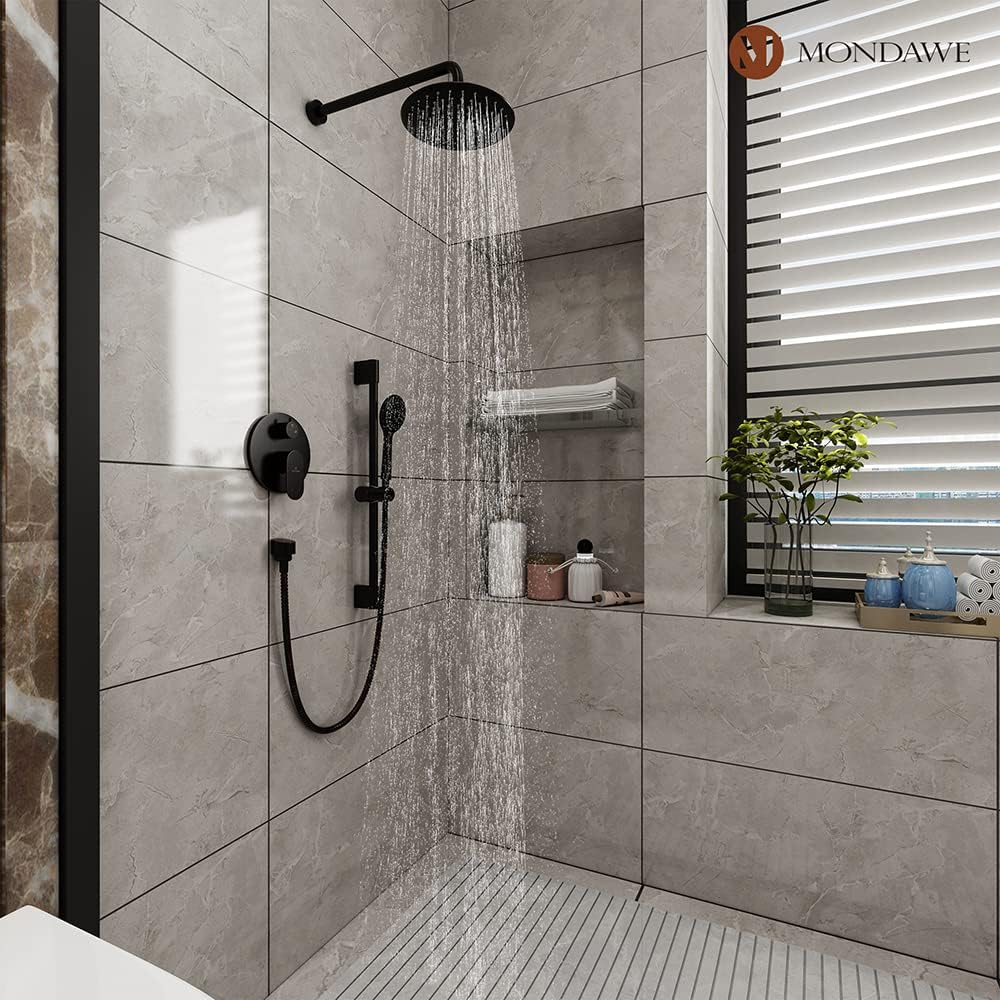
Image 4.1: Dimensional diagram of the MONDAWE 9-Inch Wall Mounted Shower System components.
5. Safety Information
Please observe the following safety precautions during installation and use:
- Always turn off the main water supply before beginning any plumbing work.
- Wear appropriate personal protective equipment (PPE) such as safety glasses and gloves during installation.
- Ensure all connections are secure and watertight to prevent leaks.
- If you are unsure about any step of the installation process, consult a qualified plumber.
- Do not use harsh chemicals or abrasive cleaners on the shower system, as this may damage the finish.
- The pressure balance valve is designed to prevent scalding; however, always test water temperature before stepping into the shower.
6. Installation
This section provides a general guide for installing your MONDAWE shower system. For detailed visual instructions, please refer to the official installation video below. It is recommended to have basic plumbing knowledge or consult a professional for installation.
6.1. Tools and Materials Required (Not Included)
- Plumber's Putty
- Wrench
- Slotted Screwdriver
- Electric Drill
- Measuring Tape
- Pencil
- Caulking Gun and Silicone Sealant
6.2. Pre-Installation Steps
- Turn off the main water supply to your home.
- Clear the installation area and ensure you have adequate space to work.
- Inspect all components for any damage or missing parts.
6.3. Valve Installation
The solid brass rough-in valve is the core of your shower system. Ensure it is securely mounted within the wall according to local plumbing codes.

Image 6.1: Detailed view of the solid brass rough-in valve, showing hot and cold water connectors, diverter, and pressure balance cartridge.
- Mount the valve body securely to the framing within the wall, ensuring it is level and at the correct depth relative to the finished wall surface.
- Connect the hot and cold water supply lines to the designated NPT 1/2" connectors on the valve body.
- Connect the shower head and handheld shower lines to their respective NPT 1/2" connectors on the valve.
- Test for leaks by turning on the water supply briefly and checking all connections.
6.4. Trim Kit Installation
Once the rough-in valve is installed and the wall is finished, you can install the decorative trim components.

Image 6.2: The control panel, showing the main handle for temperature and flow, and the diverter knob for selecting shower modes.
- Install the decorative escutcheon plate over the valve body, ensuring it is flush with the finished wall.
- Attach the main handle and the diverter knob to their respective stems on the valve. Secure them with the provided screws.
- Apply a bead of silicone sealant around the edge of the escutcheon plate to seal it against the wall and prevent water intrusion.
6.5. Shower Head and Handheld Installation

Image 6.3: The 9-inch rainfall shower head with an adjustable angle connector and easy-clean silicone nozzles.

Image 6.4: The handheld shower with three spray settings: Massage, Rain, and Rain+Massage.

Image 6.5: The height-adjustable slide bar, allowing the handheld shower to be positioned at various heights.
- Thread the shower arm into the wall connection. Ensure it is tight and sealed with plumber's tape or sealant.
- Attach the rainfall shower head to the shower arm. Hand-tighten, then use a wrench to secure, being careful not to overtighten.
- Install the slide bar to the wall using the provided mounting hardware. Ensure it is securely fastened and level.
- Connect the shower hose to the handheld shower spray and the wall outlet. Place the handheld shower into its holder on the slide bar.
6.6. Installation Video Guide
For a visual walkthrough of the installation process, please watch the official MONDAWE installation video:
Video 6.1: This video demonstrates the general installation steps for a MONDAWE shower panel. While the specific model shown may differ, the connection types and installation procedures are similar. Always refer to your product's specific instructions.
7. Operation
Operating your MONDAWE shower system is straightforward. Familiarize yourself with the controls before use.
7.1. Water Flow and Temperature Control
Image 7.1: The main handle controls water temperature (left for hot, right for cold) and flow (pull out to increase, push in to decrease).
- Turn On/Off: Pull the main handle outwards to turn on the water flow. Push it inwards to turn off.
- Adjust Temperature: Rotate the main handle left for hotter water and right for colder water. The pressure balance valve will maintain a consistent temperature once set, preventing sudden changes.
- Adjust Flow: The main handle also controls the water volume.
7.2. Shower Mode Selection
Image 7.2: The diverter knob allows switching between the rainfall shower and the handheld shower. Only one mode can be active at a time.
- Select Shower Head: Rotate the smaller diverter knob to the position indicated for the rainfall shower.
- Select Handheld Spray: Rotate the diverter knob to the position indicated for the handheld shower.
- Handheld Spray Settings: The handheld spray itself has a selector to switch between Rainfall, Massage, and Mixed modes.
Video 7.1: A brief overview of the MONDAWE 9-Inch Shower Faucet Set, demonstrating its features and water flow.
8. Maintenance
Regular cleaning and proper care will ensure the longevity and optimal performance of your MONDAWE shower system.
- Cleaning the Finish: Clean the oil rubbed bronze finish with a soft, damp cloth. Avoid abrasive cleaners, harsh chemicals, or scouring pads, as these can damage the finish. Mild soap and water are generally sufficient.
- Cleaning Nozzles: The rainfall shower head and handheld spray feature easy-clean silicone nozzles. If mineral deposits build up, gently rub the nozzles with your finger or a soft brush to dislodge them.
- Hard Water Areas: In areas with hard water, more frequent cleaning may be necessary. A solution of white vinegar and water (50/50) can be used for stubborn mineral deposits, but always rinse thoroughly immediately after application.
- Check for Leaks: Periodically inspect all connections for any signs of leaks. Tighten connections if necessary.
9. Troubleshooting
This section addresses common issues you might encounter with your shower system. For problems not listed here, please contact customer support.
| Problem | Possible Cause | Solution |
|---|---|---|
| Low Water Pressure | Clogged shower head/handheld nozzles; partially closed shut-off valve; low household water pressure. | Clean shower head/handheld nozzles. Ensure shut-off valves on the rough-in valve are fully open. Check main water supply pressure. |
| Water Leaks from Connections | Loose connections; worn O-rings/gaskets; insufficient plumber's tape/sealant. | Tighten connections. Replace O-rings/gaskets if damaged. Reapply plumber's tape/sealant as needed. |
| Inconsistent Water Temperature | Pressure balance cartridge issue; hot/cold water supply imbalance. | Ensure the pressure balance cartridge is correctly installed. If the problem persists, the cartridge may need replacement (contact customer support). |
| Diverter Not Switching Properly | Mineral buildup in diverter; faulty diverter mechanism. | Flush the system. If the issue continues, the diverter may need inspection or replacement. |
10. Warranty and Support
MONDAWE products are manufactured to high-quality standards. For warranty information and customer support, please refer to the service card included in your package or visit the official MONDAWE website. If you have any questions or require assistance with installation or operation, please do not hesitate to contact our customer service team.
Contact Information: Please refer to the service card or the MONDAWE brand store on Amazon for the most current contact details.
MONDAWE Store Link: Visit the MONDAWE Store on Amazon


