Introduction
This instruction manual provides comprehensive guidance for the assembly and finishing of your Heller 1:72 scale model kit of the DO27/CASA C-127 aircraft. Please read all instructions carefully before beginning assembly to ensure a successful and enjoyable building experience. This kit is designed for experienced modelers aged 14 and over.
Safety Information
WARNING! Not suitable for young children. Contains small parts which may present a choking hazard. Adult supervision is recommended for younger builders. Always use appropriate ventilation when working with paints and adhesives.
Kit Contents
Your Heller 1:72 DO27/CASA C-127 model kit includes:
- Plastic parts molded on sprues
- Clear parts for canopy and windows
- Decal sheet for various markings
- Instruction booklet
Please inspect all parts upon opening the box to ensure completeness and check for any damage. If any parts are missing or damaged, please contact Heller customer support.

Figure 1: Front view of the Heller 1:72 DO27/CASA C-127 model kit box, displaying the aircraft in flight with parachutists, along with branding and scale information.
Setup and Preparation
Before starting assembly, prepare your workspace:
- Ensure a clean, well-lit, and well-ventilated area.
- Gather necessary tools: hobby knife, plastic cement, tweezers, sandpaper/files, paintbrushes, and paints.
- Carefully remove parts from the sprues using a hobby knife or sprue cutters. Trim any excess plastic (flash) from the parts.
- Dry-fit parts before applying cement to ensure proper alignment and fit.
Assembly Instructions
Follow the numbered steps in the included instruction booklet for detailed assembly. The general process involves:
- Cockpit Assembly: Assemble the interior components such as seats, instrument panel, and control sticks. Paint these parts before gluing them into the fuselage halves.
- Fuselage Assembly: Join the fuselage halves, ensuring the cockpit assembly is correctly positioned. Use plastic cement sparingly.
- Wing Assembly: Assemble the wing sections, including any landing gear bays or internal structures. Attach the wings to the fuselage.
- Tail Section: Attach the horizontal and vertical stabilizers to the rear of the fuselage.
- Landing Gear: Assemble and attach the landing gear struts and wheels. Ensure they are aligned correctly for a stable stance.
- Propeller and Engine: Assemble the propeller and attach it to the engine cowling.
- Clear Parts: Carefully attach the canopy and windows using clear parts cement or white glue to avoid fogging.
- Final Details: Add any remaining small parts such as antennas, pitot tubes, and other external details.

Figure 2: Rear view of the model kit box, showing multi-language product information, a preview of the waterslide decals, and recommended paint colors.

Figure 3: A closer view of the model kit box front, highlighting the detailed illustration of the DO27/CASA C-127 aircraft and key kit specifications.
Painting and Decal Application
Once the main assembly is complete and the cement has fully cured, prepare for painting. Refer to the instruction booklet and the box art for recommended paint schemes and colors. The back of the box (Figure 2 and Figure 4) provides a guide for paint selection and decal placement.
- Painting: Apply primer if desired, then paint the model using acrylic or enamel paints. Apply thin coats to preserve surface detail.
- Decals: Cut out each decal individually. Dip in warm water for a few seconds until it slides freely from the backing paper. Carefully slide the decal onto the model surface. Use decal setting solutions to help the decals conform to irregular surfaces and eliminate silvering.
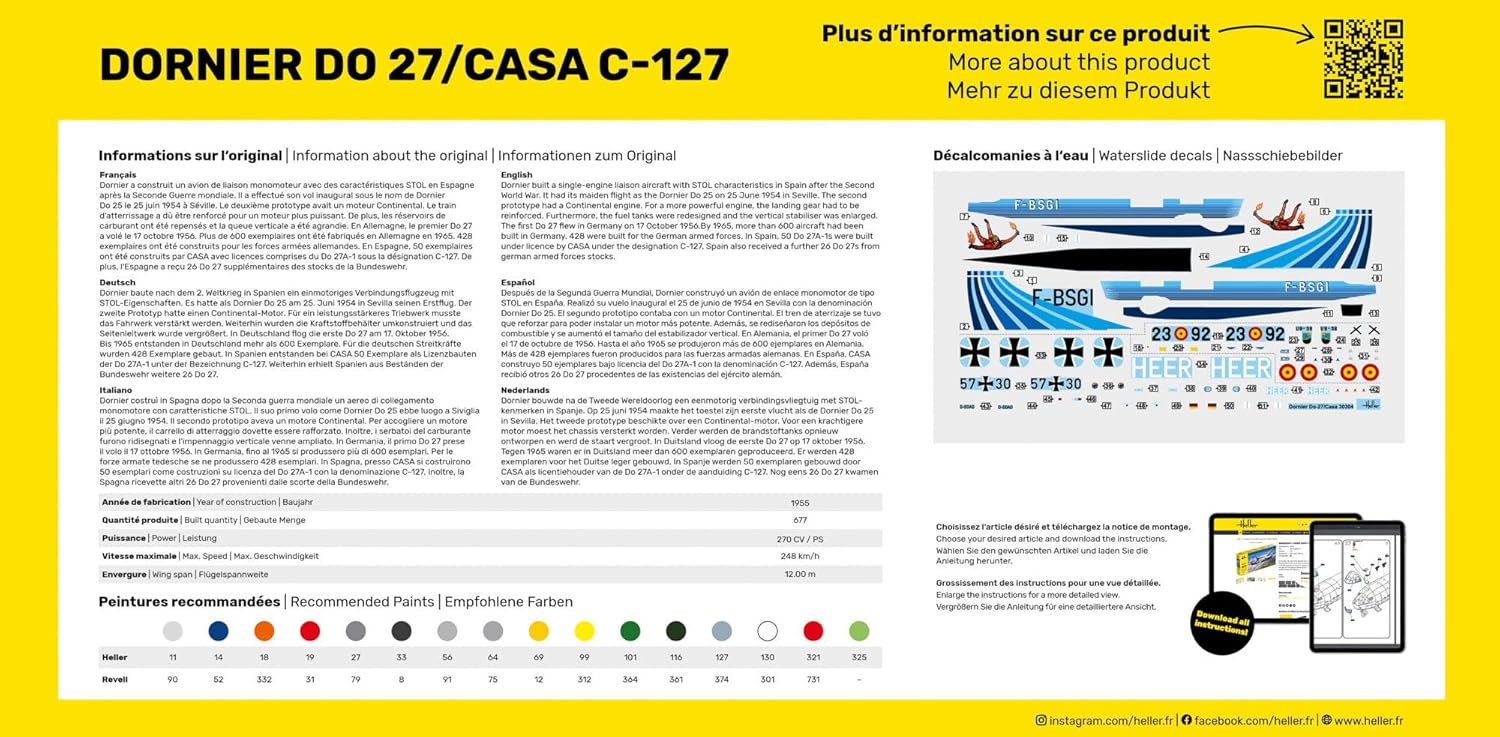
Figure 4: Detailed view of the model kit box back, showcasing the waterslide decal sheet and recommended paint color codes for various schemes.
Maintenance and Display
Once your model is complete, proper care will ensure its longevity:
- Keep the model away from direct sunlight to prevent paint fading and plastic warping.
- Dust regularly with a soft brush or compressed air. Avoid harsh cleaning agents.
- Display the model on a stable surface to prevent accidental falls.

Figure 5: Illustration showing different profiles and dimensions of the DO27/CASA C-127 model, including various decoration options.
Troubleshooting Common Issues
Here are solutions to common challenges encountered during model assembly:
- Poor Part Fit: Dry-fit parts before gluing. If fit is loose, use a small amount of filler. If too tight, gently sand edges.
- Gaps After Gluing: Fill small gaps with plastic putty or stretched sprue. Sand smooth once dry.
- Decal Silvering: Ensure the surface is glossy before applying decals. Use decal setting solutions to help decals conform and remove trapped air.
- Paint Issues: Apply paint in thin, even coats. Allow sufficient drying time between coats. Ensure proper surface preparation.
Specifications
| Feature | Detail |
|---|---|
| Brand | Heller |
| Model Name | DO27/CASA C-127 |
| Scale | 1:72 |
| Item Model Number | HEL30304 |
| Item Weight | 7 ounces |
| Manufacturer Recommended Age | 14 years and up |
| Number of Pieces | 72 pieces |
| Model Dimensions (approx.) | 133 x 167 mm |

Figure 6: Product information card detailing the year of construction, built quantity, power, maximum speed, wing span, and model dimensions.
Support and Contact Information
For further assistance, missing parts, or inquiries regarding your Heller model kit, please visit the official Heller website or contact their customer support.
Official Website: www.heller.fr


