1. Introduction
This manual provides comprehensive instructions for the assembly, installation, operation, and maintenance of your Tecmojo 6U Wall Mount Server Cabinet. Designed for IT network equipment and A/V devices, this cabinet offers a secure and organized solution for your server and networking needs. Please read this manual thoroughly before proceeding with installation to ensure proper setup and safe operation.
2. Product Overview and Features
The Tecmojo 6U Wall Mount Server Cabinet is engineered for efficiency and security, providing a robust enclosure for your valuable IT equipment. Key features include:
- Space-Saving Design: 6U wall mount configuration with dimensions of 13.78" H x 21.65" W x 17.72" D, and a maximum mounting depth of 14.2".
- Enhanced Security: Lockable glass door and side panels prevent unauthorized access. The front door can be reversed to open from either side.
- Easy Equipment Configuration: Features fully adjustable mounting rails and numbered U positions with square holes for straightforward equipment mounting.
- Durable Construction: Made of high-quality cold rolled steel, capable of holding up to 110 lbs (50 kg).
- Efficient Cooling: Includes a cooling fan and side ventilation holes to maintain optimal temperature.
- Cable Management: Top and bottom punch-out panels facilitate easy cable access and management.
- Compliance: PCI & HIPPA and EIA/ECA-310-E compliant.
Product Visuals

This image displays the overall appearance of the server cabinet, highlighting its compact design and the transparent front door, which allows for easy monitoring of internal components.

This diagram illustrates the various functional components of the cabinet, such as the top-mounted cooling fan for heat dissipation, removable cover panels for cable routing, lockable door and side panels for security, and side ventilation holes for improved airflow. It also shows the reversible nature of the front door.

This image provides a view of the cabinet's interior, emphasizing its heavy-duty cold rolled steel structure, maximum mountable depth of 14.2 inches, versatile rack rails (square or tapped), and the grounding stud for electrical safety. It visually demonstrates the cabinet's capacity to hold significant weight.
3. What's Included
Verify that all components are present in your package before beginning assembly:

The package contains the main cabinet components, an instruction manual, 10-32 screws (x10), 10-32 cage nuts (x10), two keys for the lockable door, and one cooling fan.
- Main Cabinet Components (unassembled)
- Instruction Manual
- 10-32 Screws (x10)
- 10-32 Cage Nuts (x10)
- Keys (x2)
- Cooling Fan (x1)
4. Setup and Installation
Follow these steps for proper assembly and wall mounting of your server cabinet. For a visual guide, please refer to the official assembly video below.
Assembly Steps:
- Assemble Front Frames & Back Cover: Begin by attaching the front frames to the back cover.
- Put on Top Cover: Secure the top cover to the assembled base.
- Fix Joints on Both Sides: Ensure all side joints are securely fastened with the provided screws.
- Fasten Rack Rails: Install and secure the versatile rack rails inside the cabinet.
- Install Side Panels: Attach the side panels to the cabinet structure.
- Install Front Glass Door: Mount the glass front door. It can be installed to open from either the left or right side.
Wall Mounting:
- Mark Mounting Holes: Use the included mounting hole drilling template to accurately mark the drill points on your wall. Ensure the 16-inch spacing is maintained for stud placement.
- Screw Cabinet to Wall: Securely fasten the cabinet to the wall using appropriate hardware for your wall type (not all mounting hardware may be included, consult a professional if unsure).
Installation Video Guide:
This video provides a step-by-step visual guide for assembling and installing your Tecmojo Standard Series Wall Mount Server Cabinet. It covers the entire process from unboxing to final wall mounting.
Mounting Template Visual:

This image illustrates the use of the provided mounting template to mark the precise locations for drilling holes on your wall, ensuring proper alignment and secure attachment of the cabinet.
For detailed diagrams and additional installation information, please refer to the official Installation Manual (PDF).
5. Operating Instructions
Once installed, the Tecmojo server cabinet provides a secure environment for your equipment. Consider the following for optimal operation:
- Equipment Placement: Distribute equipment weight evenly across the rack rails. Utilize shelves for non-rack-mountable devices.
- Cable Management: Use the top and bottom cable entry points to route cables neatly. Proper cable management improves airflow and simplifies maintenance.
- Airflow: Ensure adequate space around the cabinet for proper air circulation. The built-in cooling fan assists in maintaining internal temperatures.
- Security: Always lock the front glass door and side panels to protect your equipment from unauthorized access.
6. Maintenance
Regular maintenance ensures the longevity and optimal performance of your Tecmojo server cabinet:
- Cleaning: Periodically wipe down the exterior surfaces with a soft, damp cloth. Avoid abrasive cleaners.
- Fan Check: Inspect the cooling fan regularly for dust buildup. Clean the fan blades gently to ensure efficient operation.
- Hardware Inspection: Annually check all screws and fasteners to ensure they remain tight. Re-tighten if necessary.
- Cable Inspection: Verify that cables are not pinched or damaged, and that cable ties are not excessively tight.
7. Troubleshooting
Here are solutions to common issues you might encounter:
| Problem | Possible Cause | Solution |
|---|---|---|
| Cabinet Overheating | Blocked ventilation, fan malfunction, excessive equipment heat. | Ensure side vents are clear. Check if the cooling fan is operating. Reduce equipment density if possible. |
| Door/Side Panel Not Locking | Misalignment, damaged lock mechanism. | Check for proper alignment of the door/panel. Inspect the lock for any obstructions or damage. |
| Unstable Cabinet After Mounting | Improper wall anchors, loose mounting screws, uneven wall surface. | Verify that appropriate wall anchors were used for your wall type. Re-tighten all mounting screws. Ensure the wall surface is flat. |
8. Specifications
Detailed technical specifications for the Tecmojo 6U Wall Mount Server Cabinet:
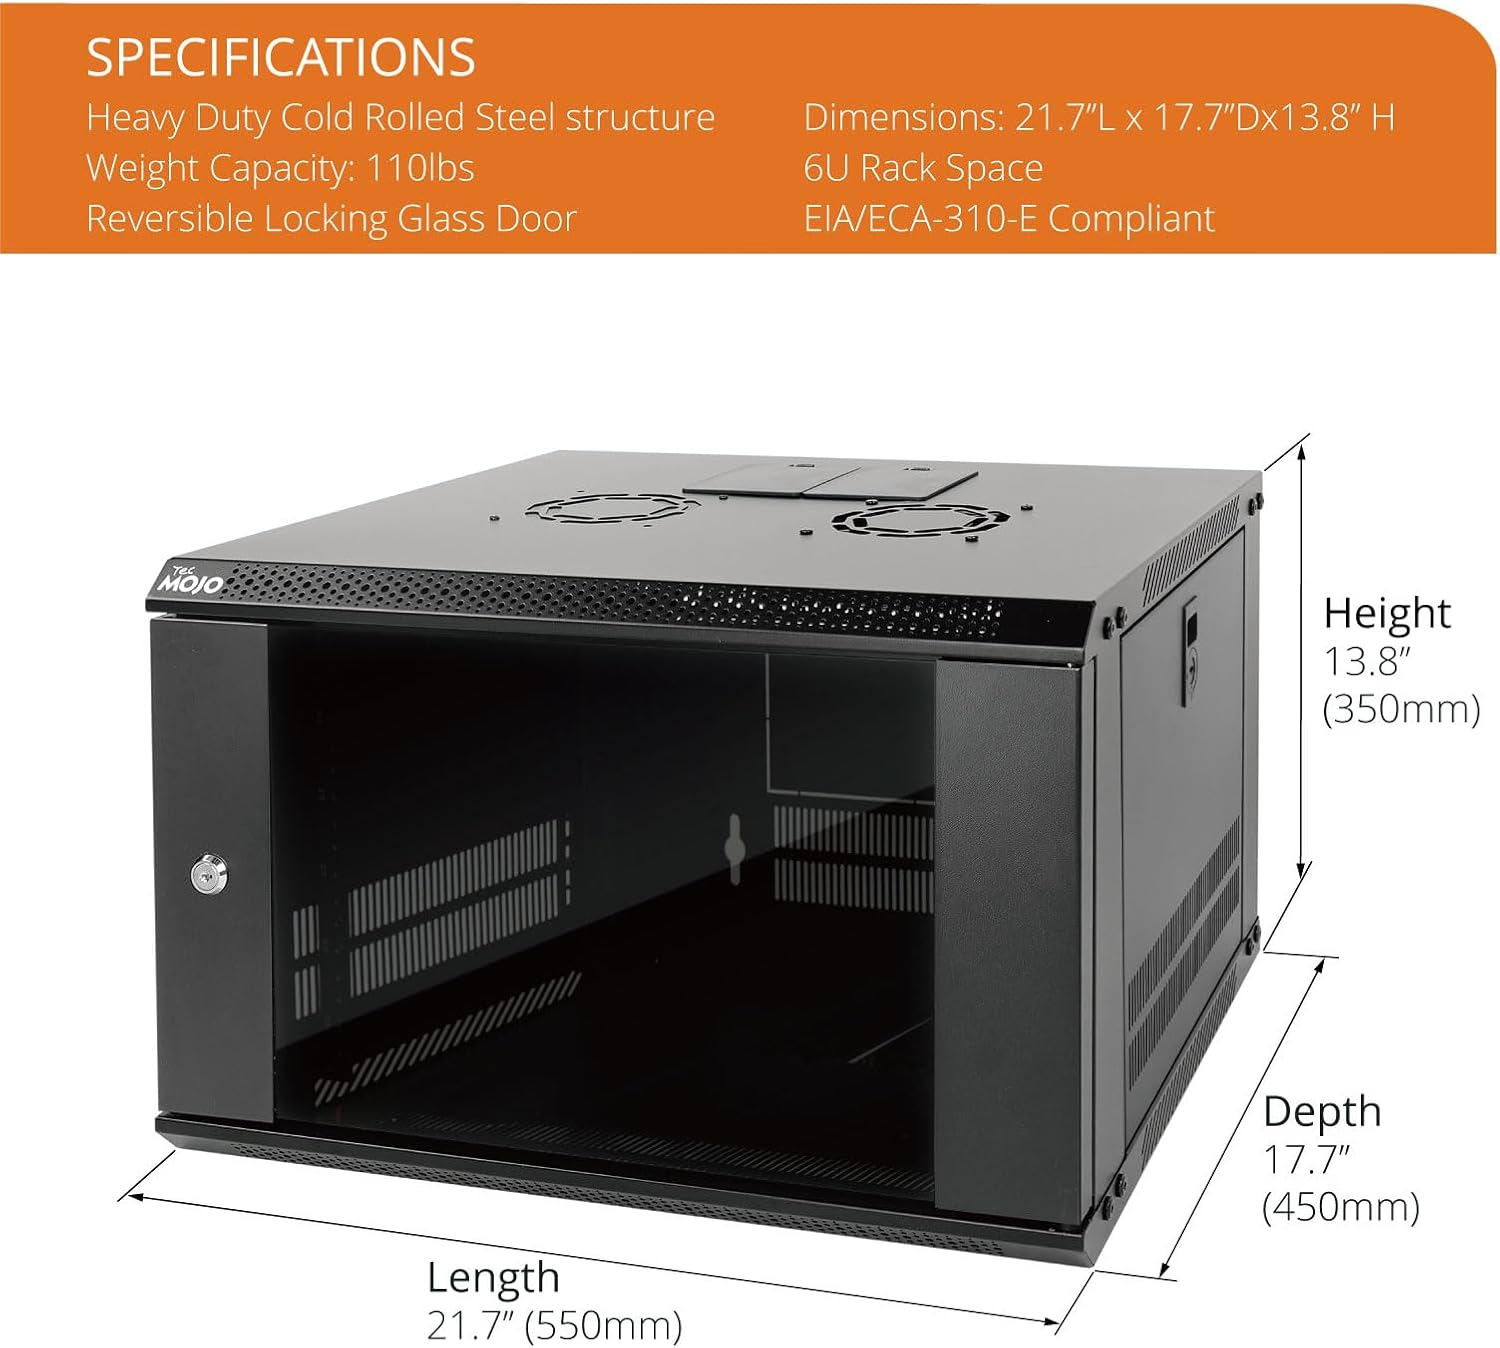
This image provides a visual representation of the cabinet's height, length, and depth, along with its weight capacity and rack unit size.
- Product Dimensions: 17.7"D x 21.7"W x 13.8"H (450mm Depth)
- Item Weight: 28.6 pounds
- Size: 6U/Glass Door
- Material: Alloy Steel (Heavy Duty Cold Rolled Steel)
- Color: Black
- Weight Capacity: Up to 110 lbs (50 kg)
- Compliance: EIA/ECA-310-E Compliant
- Manufacturer: Tecmojo
- ASIN: B0BSB242CM
9. Warranty and Support
For warranty information and technical support, please contact Tecmojo directly through their official channels or refer to the warranty card included with your product. Keep your purchase receipt for warranty claims.
Tecmojo Customer Support: Refer to the contact information provided in your product packaging or visit the official Tecmojo website.


