1. Introduction
Thank you for choosing the XTRONS PE72DLRL Android 12 Car Stereo GPS. This unit is designed to enhance your driving experience with advanced navigation, multimedia, and connectivity features. This manual provides essential information for the safe installation, setup, and operation of your new car stereo. Please read it thoroughly before use and retain it for future reference.
2. Safety Information
- Professional Installation Recommended: Due to the complexity of car electrical systems, professional installation is highly recommended to prevent damage to the unit or your vehicle.
- Disconnect Battery: Always disconnect the vehicle's negative battery terminal before beginning any installation work to avoid electrical shorts.
- Wiring: Ensure all wiring is correctly connected according to the provided wiring diagram. Incorrect wiring can cause damage or malfunction.
- Driving Safety: Do not operate the unit in a way that distracts you from driving. Always prioritize road safety.
- Volume Control: Keep the volume at a level that allows you to hear outside traffic sounds.
- Avoid Moisture: Do not expose the unit to moisture or water to prevent electric shock or fire.
3. Package Contents
Verify that all items listed below are included in your package. If any items are missing or damaged, please contact your dealer.
- XTRONS PE72DLRL Main Unit
- Power Cable Harness
- GPS Antenna
- USB Cables (x2)
- RCA Output Cables
- External Microphone
- User Manual (this document)
- Mounting Brackets
- CANbus Decoder
- Remote Control Unit

Figure 3.1: All components included with the XTRONS PE72DLRL unit. This includes the main head unit, various cables (power, USB, RCA), GPS antenna, external microphone, mounting brackets, CANbus decoder, and a separate remote control unit.
4. Product Overview
4.1 Front Panel and Display
The XTRONS PE72DLRL features a high-resolution IPS touchscreen display, offering clear visuals and responsive touch control. The Android 12 operating system provides a modern and intuitive user interface, with options for dual UI themes.
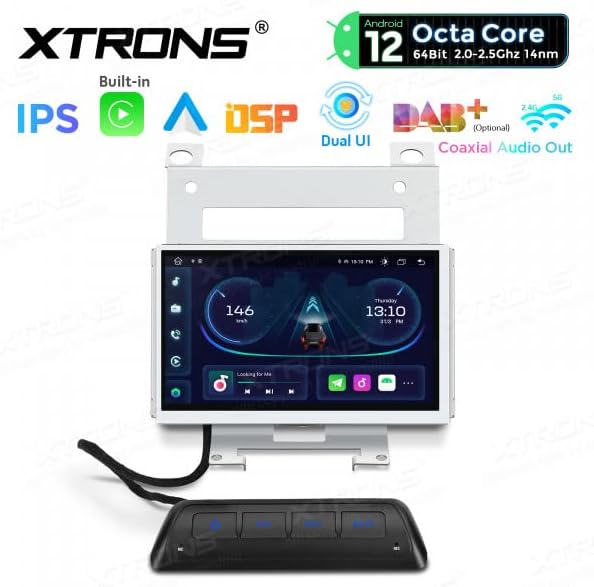
Figure 4.1: Front view of the XTRONS PE72DLRL unit with a dynamic car dashboard interface, showing speed, time, and media controls.

Figure 4.2: The unit's display showing the main media and radio interface, with quick access icons for navigation, video, and music.

Figure 4.3: The application launcher screen, providing access to various apps like Maps, Podcasts, Phone, Calendar, Settings, and SmartThings.
4.2 Rear Connections
The rear panel of the unit houses all necessary ports for power, audio, video, and peripheral connections. Refer to the wiring diagram for specific pin assignments.

Figure 4.4: Rear view of the XTRONS PE72DLRL unit, illustrating the various connectors for power, speakers, RCA outputs, USB, GPS antenna, and other accessories.
4.3 Remote Control Unit
A separate remote control unit is provided for convenient access to common functions such as power, car settings, navigation, and mute.

Figure 4.5: The remote control unit, typically mounted for easy access, with buttons for power, car settings, navigation, and mute. The image also shows the overall dimensions of the main unit.
5. Installation
This section outlines the general steps for installing the XTRONS PE72DLRL unit. For detailed vehicle-specific instructions, consult your vehicle's service manual or a professional installer.
5.1 Pre-Installation
- Ensure the vehicle's ignition is off and disconnect the negative terminal of the battery.
- Remove the original car stereo or display unit from the dashboard.
- Carefully unpack the XTRONS unit and all accessories.
5.2 Wiring Connections
Connect the provided wiring harnesses to the corresponding ports on the XTRONS unit and your vehicle's wiring. Ensure all connections are secure.
- Power Harness: Connect the main power harness to the unit and the vehicle's power supply. The CANbus decoder should be integrated here for steering wheel controls and vehicle data.
- GPS Antenna: Connect the GPS antenna and route it to a location with a clear view of the sky (e.g., dashboard, under the windshield).
- USB Cables: Connect the USB cables and route them to a convenient location for connecting USB devices.
- External Microphone: Connect the external microphone for improved call quality and voice commands. Route it to a suitable position, such as near the rearview mirror.
- RCA Cables: Connect RCA cables for external amplifiers, subwoofers, or video output if applicable.
- Optional Connections: If using a rear camera, DVR, DAB+ box, or TPMS kit, connect them according to their respective manuals.
5.3 Mounting the Unit
- Attach the provided mounting brackets to the sides of the XTRONS unit.
- Carefully slide the unit into the dashboard opening, ensuring all wires are tucked away and not pinched.
- Secure the unit using the mounting screws.
- Reinstall any removed trim panels.
6. Setup
6.1 Initial Power On
- Reconnect the vehicle's negative battery terminal.
- Turn on the vehicle's ignition. The XTRONS unit should power on automatically.
- Follow the on-screen prompts for initial setup, such as language selection and time zone.
6.2 System Settings
Access the 'Settings' menu from the main interface to configure various system parameters.
- Date & Time: Set the correct date and time, or enable automatic synchronization via GPS/network.
- Display: Adjust brightness, wallpaper, and UI themes.
- Sound: Configure audio settings, including the DSP equalizer for optimal sound.
6.3 Wi-Fi Connection
- Go to 'Settings' > 'Network & Internet' > 'Wi-Fi'.
- Turn on Wi-Fi and select your desired network from the list.
- Enter the password if prompted and connect.
6.4 Bluetooth Pairing
- Go to 'Settings' > 'Connected devices' > 'Bluetooth'.
- Ensure Bluetooth is enabled on both the XTRONS unit and your mobile device.
- Search for available devices on your mobile phone and select 'XTRONS' (or similar name).
- Confirm the pairing code on both devices.
7. Operating Instructions
7.1 Main Interface Navigation
The Android 12 interface allows for intuitive navigation. Swipe left or right to access different home screens or the app drawer. Tap icons to launch applications.
7.2 GPS Navigation
The unit comes with integrated GPS. You can use pre-installed navigation apps or download others from the Google Play Store (requires Wi-Fi connection).
- Tap the 'Navigation' or 'Maps' icon to launch the GPS application.
- Enter your destination and follow the on-screen and voice-guided directions.

Figure 7.1: The unit's display showing a navigation map, indicating a route and current location.
7.3 Radio
Access the 'Radio' application to listen to FM/AM broadcasts.
- Tap the 'Radio' icon.
- Use the on-screen controls to scan for stations, manually tune, or select presets.
7.4 Media Playback
Play audio and video files from connected USB devices or via Bluetooth streaming.
- USB: Insert a USB drive into one of the USB ports. The unit will automatically detect it, or you can access files via a file manager app.
- Bluetooth Audio: Once your phone is paired via Bluetooth, you can stream music directly to the unit.
7.5 Apple CarPlay & Android Auto
The unit supports integrated Apple CarPlay and Android Auto for seamless smartphone integration.
- Wired Connection: Connect your iPhone or Android phone to one of the USB ports using a certified USB cable.
- Follow the on-screen prompts to activate CarPlay or Android Auto.
- Once connected, you can access compatible apps, navigation, calls, and messages directly from the unit's display.
7.6 Steering Wheel Controls
The integrated CANbus decoder allows the unit to work with your vehicle's original steering wheel controls. These controls are typically pre-configured, but can be customized in the system settings if needed.
8. Maintenance
8.1 Cleaning
- Use a soft, dry cloth to clean the display and unit exterior.
- For stubborn marks on the screen, use a screen cleaner specifically designed for electronics and a microfiber cloth.
- Do not use abrasive cleaners or solvents.
8.2 Software Updates
Periodically check for software updates to ensure optimal performance and access to new features.
- Connect the unit to a Wi-Fi network.
- Go to 'Settings' > 'About device' > 'System updates'.
- Follow the on-screen instructions to download and install any available updates. Ensure the vehicle's engine is running during the update process to prevent power interruption.
9. Troubleshooting
This section addresses common issues you might encounter. For problems not listed here, please contact XTRONS customer support.
| Problem | Possible Cause | Solution |
|---|---|---|
| Unit does not power on. | Incorrect wiring, blown fuse, loose connection. | Check power connections and fuses. Ensure the negative battery terminal is reconnected. |
| No sound from speakers. | Volume too low, mute activated, incorrect speaker wiring, amplifier issue. | Increase volume, check mute status, verify speaker wiring, check external amplifier if used. |
| GPS signal is weak or unavailable. | GPS antenna not properly installed, obstructed view of sky, faulty antenna. | Ensure GPS antenna is mounted in a clear location. Check antenna connection. |
| Bluetooth connection issues. | Bluetooth not enabled, device not discoverable, pairing failed. | Ensure Bluetooth is on for both devices. Make device discoverable. Re-attempt pairing. |
| Touchscreen unresponsive. | System freeze, temporary software glitch. | Restart the unit (refer to manual for reset button location if available, or turn off ignition and restart vehicle). |
10. Specifications
- Model: PE72DLRL
- Operating System: Android 12
- CPU: 8-core
- RAM: 2GB DDR4
- ROM: 32GB SSD (Expandable via USB)
- Display: IPS Touchscreen
- Bluetooth: Version 5.0
- Wi-Fi: Integrated (2.4Ghz & 5Ghz Dual Band)
- Connectivity: Bluetooth, USB, Wi-Fi
- Compatible Devices: Smartphone (for CarPlay/Android Auto)
- Special Features: Built-in DSP Equalizer, Apple CarPlay, Android Auto, Steering Wheel Control Support, DAB+ Ready (DAB box not included), TPMS Ready (TPMS kit not included), Rear Camera Input, DVR Input.

Figure 10.1: Overview of the XTRONS PE72DLRL's core specifications and features.
11. Warranty and Support
XTRONS products are designed for reliability and performance. For warranty information, please refer to the warranty card included with your purchase or visit the official XTRONS website. For technical support, troubleshooting assistance, or inquiries about spare parts, please contact your authorized XTRONS dealer or XTRONS customer service directly.
Please note that information regarding software updates and spare parts availability is subject to change and may not be available indefinitely.


