Introduction
This manual provides essential information for the safe and efficient use of your ApisQueen U92 12V 300KV Underwater Thruster Set. Please read these instructions carefully before installation and operation. This thruster set is designed for use with kayaks, inflatable boats, and paddle boards, offering powerful and precise propulsion.
Safety Information
- Always ensure the thruster is securely mounted before operation.
- Keep hands, hair, and loose clothing away from rotating propellers.
- Do not operate the thruster out of water for extended periods to prevent overheating.
- Ensure all electrical connections are secure and waterproof where applicable.
- The remote control is not waterproof; protect it from moisture.
- Use only recommended 12V (3S LiPo) batteries for optimal performance and safety.
- Regularly inspect the thruster and cables for any signs of damage or wear.
Package Contents
The ApisQueen U92 Thruster Set includes the following components:
- 1 x CW (Clockwise) Thruster
- 1 x CCW (Counter-Clockwise) Thruster
- 2 x Electronic Speed Controller (ESC)
- 1 x Non-waterproof Remote Control
- 1 x Waterproof Case (for ESC and receiver)
- 2 x Mounting Base
- 2 x Mounting Bottom
- 2 x Double-sided Velcro
Specifications
| Feature | Detail |
|---|---|
| Brand | ApisQueen |
| Model Name | U92 12V 300KV Set |
| Material | Nylon |
| Item Weight | 7.9 Pounds (approx. 3.58 kg) |
| Product Dimensions | 6.1 x 5.11 x 5.11 inches (approx. 15.5 x 13 x 13 cm) |
| Recommended Battery | 12V (3S LiPo) |
| Motor KV Value | 300KV |
| Thrust | Up to 21.4 Kg (47.2 LBS) |
| ESC Continuous Current | 30A |
| Remote Control Channels | 6 (PWM signals) |
| Remote Control Distance (Ground) | 300m |
| Remote Control Distance (Air) | 800m |
 Image: Diagram illustrating the dimensions of the U92 underwater thruster.
 Image: Table detailing the technical parameters for the U92 thruster and its remote control.
Setup
The U92 thruster set features a modular design for flexible installation. Follow these steps for proper setup:
- Mounting the Thrusters: Securely attach the thrusters to your vessel using the provided mounting bases and bottoms. The modular design allows for flexible positioning. Ensure the thrusters are firmly fixed to prevent movement during operation.
- Connecting the ESC and Receiver: The Electronic Speed Controllers (ESCs) and remote receiver are housed within a waterproof case. This case should be placed in a secure, dry location on your vessel.
- Battery Connection: Connect the thruster's positive and negative power lines directly to a 12V (3S LiPo) battery. The O-ring connectors are designed for fast and secure battery connection, compatible with most marine battery terminals (10mm diameter O-ring).
- Remote Control: The remote control comes pre-configured. No additional settings are required. Simply connect the power, and it is ready for use. Note that the remote control itself is not waterproof and should be protected from water exposure.
 Image: Two U92 thrusters shown mounted underneath a vessel, illustrating the installation method.
 Image: A diagram highlighting the modular design of the U92 thruster, showing how the adapting piece connects to the pedestal.
 Image: A waterproof sealed case containing the ESC and remote receiver, designed for protection in marine environments.
 Image: Close-up of O-ring connectors, illustrating the design for secure and fast battery attachment.
 Image: The non-waterproof remote control unit, featuring multiple buttons and a joystick for operation.
Setup and Operation Demonstration Video
Video: A detailed demonstration of the U92 thruster set installation and initial operation, including connecting components and testing basic functions.
Operating Instructions
The U92 thruster set is equipped with a bi-directional ESC, allowing for forward, backward, left, and right movements. The remote control provides intuitive command over the thrusters.
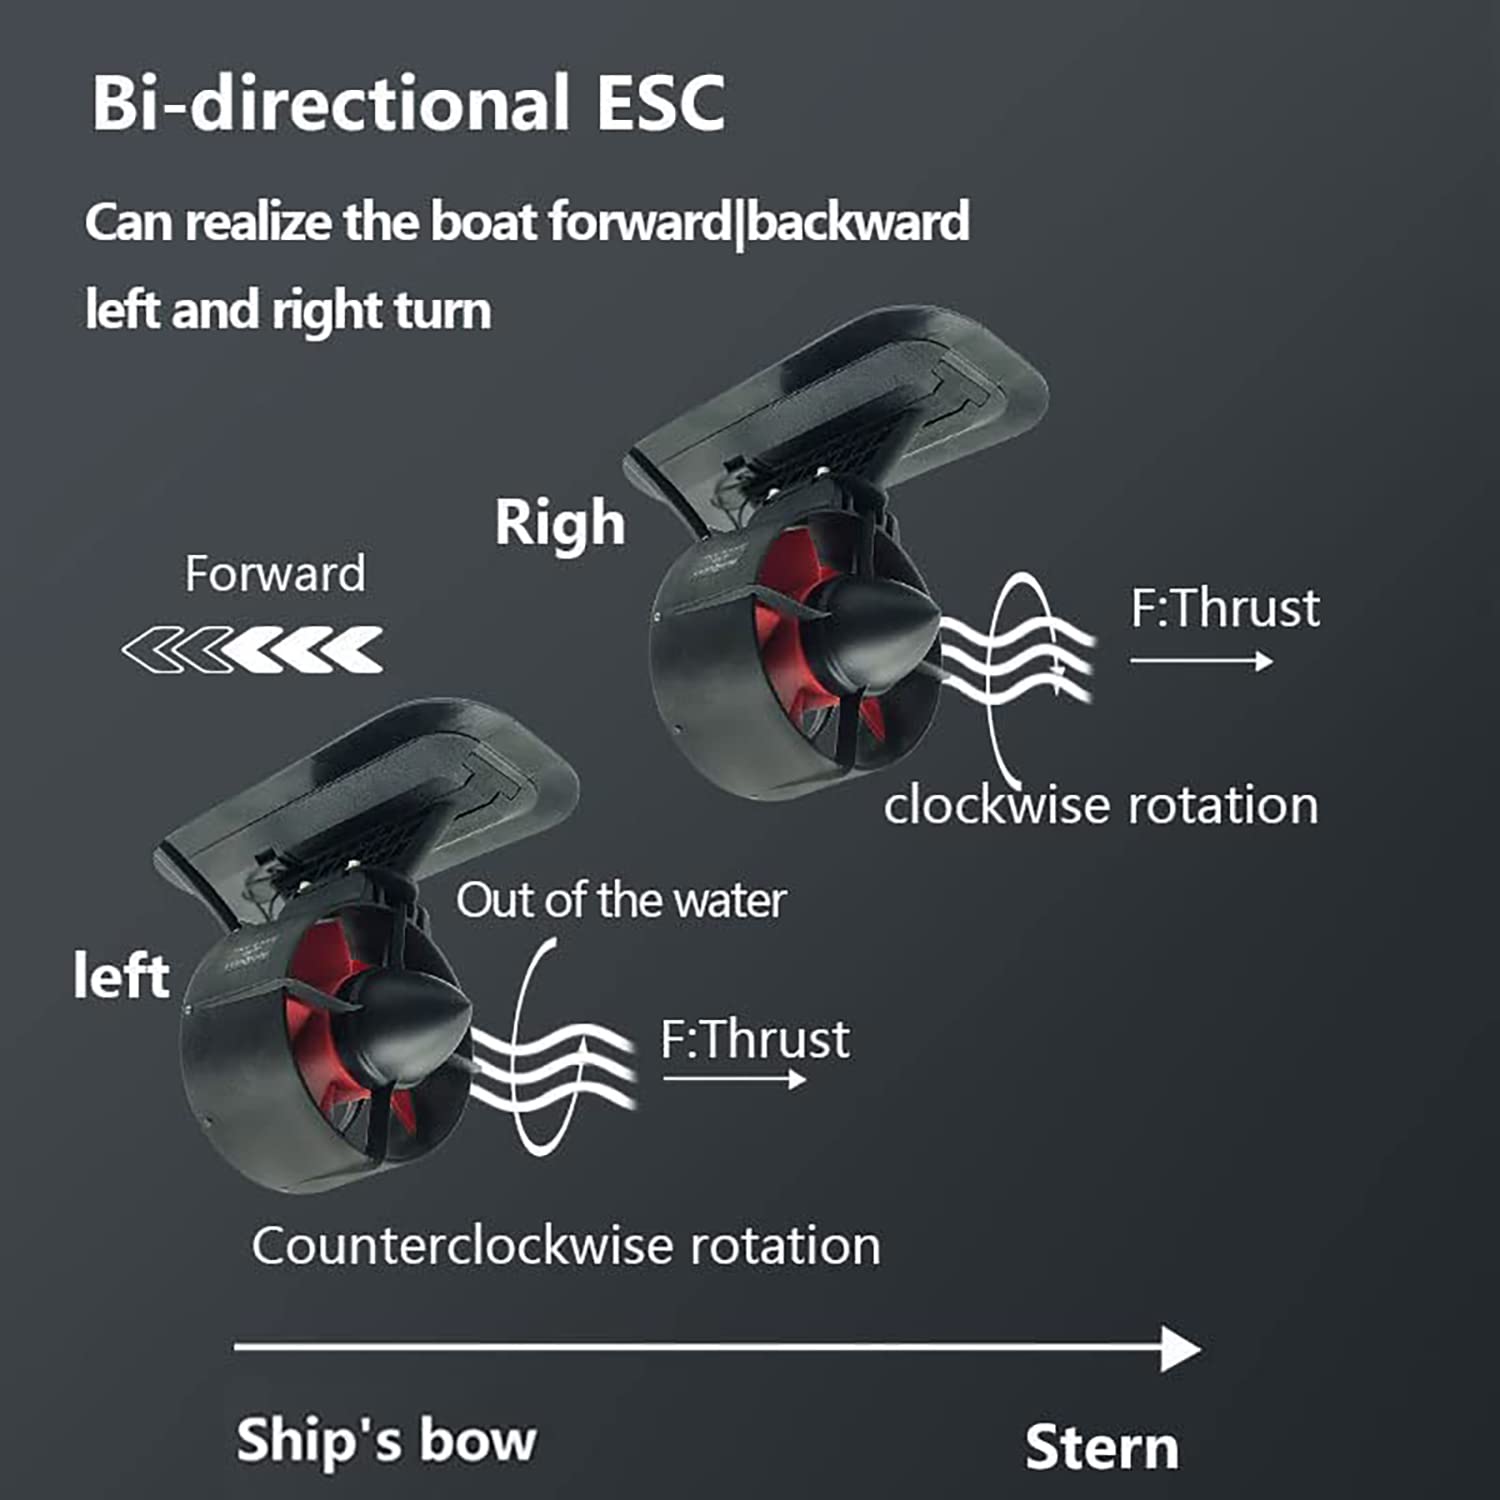 Image: Diagram illustrating the bi-directional thrust capability of the U92 thruster, showing clockwise and counter-clockwise rotation for forward and turning movements.
- Power On: After connecting the battery, turn on the remote control first, then press the power switch on the battery.
- Forward/Backward Movement: Push the remote control's main rocker forward to move the vessel forward. Pull it backward to move the vessel in reverse.
- Turning: Push the rocker to the left to turn the vessel left, and to the right to turn the vessel right.
- Fixed Speed Cruise: Press the dedicated fixed speed cruise button on the remote control to activate cruise mode. Press it again to exit.
- Safety Features: The ESC includes multiple protections such as low voltage, high voltage, over temperature, and over current protection to ensure safe operation.
In-Water Operation Video
Video: A short demonstration of the ApisQueen U92 underwater thruster operating in water, showcasing its thrust and maneuverability.
Maintenance
Proper maintenance ensures the longevity and performance of your thruster set:
- Rinse After Use: After each use in saltwater, thoroughly rinse the thrusters with fresh water to prevent corrosion.
- Inspect Propellers: Regularly check the propellers for any debris (fishing line, weeds, etc.) or damage. Remove any obstructions carefully.
- Check Connections: Periodically inspect all electrical connections for corrosion or looseness. Ensure the waterproof case for the ESC and receiver remains sealed.
- Battery Care: Follow the manufacturer's guidelines for charging and storing your 12V (3S LiPo) battery.
- Storage: Store the thruster set in a dry, cool place away from direct sunlight when not in use.
Troubleshooting
If you encounter issues with your U92 thruster set, refer to the following common troubleshooting steps:
- Thruster Not Responding:
- Check battery charge level.
- Ensure all power connections are secure.
- Verify the remote control is powered on and paired with the receiver.
- Inspect thruster propellers for obstructions.
- Reduced Thrust:
- Check for debris wrapped around the propellers.
- Ensure the battery is fully charged and providing adequate power.
- Verify no damage to the thruster housing or propellers.
- Intermittent Operation:
- Check for loose wiring connections.
- Ensure the remote control is within operating range and has fresh batteries.
- Verify the waterproof case for the ESC and receiver is properly sealed.
- Overheating:
- Ensure the thrusters are fully submerged during operation.
- Check for excessive load or obstructions on the propellers.
If problems persist after following these steps, please contact ApisQueen customer support for further assistance.
Warranty and Support
ApisQueen products are designed for reliability and performance. For warranty information, technical support, or service inquiries, please refer to the contact details provided with your purchase or visit the official ApisQueen website.
Online Resources: For additional information and support, you may visit the ApisQueen store on Amazon: ApisQueen Store


