1. Introduction
This manual provides detailed instructions for the installation, operation, and maintenance of your Nexete 53T Universal Ceiling Fan Remote Control Kit. This kit is designed to add remote control functionality to most standard AC ceiling fans, offering 3-speed fan control and light dimming capabilities.
The 53T kit is universally compatible with many major ceiling fan brands, including Hampton Bay, Home Decorators Collection, Hunter, and Litex. It is suitable for most downrod style AC fans. Please note, it is not recommended for use with hugger style fans or wall-mounted/exhaust-type fans.
2. Safety Information
- Always disconnect power at the circuit breaker before attempting any installation or maintenance.
- If you are unsure about wiring, consult a qualified electrician.
- Ensure all electrical connections are secure and comply with local electrical codes.
- Do not use this product with fans that have a built-in remote receiver or solid-state speed control unless specifically stated as compatible.
- The receiver is designed for indoor use only.
3. Package Contents
The Nexete 53T Universal Ceiling Fan Remote Control Kit includes the following components:
- 1 x 53T Remote Control (requires 9-Volt battery, not included)
- 1 x 28R Receiver
- 1 x Wall Bracket for Remote Control
4. Specifications
| Brand | Nexete |
| Model Name | 53T Kit |
| Model Number | 53T |
| Special Feature | ETL certification, Universal compatibility |
| Color | White |
| Max Number of Supported Devices | 16 (with unique DIP codes) |
| Compatible Devices | 110V 3-Speed AC Ceiling Fan, Fan |
| Connectivity Technology | Radio Frequency |
| Button Quantity | 5 |
| Maximum Range | 50 Feet |
| Battery Type | 9V (not included) |
| Item Weight | 6 Ounces |
5. Setup and Installation
5.1 Setting the DIP Switches (Code Matching)
The remote control and receiver use 4 DIP switches to set a unique code. This prevents interference from other remote-controlled devices. Both the remote and receiver must be set to the same code pattern.
- For the Remote Control (Transmitter):
a. Remove the battery cover from the back of the 53T remote control. You may need to press firmly below the arrow and slide the cover off.
b. Locate the 4 DIP switches inside the battery compartment. Slide these switches to your desired combination of up or down positions. The factory default setting is all switches in the 'up' position (0000), but it is recommended to choose a different combination.
c. Replace the battery cover. - For the Receiver:
a. Locate the 4 DIP switches on the side of the 28R receiver unit.
b. Slide these switches to match the exact pattern you set on your remote control (transmitter).

Image: Setting the DIP switches on both the remote and receiver.
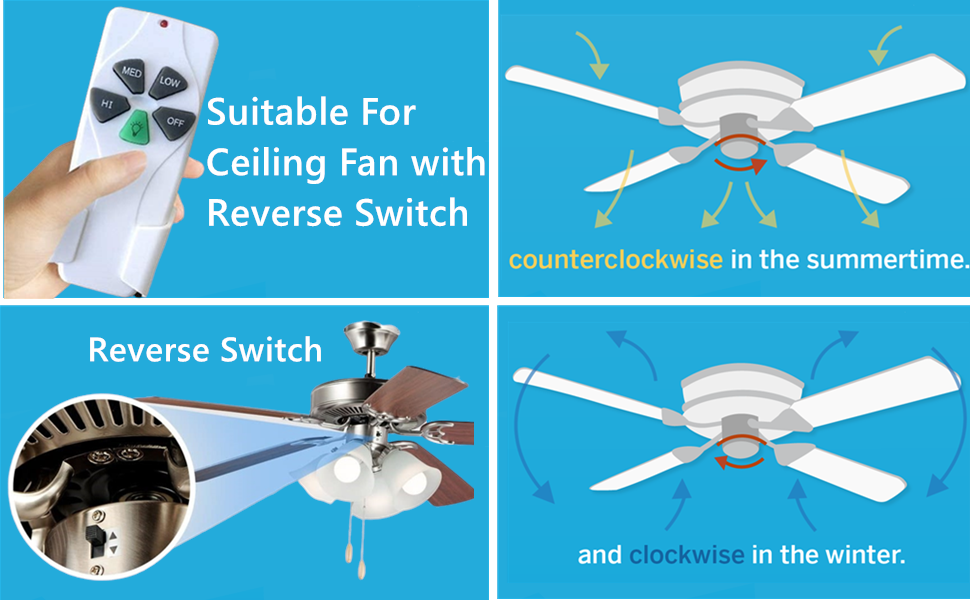
Image: Diagram illustrating 16 possible DIP switch code combinations.
5.2 Wiring Installation
Important: Before proceeding, ensure power to the ceiling fan circuit is turned OFF at the main electrical panel.
- Disconnect Fan Wiring: Carefully disconnect the existing wiring from your ceiling fan.
- Connect Receiver: Connect the 28R receiver to the ceiling fan and household wiring as shown in the diagram below. Ensure all connections are secure using wire nuts.
- AC 110-120V 60HZ (Household Power): Connect the white wire from the receiver to the neutral (white) household wire. Connect the red wire from the receiver to the hot (black) household wire.
- To Fan: Connect the white wire from the receiver to the neutral (white) fan wire. Connect the black wire from the receiver to the fan motor (black) wire. Connect the blue wire from the receiver to the fan light (blue) wire.
- Position Receiver: Carefully tuck the receiver into the fan's canopy or mounting bracket, ensuring it does not interfere with fan operation or wiring.
- Restore Power: Once all connections are secure and the receiver is properly positioned, restore power at the circuit breaker.

Image: Wiring diagram for connecting the receiver to the ceiling fan and household power.
5.3 Battery Installation (Remote Control)
The 53T remote control requires one 9-Volt battery (not included). Open the battery cover on the back of the remote and insert the 9-Volt battery, observing the correct polarity. Replace the battery cover.
6. Operating Instructions
Once installed and powered, your Nexete 53T remote control allows you to operate your ceiling fan and light.

Image: Nexete 53T Remote Control layout.
6.1 Fan Speed Control
- Press the HI button for high fan speed.
- Press the MED button for medium fan speed.
- Press the LOW button for low fan speed.
- Press the OFF button to turn the fan off.
6.2 Light Control and Dimming
- Press the Light button (green button with light bulb icon) to turn the light ON or OFF.
- To dim the light, press and hold the Light button. Release the button when the desired brightness level is reached.
Light Bulb Compatibility: The light dimming function is compatible with incandescent light bulbs and dimmable LED/CFL lamps. Non-dimmable LED/CFL lamps will only support ON and OFF functionality.

Image: Light bulb compatibility for the dimming function.
6.3 Fan Reverse Switch
This remote control kit does not include a reverse function. If your ceiling fan has a reverse switch, it must be operated manually on the fan motor housing. For optimal air circulation:
- In summertime, set the fan to rotate counter-clockwise to create a cooling downdraft.
- In wintertime, set the fan to rotate clockwise to create an updraft that circulates warm air.

Image: Fan blade rotation for seasonal comfort.
7. Troubleshooting
| Problem | Possible Cause | Solution |
| Fan or light does not respond to remote. | Incorrect DIP switch settings. Dead or low battery in remote. Power to fan is off. | Verify DIP switches on both remote and receiver match exactly. Replace 9V battery in remote. Check circuit breaker and wall switch for fan. |
| Fan operates at incorrect speed or inconsistently. | Interference from other devices. Fan's original speed control (e.g., rotary knob) is not set to high. | Change DIP switch code to a different combination. Ensure the fan's original pull chain or wall control is set to the highest speed before using the remote. |
| Light does not dim. | Non-dimmable light bulbs installed. | Replace with dimmable LED/CFL or incandescent bulbs. |
| Multiple fans in the house respond to one remote. | All fans are set to the same DIP code. | Set different DIP switch codes for each fan/remote pair to prevent interference. |

Image: Setting unique PIN codes for multiple ceiling fans.
8. Maintenance
8.1 Battery Replacement
When the remote control's range decreases or it becomes unresponsive, it is likely time to replace the 9-Volt battery. Follow the instructions in Section 5.3 to replace the battery.
8.2 Cleaning
Wipe the remote control and receiver with a soft, dry cloth. Do not use abrasive cleaners or solvents.
9. Warranty and Support
For warranty information or technical support, please refer to the product packaging or contact Nexete customer service through the retailer where the product was purchased. Keep your purchase receipt for warranty claims.


