1. Introduction
The AWOL VISION IC-A150 Motorized Slider Tray is designed to enhance your ultra-short throw (UST) projector experience by providing an automatically retractable and telescopic platform. This device allows for flexible projector placement, optimizing screen size and saving space. It features smart synchronization with your projector's power, ensuring seamless operation.
2. Package Contents
Before beginning installation, please verify that all components are present:
- Slider Tray Unit
- Signal Cable (USB)
- Power Adapter (with US, EU, UK plugs)
- Metal Brackets (long and short pieces)
- Laser TV Fixing Screws
- Bracket Fixing Screws (M4*5)
- Self-tapping Screws (M4*16)
- Expansion Screws (M4*40)

Image: Components included in the AWOL Vision IC-A150 Motorized Slider Tray package, showing the slider unit, cables, power adapter, various screws, and metal brackets.
3. Product Features
- Extended Projection: Project images up to 150 inches or more, allowing the UST projector to be placed closer to the wall.
- Automatic Retraction: The tray automatically slides out when the projector is powered on and retracts when powered off, thanks to a signal cable connection.
- Memory Function: Easily preset your desired projection distance. The tray will remember the last set position after 30 seconds.
- Durable Construction: Built with an all-aluminum alloy for high loading capacity (up to 44 lbs / 20 kg), ensuring stable support for your projector.
- Quiet Operation: Equipped with an advanced brushless motor for smooth and quiet sliding.
- Flexible Installation: Offers two installation options: directly on a TV cabinet or mounted to a wall.
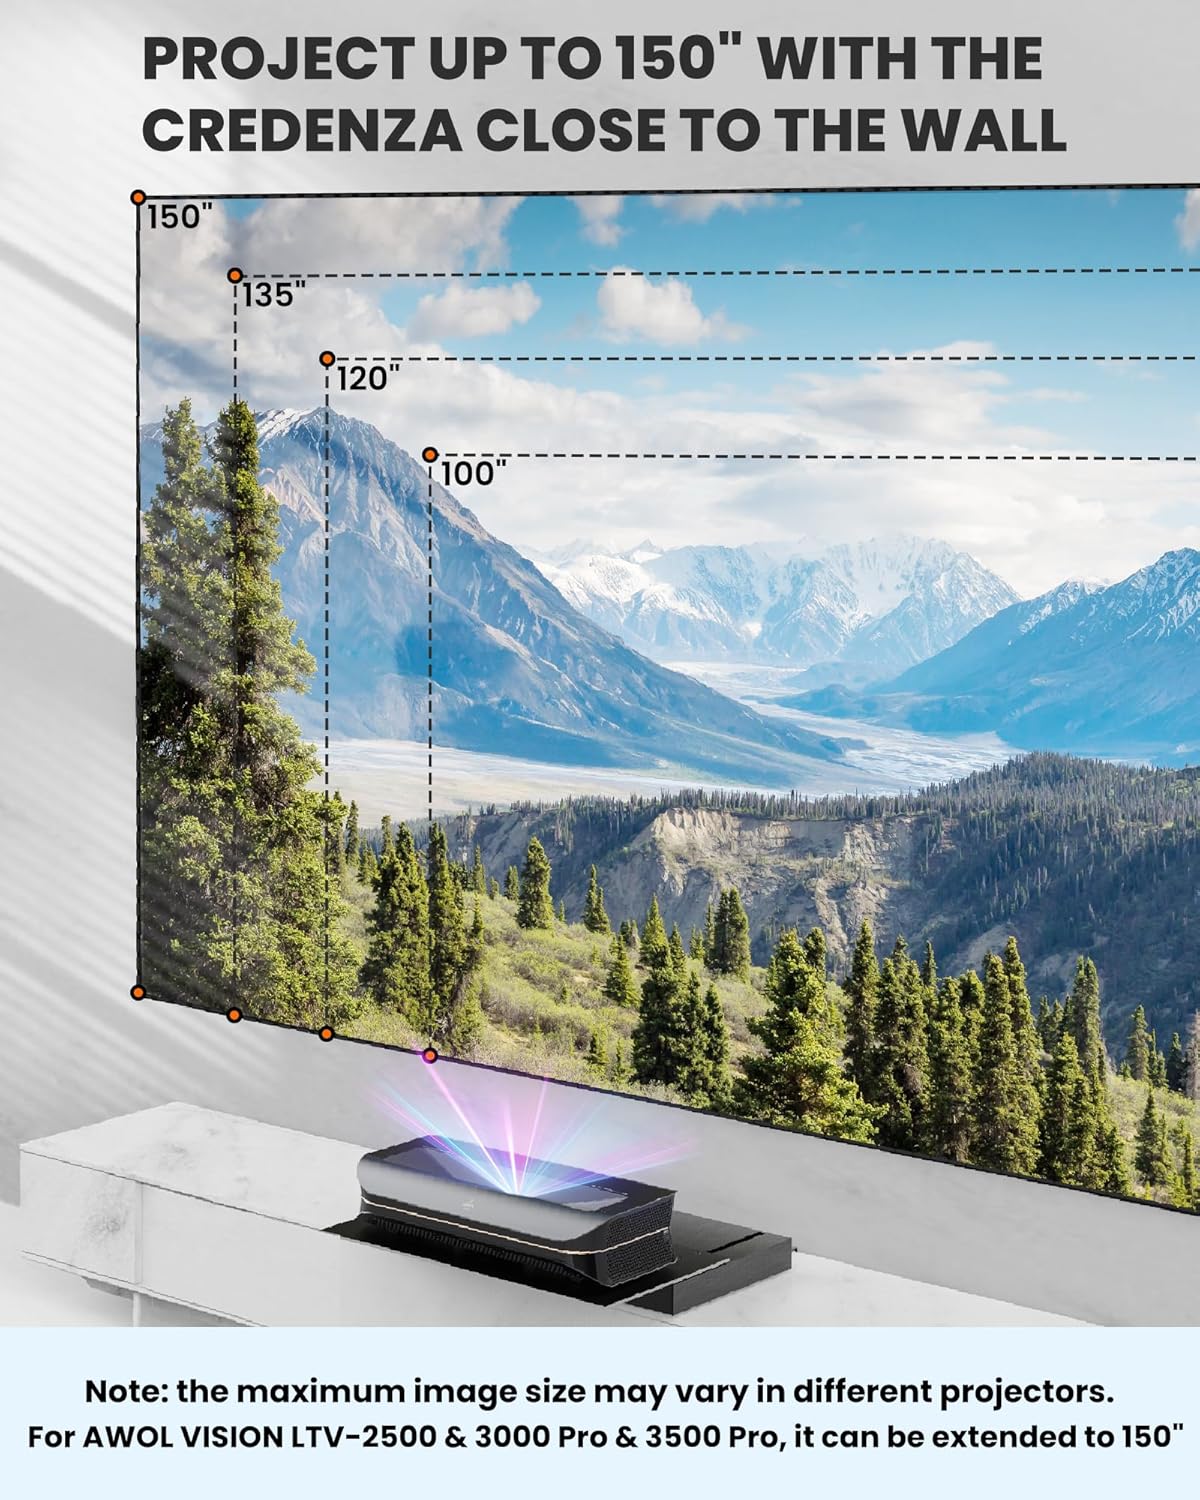
Image: The motorized slider tray extending to allow an ultra-short throw projector to cast a large image, illustrating its space-saving capability.
4. Specifications
| Feature | Detail |
|---|---|
| Model | IC-A150 |
| Brand | AWOL VISION |
| Material | Aluminum Alloy |
| Load Capacity | Up to 44 lbs (20 kg) |
| Product Dimensions (L x W x H) | 14.8 x 21.7 x 2.7 inches |
| Item Weight | 19.8 pounds (9 kg) |
| Max Extension Length | 28.35 inches |
| Adjustable Range | 0 - 7.09 inches |
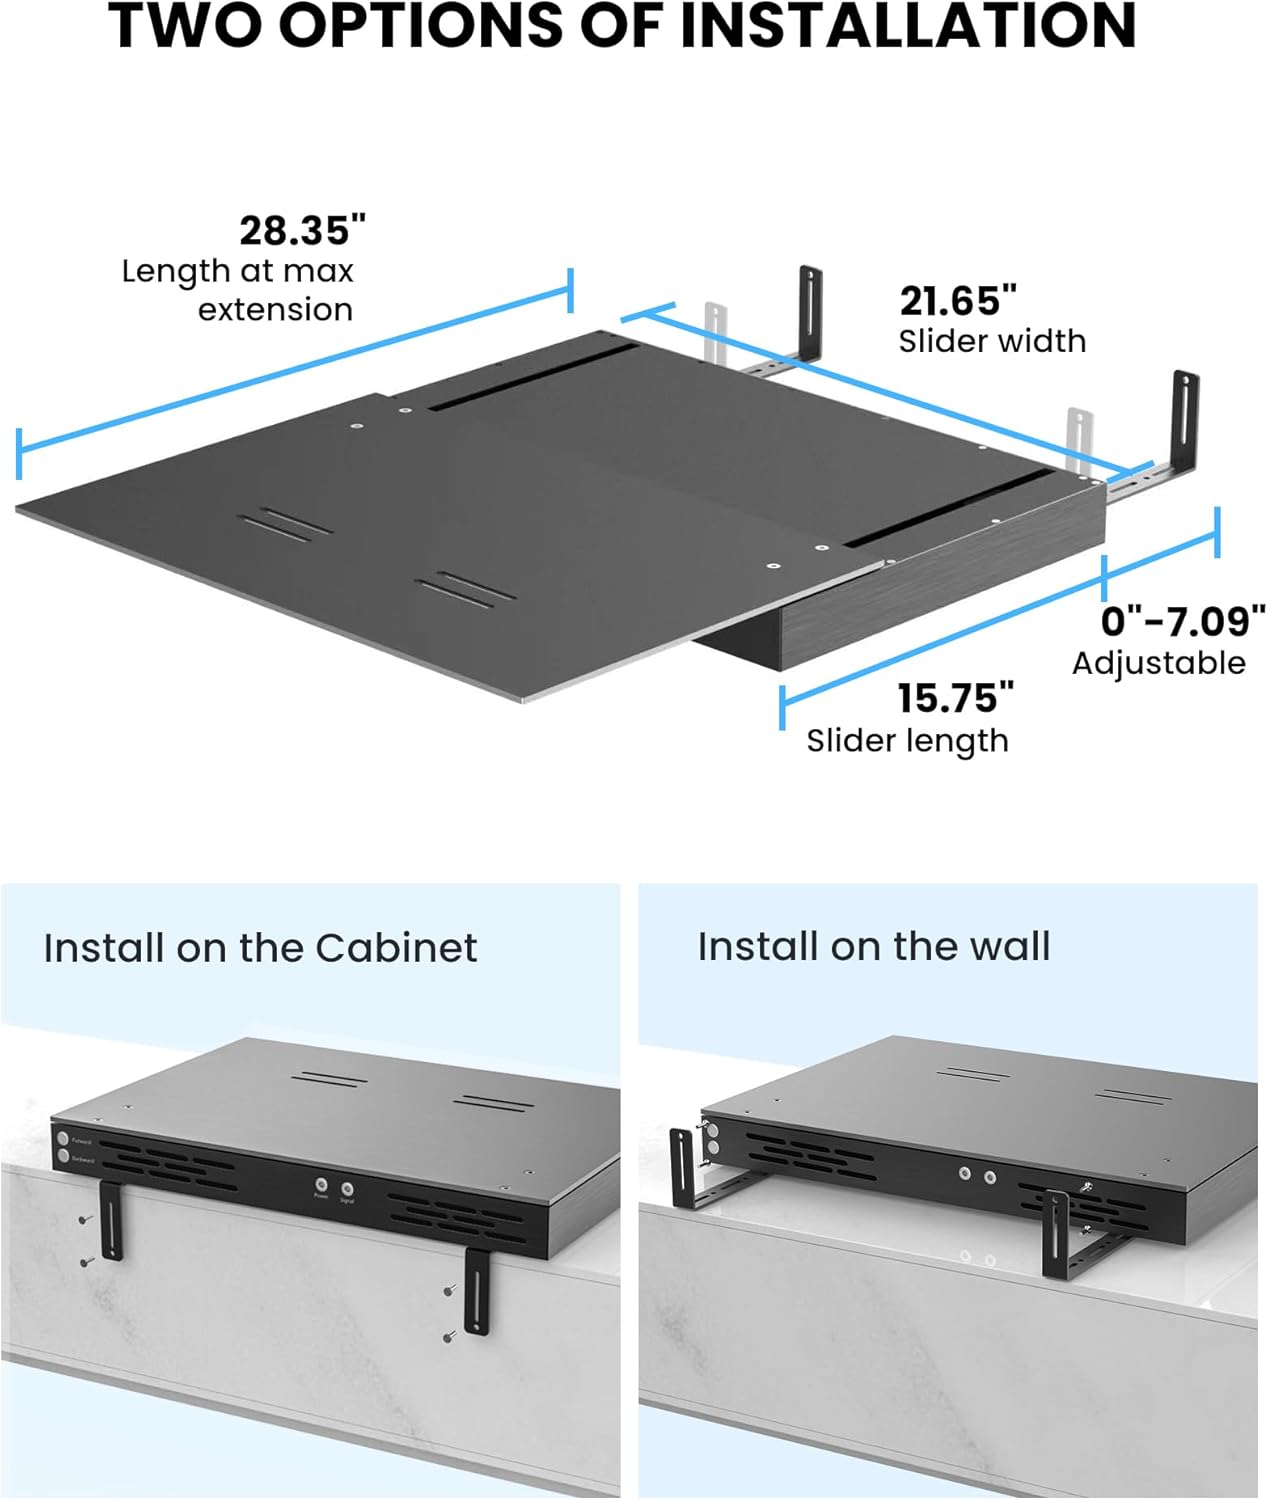
Image: Detailed dimensions of the slider tray, including its length at maximum extension, slider width, and adjustable range.
5. Setup & Installation
The IC-A150 Motorized Slider Tray offers two primary installation methods. Choose the method that best suits your home theater setup.
5.1. Installation Method 1: Fixed at the Rear of the Cabinet (Wooden Cabinet Required)
- Attach the short metal brackets to the long metal brackets using two M4*5 screws for each.
- Fix the assembled metal brackets to the bottom of the slider tray using three M4*5 screws per bracket. Ensure the position of the bracket is adjusted according to your specific requirements.
- Place the slider tray on top of your wooden cabinet, ensuring the end of the metal bracket is close to the rear of the cabinet.
- Use four M4*16 self-tapping screws to securely fix the slider tray to the wooden cabinet through the metal brackets.
For a visual guide, please refer to the installation video below.
5.2. Installation Method 2: Wall Fixing
- Attach the short metal brackets to the long metal brackets using two M4*5 screws for each.
- Fix the assembled metal brackets to the bottom of the slider tray using three M4*5 screws per bracket. Adjust the bracket position as needed.
- Place the slider tray on top of your cabinet and close to the wall. Mark the screw holes of the metal bracket on the wall using a marker. (4 holes are recommended for secure mounting).
- Move the slider tray away from the wall. Drill holes in the marked positions on the wall (hole diameter 6mm).
- Hammer the expansion tubes into the drilled holes.
- Place the slider tray back on the cabinet, aligning the metal brackets with the drilled holes. Fix the expansion screws through the brackets into the expansion tubes.
Note: Wall installation provides auxiliary fixation and is not designed for load-bearing purposes. The primary support should come from the cabinet.
Video: This video provides a step-by-step guide on how to install the AWOL Vision IC-A150 Motorized Slider Tray using both cabinet and wall-fixing methods.
6. Operating Instructions
- Power Connection: Connect the slider tray to its power adapter and plug it into an electrical outlet. Connect the signal cable from the slider tray's rear signal port to a USB port on your AWOL Vision projector.
- Automatic Synchronization: When the projector is powered on, the slider tray will automatically expand to its last saved memory position. When the projector is powered off, the tray will automatically retract.
- Setting Projection Distance:
- Manually adjust the tray to your desired projection distance using the "Forward" and "Backward" buttons located at the rear of the slider tray.
- Once the desired position is reached, release the buttons. The slider tray will automatically store this position in its memory after approximately 30 seconds.
Video: This video demonstrates the automatic sliding function of the projector tray when the projector is powered on and off, and how to set the maximum sliding distance.
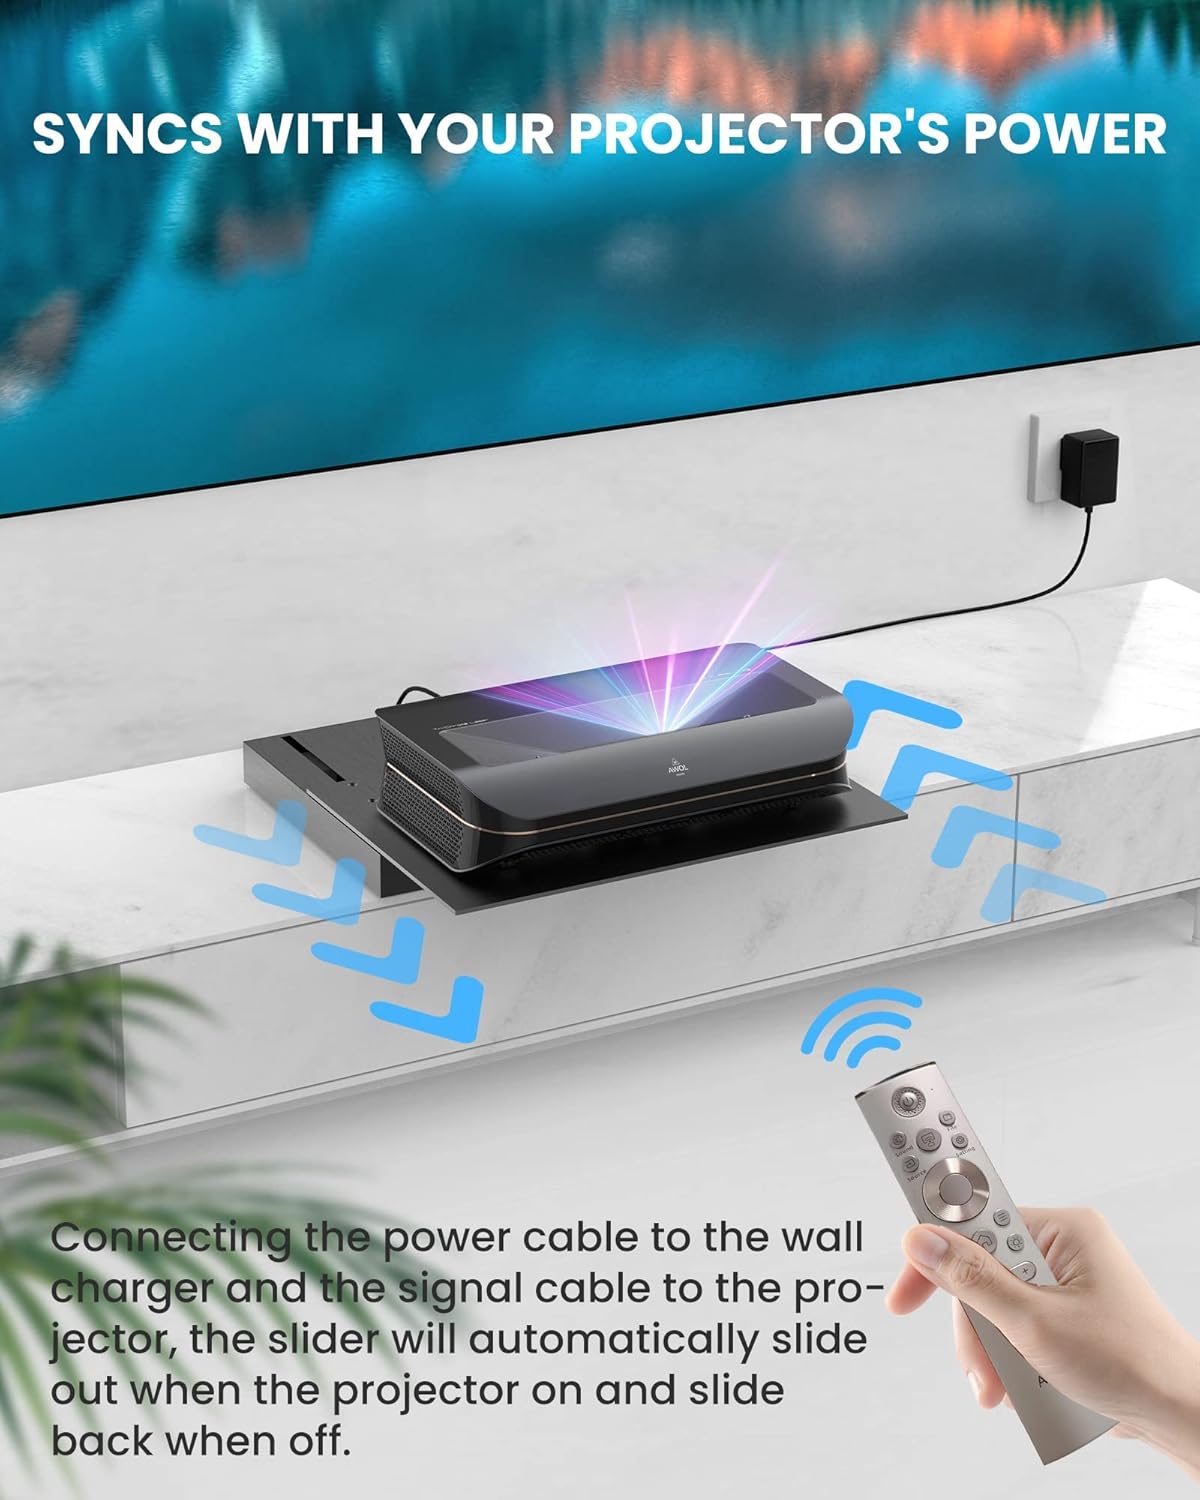
Image: A visual representation of the slider tray's synchronization with the projector's power, showing the connection points and remote control.
7. Maintenance
- Cleaning: Use a soft, dry cloth to wipe the surface of the slider tray. Avoid abrasive cleaners or solvents.
- Cable Management: Ensure all cables are neatly organized and not pinched or tangled, especially during the tray's movement.
- Inspection: Periodically check the screws and brackets to ensure they remain tight and secure.
8. Troubleshooting
- Tray Not Moving:
- Check if the power adapter is securely plugged into both the tray and the electrical outlet.
- Ensure the signal cable is correctly connected between the tray and the projector's USB port.
- Verify the projector is powered on.
- Incorrect Distance:
- Re-adjust the tray to the desired position using the "Forward" and "Backward" buttons and allow 30 seconds for the new position to be saved.
- Unusual Noise:
- Ensure no obstructions are in the path of the moving tray.
- Check that the projector is seated correctly and not causing imbalance.
9. Warranty and Support
AWOL VISION is committed to providing high-quality products and customer satisfaction.
- 2 Years Product Support: Your product is covered by a 2-year support period.
- Contact Support:
- Phone / WhatsApp: +1 (888) 891-6866
- Email: support@awolvision.com

Image: AWOL VISION's commitment to customer support and warranty details.


