1. Setup
1.1 Unboxing and Initial Inspection
Carefully remove the Lian Li Lancool 216 PC case from its packaging. Inspect the case for any signs of damage during transit. Ensure all accessories, including screws and mounting hardware, are present.
1.2 Panel Removal
The Lancool 216 is designed for easy access to internal components. Most panels can be removed without tools.
- Side Panels: Gently pull the tempered glass side panel to detach it. The solid side panel can also be removed by pulling it away from the chassis.
- Top Panel: The top panel, featuring a fine mesh, can be easily lifted off for access to the top fan/radiator mounts.
- Front Panel: The front mesh panel is designed for optimal airflow and can be detached for cleaning or fan installation.
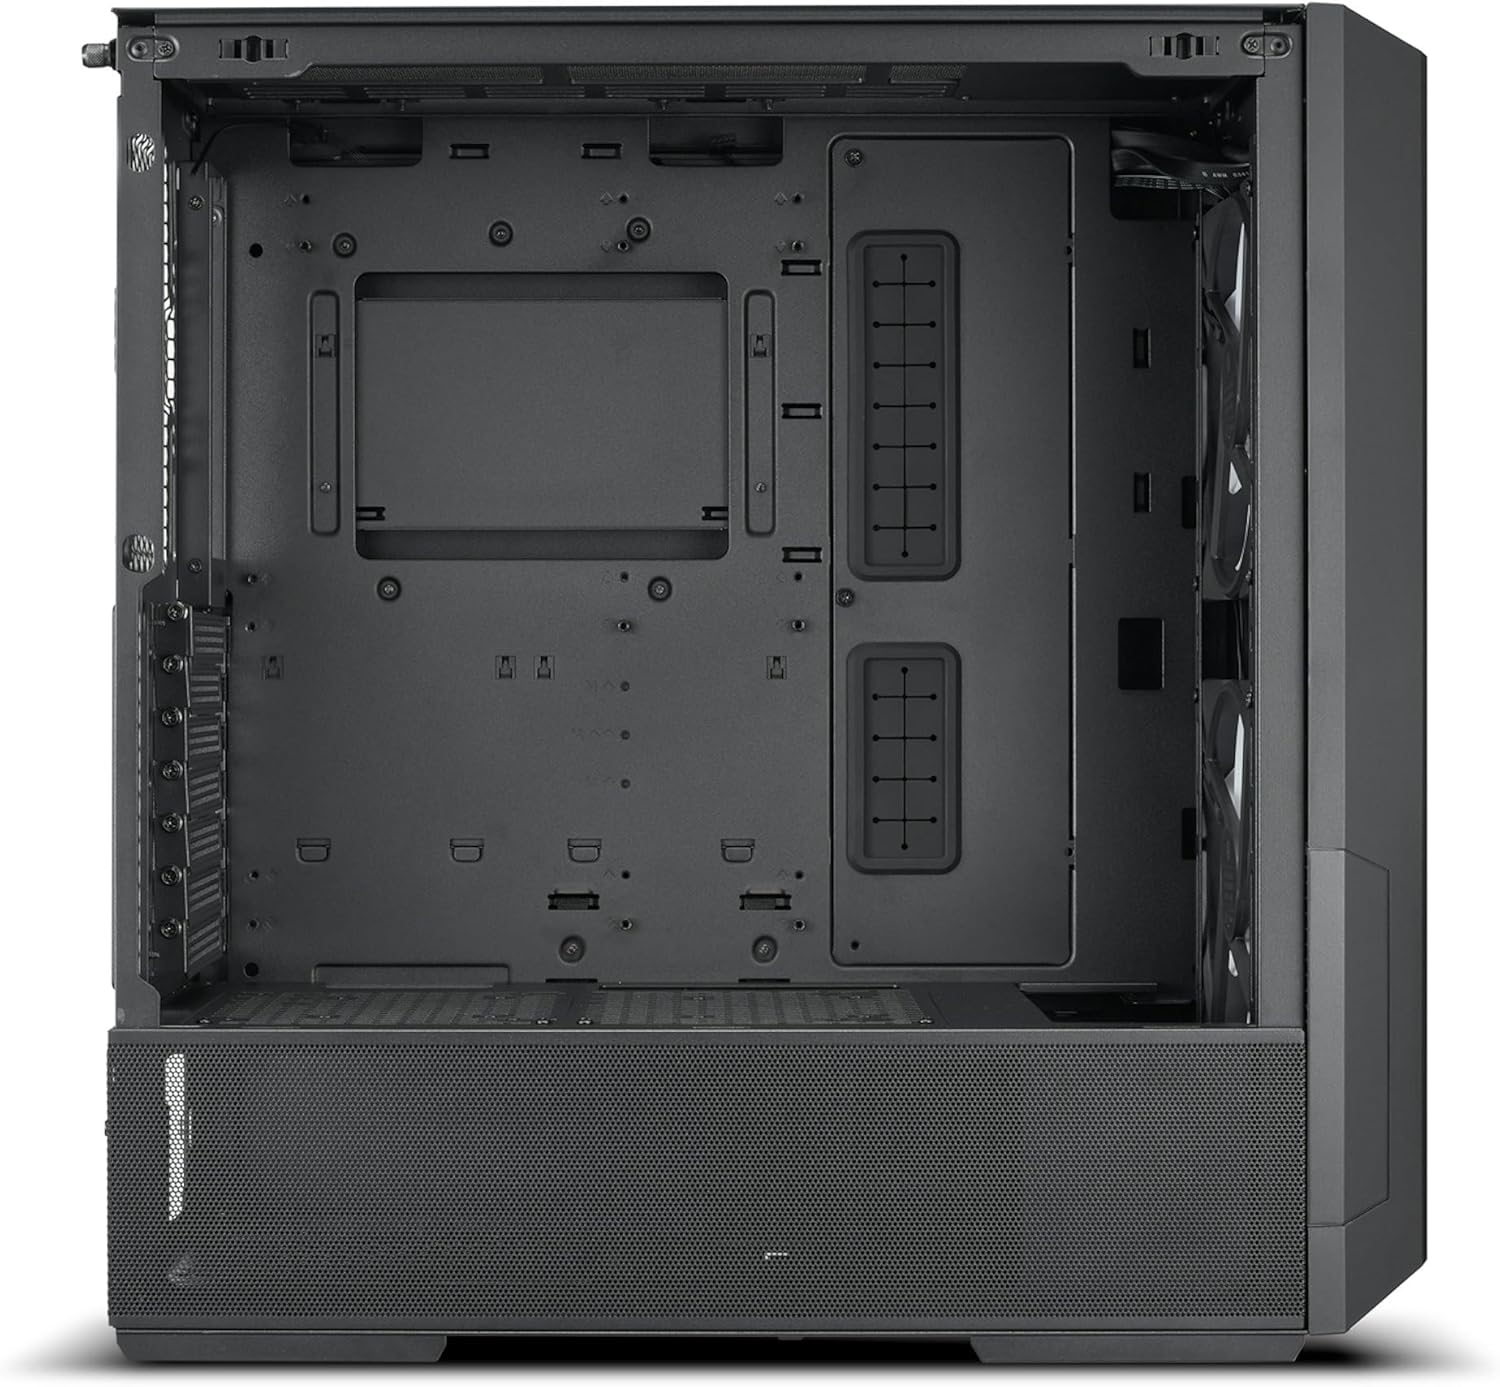
Figure 1: Internal view of the Lian Li Lancool 216 case, showing the spacious interior and cable routing options.

Figure 2: The removable top radiator bracket for easier installation of cooling solutions.
1.3 Motherboard Installation
The Lancool 216 supports E-ATX (under 280mm), ATX, Micro-ATX, and Mini-ITX motherboards. Install standoffs as required for your motherboard size. Secure the motherboard with screws.

Figure 3: The adjustable motherboard tray allows for configurations optimized for either air or water cooling.
1.4 Fan and Radiator Installation
The case comes with dual front 160mm PWM fans and one rear 140mm PWM fan. Additional fans and radiators can be installed:
- Front: Supports 3 x 120mm, 2 x 140mm, or 2 x 160mm fans. Radiator support up to 360mm.
- Top: Supports 3 x 120mm or 2 x 140mm fans. Radiator support up to 360mm. The top mounting bracket is removable for ease of installation.
- Bottom (PSU Cover): Supports 2 x 120mm or 2 x 140mm fans (Air Cooling mode). Radiator support up to 240mm.
- Rear: Supports 1 x 120mm or 1 x 140mm fan.
- PCIe Fan Bracket: Supports 1 x 120mm fan.

Figure 4: The fine mesh front panel ensures maximum airflow for optimal cooling performance.
1.5 Drive Installation
The Lancool 216 offers multiple drive mounting options:
- Drive Cage: 2 x 2.5” SSD + 2 x 3.5” HDD.
- PSU Cover: 2 x 2.5” SSD.
- Behind MB Tray: 2 x 2.5” SSD.
1.6 GPU Installation
The case supports GPUs up to 392mm in length. It features a rotatable PCIe expansion slot panel, allowing for both standard horizontal and vertical GPU mounting (riser cable sold separately).

Figure 5: Rear view showing the rotatable PCIe slots, enabling vertical GPU mounting.
1.7 Cable Management
The Lancool 216 is designed with cable management in mind. Utilize the three Velcro straps behind the motherboard tray and two additional straps above the PSU chamber to bundle and route cables neatly. This helps maintain optimal airflow and a clean build appearance.

Figure 6: Integrated Velcro straps and routing channels for efficient cable management.
2. Operating
2.1 Power On/Off
Press the Power Button located on the front I/O panel to turn the PC on or off. A Reset Button is also available for system restarts.
2.2 Front I/O Port Usage
The front I/O panel provides convenient access to:
- 2 x USB 3.0 ports for high-speed data transfer.
- 1 x USB Type-C port for modern connectivity.
- 1 x Audio jack for headphones or microphones.
2.3 Fan Control
The pre-installed PWM fans can be controlled via your motherboard's fan headers and BIOS/software settings. Refer to your motherboard manual for detailed fan control instructions.
3. Maintenance
3.1 Dust Filter Cleaning
The Lancool 216 includes a bottom dust filter. Regularly remove and clean this filter to maintain optimal airflow and prevent dust buildup inside the case. The front and top mesh panels can also be cleaned with compressed air or a soft brush.
3.2 General Cleaning
For the exterior, use a soft, damp cloth to wipe down surfaces. Avoid abrasive cleaners. For the interior, use compressed air to remove dust from components and internal surfaces.
4. Troubleshooting
4.1 No Power
Ensure all power cables are securely connected to the power supply, motherboard, and components. Verify that the power supply unit (PSU) switch is in the 'ON' position.
4.2 Fans Not Spinning
Check that all fan cables are correctly connected to the motherboard's fan headers. Ensure fan control settings in the BIOS or software are configured correctly.
4.3 Overheating
Verify that all fans are spinning and oriented correctly for optimal airflow (front/bottom intake, rear/top exhaust). Clean all dust filters and ensure no cables are obstructing airflow. Check thermal paste application on CPU cooler.
5. Specifications
| Feature | Specification |
|---|---|
| Model | LANCOOL 216-X |
| Dimensions (D x W x H) | 480.9mm x 235mm x 491.7mm |
| Color | Black |
| Material | Steel / 4.0mm Tempered Glass |
| Motherboard Support | E-ATX (Under 280mm) / ATX / Micro-ATX / Mini-ITX |
| Fan Support (Top) | 3 x 120mm / 2 x 140mm |
| Fan Support (PSU Cover) | 2 x 120mm / 2 x 140mm (Air Cooling mode) |
| Fan Support (Front) | 3 x 120mm / 2 x 140mm / 2 x 160mm (2 x 160mm PWM pre-installed) |
| Fan Support (Rear) | 1 x 120mm / 1 x 140mm (1 x 140mm PWM pre-installed) |
| Fan Support (PCIe Fan Bracket) | 1 x 120mm |
| Radiator Support (Front) | 360 / 280 / 240mm |
| Radiator Support (Top) | 360 / 280 / 240mm |
| Radiator Support (Bottom) | 240mm |
| PSU Support Length | ATX (Under 220mm) |
| GPU Length Clearance | 392mm (max) |
| CPU Cooler Height Clearance | 180.5mm (max) |
| Drive Bays | Drive Cage: 2 x 2.5” SSD + 2 x 3.5” HDD; PSU Cover: 2 x 2.5” SSD; Behind MB tray: 2 x 2.5” SSD |
| Expansion Slots | 7 |
| I/O Ports | 1 x Power Button, 1 x Reset Button, 2 x USB 3.0, 1 x USB Type C, 1 x Audio |
| Dust Filters | 1 x Bottom |
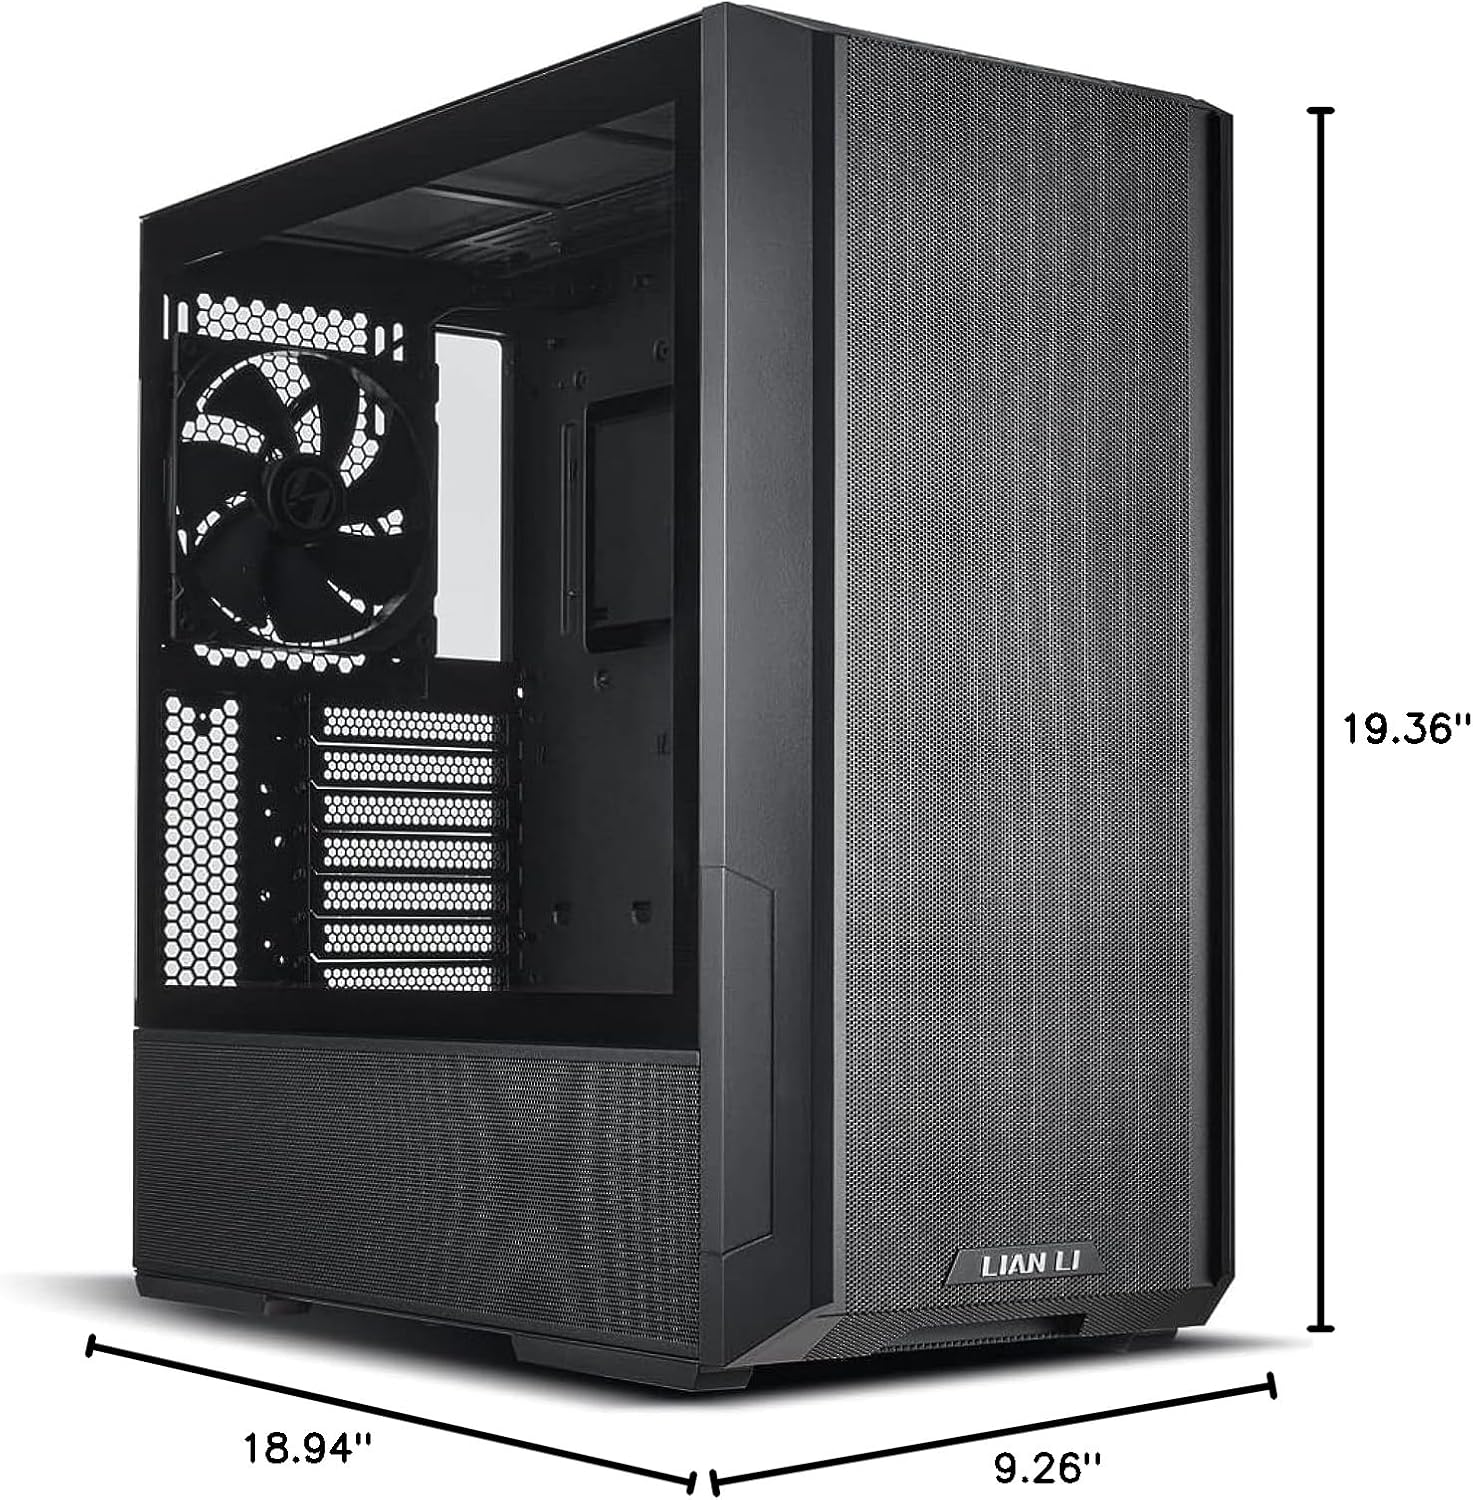
Figure 7: Detailed dimensions of the Lancool 216 chassis.
6. Warranty & Support
6.1 Warranty Information
Lian Li products typically come with a manufacturer's warranty covering defects in materials and workmanship. Please retain your proof of purchase for warranty claims. Specific warranty duration and terms may vary by region and product. Refer to the official Lian Li website for the most up-to-date warranty policy.
6.2 Technical Support
For technical assistance, troubleshooting, or any questions regarding your Lian Li Lancool 216 PC case, please visit the official Lian Li support website or contact their customer service department. You may find FAQs, driver downloads, and contact information for your region.


