1. Introduction
Thank you for choosing the AcmyslaT Heavy Duty Heat Gun, Model R003. This powerful tool is designed for a wide range of applications, offering dual temperature settings and robust safety features. Please read this manual thoroughly before operation to ensure safe and effective use of your heat gun.

Image 1.1: AcmyslaT R003 Heat Gun and included nozzles.
2. Safety Instructions
Always observe the following safety precautions to reduce the risk of electric shock, fire, or serious injury.
- Read All Instructions: Familiarize yourself with the heat gun's operation and safety guidelines before use.
- Personal Protective Equipment: Wear safety glasses or goggles to protect your eyes from debris and heat. Heat-resistant gloves are recommended.
- Work Area: Ensure your work area is well-ventilated and free from flammable materials. Do not use in explosive atmospheres, such as in the presence of flammable liquids, gases, or dust.
- Electrical Safety: The heat gun operates on US 110/120V. Ensure the power outlet matches the tool's requirements. Do not expose the heat gun to rain or wet conditions. Do not abuse the cord.
- Heat Hazard: The nozzle and accessories become extremely hot during and after use. Avoid direct contact. Allow the tool to cool completely before storing.
- Overload Protection: This heat gun is equipped with an overload protector that automatically stops operation if it overheats. If this occurs, turn off the tool, unplug it, and allow it to cool before resuming use.
- Initial Use Smoke: During the first few uses, the heat gun may emit a slight amount of smoke. This is normal and results from the drying of internal mica paper glue. It will dissipate once the glue has fully evaporated and does not affect performance or safety.
- Proper Distance: Maintain a distance of 20-25mm (approximately 0.8-1 inch) between the nozzle and the workpiece. Operating too close can cause the heat gun to enter a cooling cycle, blowing cold air for 15-20 seconds before reheating.

Image 2.1: Internal view illustrating the mica paper, which may cause initial smoke.
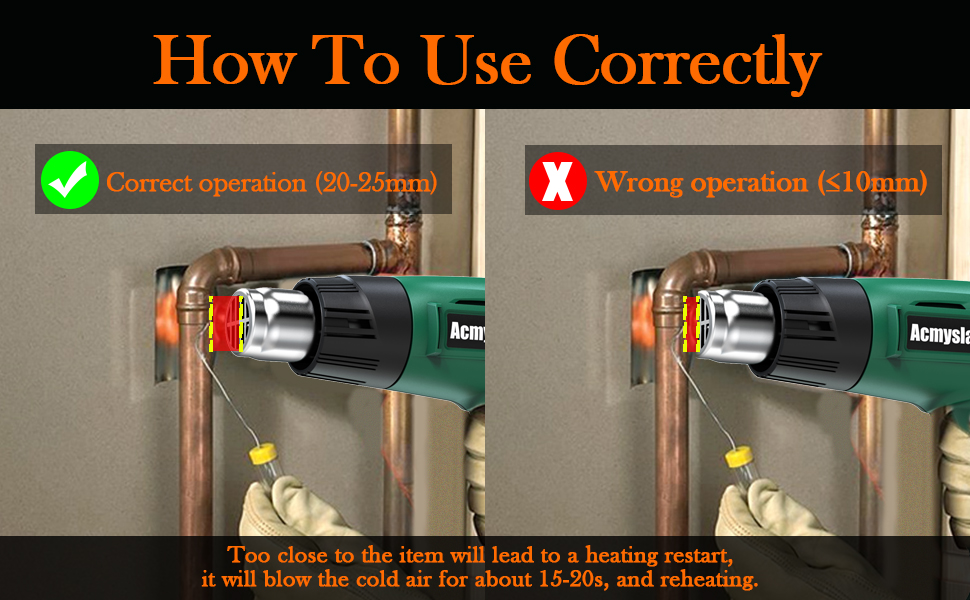
Image 2.2: Correct operation distance (20-25mm) versus incorrect (too close).
3. Package Contents
Verify that all items are present upon unpacking:
- 1 x AcmyslaT Heat Gun (Model R003)
- 4 x Heat Gun Nozzles (various types for different applications)
- 1 x User Manual (this document)
- 1 x Warning Tips & Warranty Card

Image 3.1: The heat gun and its four included nozzles.
4. Product Overview
The AcmyslaT R003 Heat Gun features a robust design for durability and ease of use.
- Dual Temperature Settings: Allows selection between two heat levels for versatile applications.
- Overload Protection: Automatically shuts off to prevent damage from overheating.
- Ergonomic Design: Comfortable handle and integrated stand for hands-free operation.
- Durable Construction: Made from high-quality ABS plastic and stainless steel, featuring an oxidation heating wire and all-copper motor.
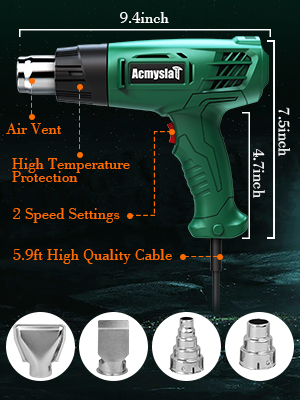
Image 4.1: Key features and dimensions of the AcmyslaT Heat Gun.
5. Setup
Before operating the heat gun, ensure it is properly set up.
- Select Nozzle: Choose the appropriate nozzle for your task. The four included nozzles are designed for various applications such as concentrating heat, spreading heat, or protecting surfaces.
- Attach Nozzle: Securely attach the selected nozzle to the heat gun's outlet. Ensure it is firmly in place before use.
- Power Connection: Plug the heat gun into a standard 110/120V AC power outlet.
6. Operating Instructions
Follow these steps for safe and effective operation:
- Power On: Locate the power switch on the handle.
- Select Temperature Mode:
- Mode I: 572℉ (300℃) with an airflow of 250 L/min. This mode is suitable for delicate tasks.
- Mode II: 932℉ (500℃) with an airflow of 500 L/min. This mode is for heavy-duty applications requiring higher heat.
- Heating Time: The heat gun heats up rapidly, reaching operating temperature in seconds.
- Application: Direct the hot air towards the workpiece, maintaining the recommended distance of 20-25mm.
- Hands-Free Use: The integrated stand allows the heat gun to be placed on a flat surface for hands-free operation, enhancing safety and convenience for certain tasks.
- Power Off: After use, switch the heat gun to the 'OFF' position. Allow the tool to cool down completely before unplugging and storing.

Image 6.1: Dual temperature settings switch on the heat gun.
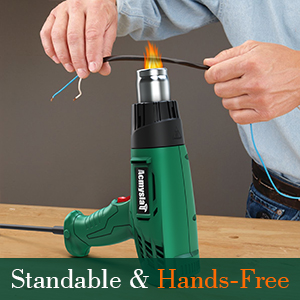
Image 6.2: Heat gun in standable position for hands-free operation.
7. Applications
The AcmyslaT Heat Gun is suitable for a variety of tasks, including but not limited to:
- Crafts and DIY projects
- Shrink wrapping and tubing
- Epoxy resin curing
- Heating PVC pipes for bending
- Paint and varnish removal
- Thawing frozen water pipes
- Loosening rusted bolts
- Igniting charcoal
- Applying film (e.g., vinyl wrap)

Image 7.1: Examples of heat gun applications including rusty bolt removal, paint removal, thawing pipes, and charcoal ignition.
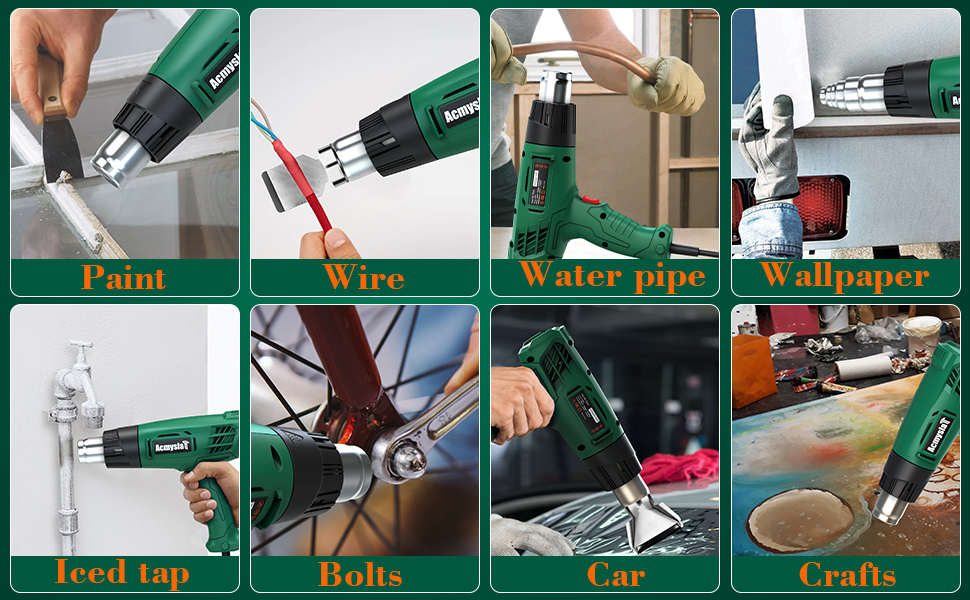
Image 7.2: Diverse applications of the heat gun in various home and craft projects.
8. Maintenance
Proper maintenance ensures the longevity and safe operation of your heat gun.
- Cleaning: Ensure the tool is unplugged and completely cool before cleaning. Wipe the exterior with a damp cloth. Do not use harsh chemicals or abrasive cleaners. Keep the air vents clear of dust and debris.
- Storage: Store the heat gun in a dry, secure location, out of reach of children. Ensure the power cord is not kinked or damaged during storage.
- Inspection: Periodically inspect the power cord, plug, and housing for any signs of damage. If damage is found, discontinue use and contact customer support.
9. Troubleshooting
Refer to this section for common issues and solutions.
| Problem | Possible Cause | Solution |
|---|---|---|
| Heat gun emits smoke during first use. | Normal burning off of mica paper glue. | This is normal and will stop after a few uses. Ensure good ventilation. |
| Heat gun blows cold air intermittently. | Overload protection activated due to overheating or operating too close to workpiece. | Turn off, unplug, and allow to cool. Maintain proper distance (20-25mm) from workpiece. |
| Heat gun does not turn on. | No power, faulty outlet, or damaged cord/switch. | Check power connection and outlet. Inspect cord for damage. If issues persist, contact customer support. |
10. Specifications
| Feature | Specification |
|---|---|
| Model Number | R003 |
| Power Source | AC |
| Voltage | 110-120V |
| Wattage | 1300 Watts |
| Temperature Setting I | 572℉ (300℃) |
| Airflow Setting I | 250 L/min |
| Temperature Setting II | 932℉ (500℃) |
| Airflow Setting II | 500 L/min |
| Material | ABS/Metal |
| Cord Length | 5.9 Feet |
| Item Weight | 2.01 pounds |
| Dimensions (Package) | 9.96 x 9.69 x 2.91 inches |
11. Warranty and Support
AcmyslaT provides a 1-year quality guarantee for this product. In case of any issues, a replacement is supported within 7 days of purchase. For assistance or warranty claims, please contact AcmyslaT customer support.
Contact information can typically be found on the product packaging or the official AcmyslaT website.


