Introduction
This user manual provides comprehensive instructions for the safe and effective operation, maintenance, and troubleshooting of the YATO YT-06835 Pneumatic Brake Bleeder Device. This tool is designed for efficient and clean brake fluid bleeding and replacement in automotive systems. Please read this manual thoroughly before initial use to ensure proper function and safety.
Safety Information
Always adhere to general workshop safety practices when using this device. Failure to follow these guidelines may result in injury or damage to the equipment or vehicle.
- Wear appropriate personal protective equipment (PPE), including safety glasses and gloves, to protect against brake fluid contact.
- Ensure the work area is well-ventilated to avoid inhaling brake fluid fumes.
- Keep the device away from heat sources, open flames, and sparks. Brake fluid is flammable.
- Do not exceed the maximum operating pressure specified for the device.
- Dispose of used brake fluid according to local environmental regulations.
- Keep children and unauthorized persons away from the work area.
- Before connecting to an air compressor, ensure the compressor's pressure regulator is set to the appropriate operating pressure.
Product Overview and Components
The YATO YT-06835 Pneumatic Brake Bleeder Device consists of several key components designed for efficient brake system maintenance.

Figure 1: Complete set of the YATO YT-06835 Pneumatic Brake Bleeder Device, showing the bleeder gun, collection bottle, reservoir bottle, hose, and various adapters.

Figure 2: Close-up of the brake bleeder gun with integrated vacuum generator and the attached collection bottle for used brake fluid.
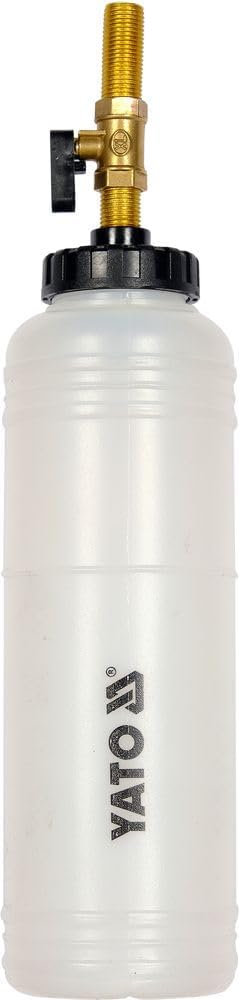
Figure 3: The 1-liter brake fluid reservoir bottle, designed to automatically refill the vehicle's master cylinder during the bleeding process, equipped with a control valve.

Figure 4: A set of four universal adapters (21-30 mm, 24-32 mm, 28-37 mm, 32-41 mm) for connecting to various vehicle brake fluid reservoirs.

Figure 5: Two quick-connect air fittings for connecting the device to a standard air compressor hose.

Figure 6: Diagram illustrating key technical specifications: 0.62 MPa (6.2 bar) operating pressure, standard connection type, 180 cm hose length, and 1.0 L capacity.
What's in the Box:
- Collection Bottle (for used brake fluid)
- Refill Bottle (1-liter reservoir for new brake fluid)
- Hose (180 cm length)
- 4 Adapters (21-30 mm, 24-32 mm, 28-37 mm, 32-41 mm)
- Pneumatic Brake Bleeder Gun
Specifications
| Specification | Value |
|---|---|
| Brand | Yato |
| Model | Pneumatic brake bleeder device YT-06835 |
| Product Dimensions (L x W x H) | 20 x 12.5 x 18 cm |
| Material | Plastic |
| Maximum Operating Pressure | 12 Bars (1.2 MPa / 174 PSI) |
| Hose Length | 180 cm |
| Reserve Container Content | 1 Liter |
| Output Connection Type | NPT |
| Number of Ports | 4 (referring to adapters) |
| Valve Type | Vacuum Release Valve |
| Specific Features | 4 adapters (21-30 mm, 24-32 mm, 28-37 mm, 32-41 mm), 1 liter refill bottle |
Setup
- Prepare the Vehicle: Ensure the vehicle is on a level surface and the engine is off. Refer to the vehicle's service manual for specific brake bleeding procedures.
- Access Master Cylinder: Locate and clean the area around the brake fluid master cylinder reservoir.
- Connect Reservoir Bottle: Select the appropriate adapter from the four provided (21-30 mm, 24-32 mm, 28-37 mm, 32-41 mm) that fits your vehicle's master cylinder reservoir. Securely attach the refill bottle to the master cylinder using the chosen adapter. Fill the refill bottle with new, clean brake fluid of the correct type for your vehicle.
- Connect Air Supply: Connect the pneumatic brake bleeder gun to an air compressor using a standard quick-connect fitting. Ensure the air compressor's pressure regulator is set to a maximum of 6.2 bar (0.62 MPa / 90 PSI) for optimal operation and safety. The maximum operating pressure for the device is 12 bar, but 6.2 bar is recommended for typical bleeding operations.
- Prepare Bleeder Nipple: Identify the brake caliper or wheel cylinder bleeder nipple. Clean the area around the nipple.
- Attach Collection Bottle Hose: Connect the hose from the collection bottle to the bleeder nipple. Ensure a snug fit to prevent air ingress.
Operating Instructions
Follow these steps to bleed the brake system using the YATO YT-06835 device. It is generally recommended to bleed the brake system starting with the wheel furthest from the master cylinder and working towards the closest.
- Initiate Vacuum: With the collection bottle hose securely attached to the bleeder nipple, open the bleeder nipple slightly (typically 1/4 to 1/2 turn).
- Activate Bleeder Gun: Squeeze the trigger on the pneumatic brake bleeder gun. This will create a vacuum, drawing old brake fluid and air from the brake system into the collection bottle.
- Monitor Fluid Flow: Observe the fluid flowing into the collection bottle. Initially, it may contain air bubbles and discolored fluid. Continue bleeding until the fluid runs clear and is free of air bubbles.
- Monitor Master Cylinder Level: The refill bottle connected to the master cylinder will automatically replenish the fluid as it is drawn out. Periodically check the level in the refill bottle and the master cylinder to ensure it does not run dry. Refill the reservoir bottle as needed.
- Close Bleeder Nipple: Once the fluid is clear and bubble-free, release the trigger on the bleeder gun and then immediately close the bleeder nipple. Do not release the trigger before closing the nipple, as this could draw air back into the system.
- Repeat for All Wheels: Repeat the process for each brake caliper/wheel cylinder.
- Final Check: After bleeding all wheels, remove the refill bottle and adapter from the master cylinder. Top off the master cylinder reservoir to the MAX line with new brake fluid. Securely replace the master cylinder cap.
- Test Brakes: Pump the brake pedal several times to build pressure. Test the brake pedal for firmness before driving the vehicle. If the pedal feels spongy, repeat the bleeding process.
Maintenance
Proper maintenance ensures the longevity and reliable performance of your YATO brake bleeder device.
- Cleaning: After each use, thoroughly clean the collection bottle, hoses, and adapters with an appropriate brake cleaner or warm soapy water. Rinse thoroughly and allow to air dry completely. Brake fluid is corrosive and can damage components if left uncleaned.
- Storage: Store the device in a clean, dry place, away from direct sunlight and extreme temperatures.
- Inspection: Regularly inspect hoses for cracks, kinks, or wear. Check all connections for leaks. Replace any damaged components immediately.
- Air Inlet Filter: Periodically check and clean the air inlet filter on the bleeder gun to ensure proper airflow and vacuum generation.
Troubleshooting
This section addresses common issues you might encounter during operation.
| Problem | Possible Cause | Solution |
|---|---|---|
| No vacuum or weak vacuum |
|
|
| Brake fluid not flowing |
|
|
| Air bubbles persist in fluid |
|
|
Warranty and Support
For warranty information and technical support, please refer to the documentation provided with your purchase or contact YATO customer service directly. Keep your proof of purchase for warranty claims.
For further assistance, visit the official YATO website or contact your local distributor.


