1. Introduction
The MHCOZY ZigBee Smart Relay Switch is designed to integrate your household appliances and electrical devices into a smart home system. Utilizing ZigBee 3.0 protocol, this smart switch offers reliable control and compatibility with various ZigBee hubs, including SmartThings, Alexa, and Google Home. It provides two primary operating modes: momentary (inching) and self-lock (on/off), allowing flexible control over a wide range of applications.
This manual provides detailed instructions for installation, configuration, and operation of your MHCOZY ZigBee Smart Relay Switch.
2. Safety Information
WARNING: Risk of Electric Shock.
- Installation should be performed by a qualified electrician or a person with a thorough understanding of electrical systems.
- Ensure power is disconnected at the circuit breaker before installation, maintenance, or removal of the device.
- Do not exceed the maximum load ratings specified in this manual.
- This device is intended for indoor use only.
- Keep away from water and high humidity environments.
3. Package Contents
- 1 x MHCOZY ZigBee Smart Relay Switch
- 1 x User Manual (this document)
4. Specifications
| Feature | Specification |
|---|---|
| Model Number | ZG002RF |
| Working Voltage | USB 5V or AC 85-250V |
| Power Consumption | <1 W (Standby: 80 mA) |
| Cut-off Current | <10 A |
| Cut-off Voltage | <250 V |
| Relay Model | 10 A |
| Operating Temperature | -20 to 70 °C |
| Humidity | 40% to 80% RH |
| Wireless Protocol | ZigBee 3.0 |
| RF Frequency | 433 MHz (for RF remote, not included) |
| Dimensions (L x W x H) | 6.86 x 4.32 x 2.79 cm |
| Weight | 50 grams |
5. Setup and Installation
5.1 Wiring Instructions
The MHCOZY ZigBee Smart Relay Switch supports two power input options: USB 5V or AC 85-250V. The relay output is a passive, clean contact, meaning it provides an on/off signal without voltage at the output terminals. This makes it suitable for controlling devices that require a dry contact closure, such as garage door openers or boiler systems.
Always ensure power is disconnected before wiring.

Figure 1: Wiring diagram for AC 85-250V power input. Connect the AC 85-250V power supply to the 'Input AC 85-250V' terminals.

Figure 2: Wiring diagram for the passive output clean contact. The output terminals are labeled NO (Normally Open), COM (Common), and NC (Normally Closed). This provides an on/off signal without voltage.

Figure 3: Overview of the MHCOZY relay switch showing power option 1 (5V USB) and power option 2 (85-250V AC input). An example application shows its use with a garage door opener. The mode change button is also indicated.
5.2 Pairing with a ZigBee Hub
The MHCOZY ZigBee Smart Relay Switch uses the ZigBee 3.0 protocol for seamless integration with compatible ZigBee hubs. No third-party application is required for the initial pairing process.
- Power On: Connect the MHCOZY Smart Relay Switch to a power source (either 5V USB or AC 85-250V). The device will automatically enter pairing mode.
- Open ZigBee Hub App: On your ZigBee hub's application (e.g., SmartThings, Amazon Alexa, Google Home), initiate the device discovery or 'Add Device' process.
- Add Device: The hub should detect the MHCOZY switch. Follow the on-screen prompts in your hub's app to complete the pairing process.

Figure 4: Quick setup guide illustrating the steps: 1. Download Alexa/SmartThings App, 2. Connect with Alexa/SmartThings hub, 3. Power on the MHCOZY device, 4. Add devices within the app.

Figure 5: An image showing the MHCOZY Zigbee+RF module, its internal circuit board, and indicating compatibility with Zigbee 3.0 and Tuya, as well as voice assistants like Alexa and Google Home.
6. Operating Modes
The MHCOZY Smart Relay Switch supports two distinct operating modes, which can be selected via the mode change button on the device (refer to Figure 3 for location).
6.1 Momentary (Inching) Mode
In this mode, when the relay is triggered (e.g., by a command from your smart home app or voice assistant), it will activate for approximately 0.5 to 1 second and then automatically return to its initial state. This mode is ideal for applications requiring a brief pulse, such as:
- Garage door openers
- Gate door control
- Door security systems
6.2 Self-Lock (On/Off) Mode
In self-lock mode, when the relay is triggered, its state will change (e.g., from off to on) and remain in that new state until another command is received to change it back. This functions as a standard toggle switch and is suitable for:
- Lighting control
- TV power supply control
- Controlling other appliances that require a continuous on/off state
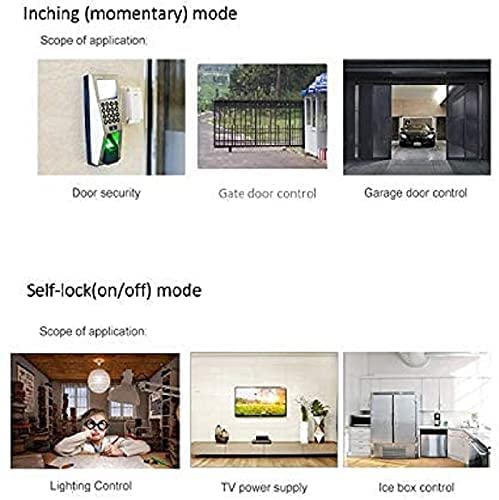
Figure 6: Visual examples of applications for both operating modes. Inching mode is shown for door security, gate control, and garage door control. Self-lock mode is shown for lighting control, TV power supply, and ice box control.
7. Voice Control
Once paired with a compatible ZigBee hub (e.g., SmartThings, Amazon Alexa, Google Home), you can control your connected devices using voice commands. This allows for hands-free operation of your appliances.
Examples of Voice Commands:
- "Alexa, turn on the light."
- "Alexa, turn on the garage door."
- "Hey Google, turn off the bedroom light."
8. Timer and Scheduling
Leverage the capabilities of your ZigBee hub to set up countdown timers, schedules, and loop timers for your connected devices. This feature enhances convenience and energy efficiency by automating when your devices turn on or off.
- Countdown Timer: Set a device to turn off after a specified duration.
- Scheduling: Program devices to turn on or off at specific times of the day or week.
- Loop Timer: Automate repetitive on/off cycles for certain applications.
Refer to your specific ZigBee hub's application guide for detailed instructions on setting up timers and schedules.
9. Maintenance
The MHCOZY ZigBee Smart Relay Switch requires minimal maintenance. Follow these guidelines to ensure optimal performance and longevity:
- Keep the device clean and free from dust. Use a dry, soft cloth for cleaning.
- Avoid exposing the device to extreme temperatures, direct sunlight, or moisture.
- Do not attempt to open or repair the device yourself, as this will void the warranty and poses a safety risk.
10. Troubleshooting
If you encounter issues with your MHCOZY ZigBee Smart Relay Switch, refer to the following common troubleshooting steps:
- Device Not Pairing:
- Ensure the device is powered on and within range of your ZigBee hub.
- Verify your ZigBee hub is in pairing mode.
- Try resetting the device by disconnecting and reconnecting power.
- Consult your ZigBee hub's manual for specific pairing instructions.
- No Response from Device:
- Check the power supply to the relay switch.
- Confirm the device is still paired with your ZigBee hub. If not, re-pair it.
- Ensure the connected appliance is functioning correctly and its wiring to the relay is secure.
- Voice Control Issues:
- Verify that your voice assistant (Alexa, Google Home) is linked to your ZigBee hub account.
- Check the device name in your smart home app; ensure it is easily recognizable by voice commands.
- Ensure your voice assistant device is online and functioning.
11. Warranty Information
MHCOZY products are covered by a manufacturer's warranty against defects in materials and workmanship. The specific duration and terms of the warranty may vary by region and retailer. Please retain your proof of purchase for warranty claims.
For detailed warranty information, please refer to the documentation provided with your purchase or contact your retailer.
12. Support
For further assistance, technical support, or inquiries regarding your MHCOZY ZigBee Smart Relay Switch, please contact your retailer or visit the official MHCOZY support website. Have your product model number (ZG002RF) and purchase information ready when seeking support.

