1. Introduction
This manual provides essential information for the safe operation and maintenance of your GoolRC C129 V2 RC Helicopter. Please read this manual thoroughly before operating the aircraft to ensure proper function and to prevent damage or injury. Keep this manual for future reference.
2. Safety Precautions
- Read Instructions: Always read the entire instruction manual before operating the helicopter.
- Age Recommendation: This product is recommended for users aged 16 years and up.
- Flight Environment: Operate in open, clear areas away from people, animals, buildings, and power lines. Avoid flying in windy conditions.
- Battery Safety: Use only the provided charger and batteries. Do not overcharge or short-circuit batteries. Discontinue use if batteries show signs of damage or swelling.
- Rotor Blades: Keep hands, face, and loose clothing away from rotating blades. The blades can cause serious injury.
- Water Exposure: Avoid contact with water or moisture to prevent damage to electronic components.
- Supervision: Adult supervision is recommended for younger operators.
- Maintenance: Regularly inspect the helicopter for any damage or loose parts before each flight.
3. Package Contents
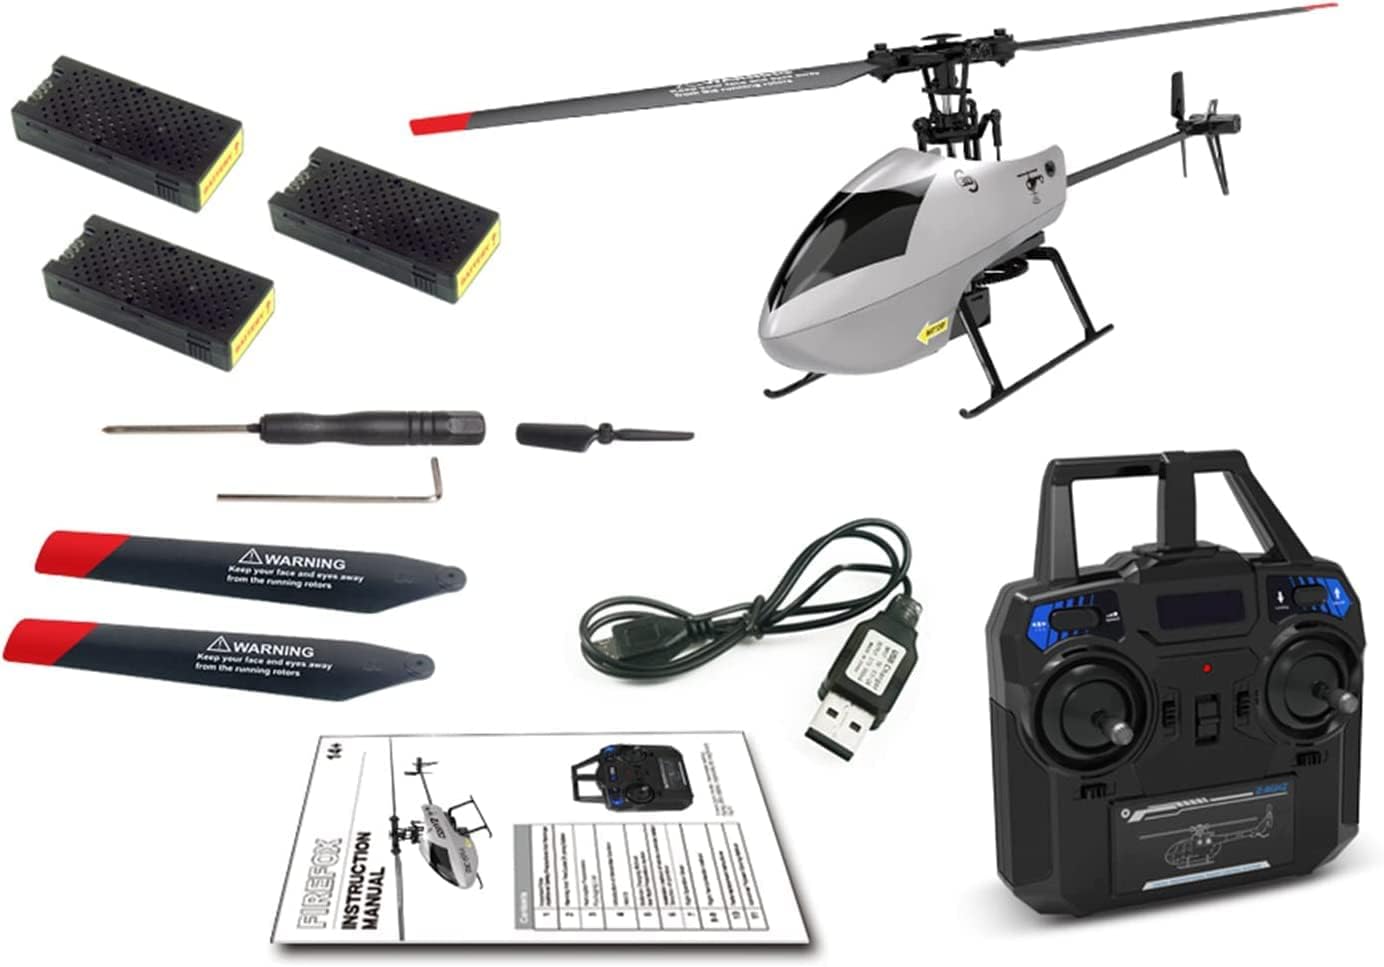
Verify that all items are present in the package:
- GoolRC C129 V2 RC Helicopter
- Remote Controller (2.4GHz)
- Lithium Ion Batteries (3 included)
- USB Charger
- Spare Main Blades
- Screwdriver
- Instruction Manual (this document)
4. Product Overview
The GoolRC C129 V2 is a 4-channel remote control helicopter featuring a 6-axis gyroscope for stable flight. It is designed with an aileronless structure for increased flexibility and stability, making it suitable for beginners.

4.1 Key Components
- Main Rotor Blades: Designed with aerodynamic principles for strong power and self-stability. Made from PC engineering materials for strength and impact resistance.
- Tail Rotor: Provides yaw control and counteracts main rotor torque.
- Helicopter Shell: Made of blister material (0.5mm thickness) for toughness and resilience.
- Landing Gear: Provides stable support during takeoff and landing.
- Modular Battery: 300mAh 25C High Performance Lipo battery, designed for convenient installation and extended service life (up to 15 minutes flight time).
- 6-Axis Gyroscope: Ensures flight stability and altitude hold.


5. Remote Controller Functions
The 2.4GHz remote controller provides precise control over the helicopter. Familiarize yourself with the controls before flight.

- Left Stick: Controls throttle (up/down) and yaw (left/right rotation).
- Right Stick: Controls pitch (forward/backward) and roll (left/right side-fly).
- One Key Take Off/Landing Button: Initiates automatic takeoff or landing.
- Speed Switch: Adjusts flight speed modes.
- 3D Tumbling Mode Button: Activates 3D flip function.
- Fine-tuning Trimmers: Used to adjust the helicopter's stability if it drifts in any direction during hover.
- Power Switch: Turns the remote controller on/off.
6. Battery Installation and Charging
6.1 Helicopter Battery
- Insert the modular battery into the designated slot on the helicopter until it clicks into place.
- To charge, connect the USB charger to a power source and then connect the battery. The indicator light on the charger will show charging status.
- Charging time is approximately 60-90 minutes for a full charge. Do not leave batteries unattended while charging.
6.2 Remote Controller Batteries
The remote controller requires 4x AA batteries (not included). Ensure correct polarity when inserting the batteries.
7. Setup and Pre-Flight Checks
7.1 Binding the Helicopter to the Remote Controller
- Ensure the helicopter battery is fully charged and installed.
- Place the helicopter on a flat, level surface.
- Turn on the remote controller. The indicator light will flash.
- Connect the helicopter battery. The helicopter's lights will flash.
- Push the left throttle stick all the way up, then all the way down. The remote controller and helicopter lights will become solid, indicating successful binding.
7.2 Pre-Flight Checks
- Check that all batteries are fully charged.
- Ensure all blades are securely attached and undamaged.
- Verify that the remote controller and helicopter are properly bound.
- Choose a safe, open flying area.
8. Operating Instructions
8.1 Basic Flight Controls

- Take Off: Press the "One Key Take Off" button. The helicopter will automatically ascend and hover. Alternatively, slowly push the left throttle stick up to manually take off.
- Landing: Press the "One Key Landing" button. The helicopter will automatically descend and land. Alternatively, slowly pull the left throttle stick down to manually land.
- Altitude Hold: The 6-axis gyroscope and automatic air pressure sensing allow the helicopter to maintain its altitude, simplifying control for beginners.
- Forward/Backward: Push the right stick forward or backward.
- Left/Right Side-Fly: Push the right stick left or right.
- Turn Left/Right: Push the left stick left or right.
8.2 Special Functions
- 3D Flips/Rolls: Press the "3D Tumbling Mode" button. The helicopter will perform a 360° flip. Ensure sufficient altitude (above 3 meters) before attempting 3D flips.


8.3 Official Product Video: Flight Demonstration
9. Maintenance
- Cleaning: Use a soft, dry cloth to clean the helicopter after each use. Avoid using water or solvents.
- Blade Inspection: Regularly check main and tail rotor blades for cracks, bends, or damage. Replace damaged blades immediately using the provided spare parts.
- Motor Care: Keep motors free from dust and debris. Avoid prolonged operation in dusty environments.
- Storage: Store the helicopter and remote controller in a cool, dry place away from direct sunlight. Remove batteries from the remote controller during long periods of non-use.
- Battery Storage: Store LiPo batteries at approximately 50% charge if not used for an extended period.
10. Troubleshooting
| Problem | Possible Cause | Solution |
|---|---|---|
| Helicopter does not respond to remote. | Not bound, low battery (helicopter or remote), out of range. | Re-bind the helicopter. Charge/replace batteries. Ensure within operating range. |
| Helicopter drifts during hover. | Trimmers not adjusted, uneven surface during calibration. | Use fine-tuning trimmers to correct drift. Ensure helicopter is on a flat surface during power-on for proper gyroscope calibration. |
| Short flight time. | Battery not fully charged, old battery, aggressive flying. | Ensure battery is fully charged. Consider replacing old batteries. Fly less aggressively. |
| Blades not spinning. | Obstruction, motor issue, loose connection. | Check for obstructions. Inspect motor and connections. Contact support if issue persists. |
| Loss of control. | Out of range, interference, damaged components. | Fly within range. Avoid areas with strong interference. Inspect for damage. |
11. Specifications
| Feature | Detail |
|---|---|
| Model Number | C129 V2 |
| Brand | GoolRC |
| Channels | 4 Channel |
| Gyroscope | 6-Axis Gyroscope |
| Frequency | 2.4GHz |
| Battery Type | Lithium Ion (300mAh 25C) |
| Flight Time | Up to 15 minutes (approximate) |
| Recommended Age | 16 years and up |
| Item Weight | 1.41 pounds |
| Package Dimensions | 12.28 x 9.53 x 3.58 inches |
12. Warranty and Support
For warranty information or technical support, please refer to the contact details provided with your purchase or visit the official GoolRC website. Keep your proof of purchase for warranty claims.
GoolRC Store: Visit the GoolRC Store on Amazon


