
1. Introduction
Thank you for choosing the JoFomp 13-Inch Digital LED Wall Clock. This clock features a large, clear LED display, multiple functions including time, date, day of the week, temperature, alarm, and a countdown timer. It is designed for easy readability and convenience in various indoor environments. This manual provides detailed instructions for setup, operation, and maintenance to ensure optimal performance of your device.
2. Package Contents
Please check the package contents upon unboxing. If any items are missing or damaged, contact customer support.
- JoFomp 13-Inch Digital LED Wall Clock
- Remote Control
- USB Power Cable
- User Manual
3. Product Features
The JoFomp Digital Wall Clock offers a range of functionalities for enhanced usability:
- Multi-Function Display: Shows time, date, day of the week, temperature, and supports alarm and countdown timer modes.
- Automatic Brightness Dimmer: Features a built-in light sensor that adjusts display brightness across 10 levels based on ambient light.
- Plug-in Powered: Operates via USB power (5V/1A or 5V/2A adapter required, not included).
- Battery Backup: Requires 2 AAA alkaline batteries (not included) to maintain settings and trigger alarms during power outages. The display does not light up on battery power alone.
- Remote Control: Conveniently adjust settings without needing to physically access the clock.
- Dual Alarms: Set two independent alarms for different schedules.
- Automatic Daylight Saving Time (DST): Automatically adjusts time for DST when enabled.
- 12/24H Format: Switch between 12-hour and 24-hour time display.

Figure 3.1: Overview of the clock's multi-functional display and features.
4. Setup
4.1 Powering the Clock
- Connect Power: Plug the provided USB cable into the clock's power input port. Connect the other end of the USB cable to a 5V/1A or 5V/2A USB power adapter (not included) and then into a wall outlet. The clock display will illuminate.
- Install Battery Backup: Open the battery compartment on the back of the clock. Insert 2 AAA alkaline batteries (not included), ensuring correct polarity (+/-). These batteries will preserve settings and activate alarms during a power interruption, but will not power the display.
4.2 Initial Setup (Time, Date, 12/24H Format)
Upon first power-up, the clock may display a default time. Use the remote control to set the correct time and date.
- Access Settings: Press the SET button on the remote control. The time display will start flashing.
- Set Time: Use the UP and DOWN arrows to adjust the hour. Press SET again to move to minutes, then adjust with UP and DOWN.
- Set Date: After setting minutes, press SET to move to the date setting (Year, Month, Day). Adjust each value using UP and DOWN, pressing SET to confirm and move to the next.
- 12/24H Format: During time setting, you can toggle between 12-hour and 24-hour formats by pressing the 12/24H button on the remote.
- Confirm Settings: Press SET one last time or wait a few seconds for the clock to exit the setting mode automatically.
4.3 Mounting the Clock
The clock can be placed on a desk or mounted on a wall.
- Desk Placement: Simply place the clock on a flat, stable surface.
- Wall Mounting: The clock has keyhole slots on the back for wall mounting. Use appropriate screws (not included) for your wall type. Ensure the clock is securely fastened and level.
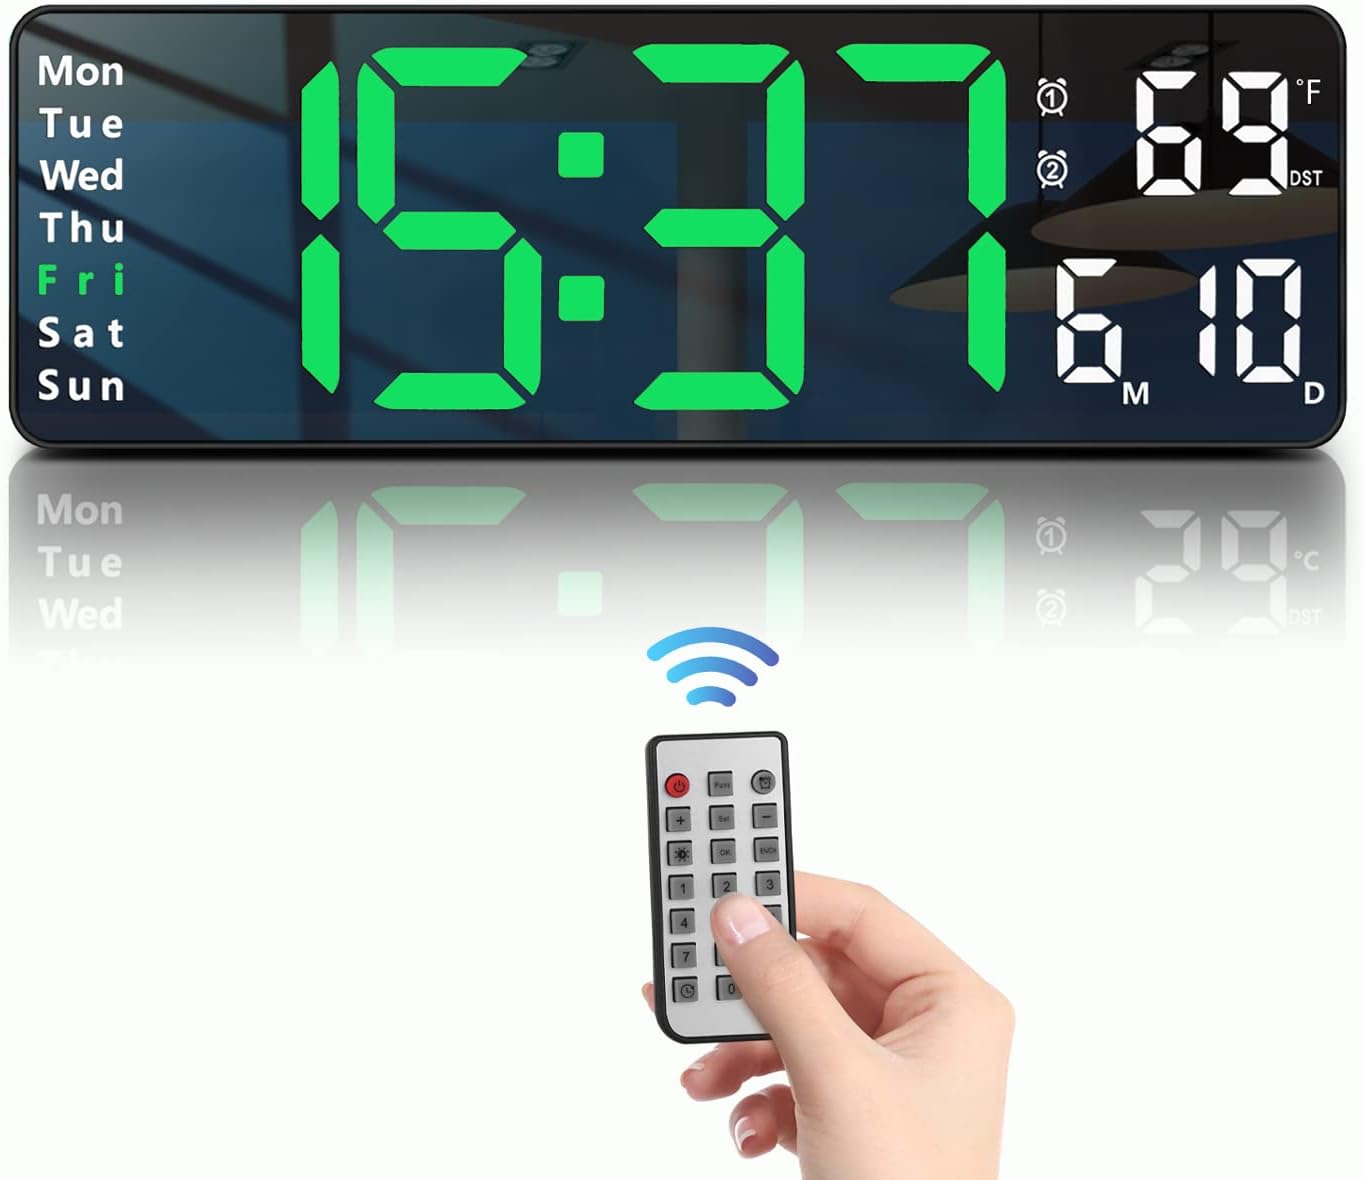
Figure 4.1: The JoFomp Digital Wall Clock and its remote control.

Figure 4.2: Physical dimensions of the 13-inch clock.
5. Operating Instructions
5.1 Remote Control Usage
The remote control allows for convenient adjustment of all clock settings from a distance. Ensure the remote has a clear line of sight to the clock's sensor.

Figure 5.1: Using the remote control to operate the clock.
5.2 Setting Alarms
The clock supports two independent alarms (AL1 and AL2).
- Enter Alarm Setting: Press the ALARM button on the remote. AL1 will appear, and the hour will flash.
- Set Alarm Time: Use UP and DOWN to adjust the hour. Press ALARM to move to minutes, then adjust.
- Enable/Disable Alarm: After setting the time, press ALARM again. The alarm icon will flash. Use UP or DOWN to turn the alarm ON or OFF.
- Set Second Alarm (AL2): Press ALARM again to switch to AL2 settings and repeat the steps.
- Exit Alarm Setting: Press SET or wait for the display to return to normal time.

Figure 5.2: Examples of using the dual alarm feature for different daily activities.
5.3 Timer Function
The clock includes a countdown timer.
- Activate Timer: Press the TIMER button on the remote. The display will show '00:00'.
- Set Countdown Time: Use the number buttons on the remote to enter the desired countdown duration (e.g., '1000' for 10 minutes).
- Start/Pause Timer: Press START/PAUSE to begin or pause the countdown.
- Reset Timer: Press RESET to clear the timer.
5.4 Brightness Adjustment
The clock offers both automatic and manual brightness control.
- Automatic Brightness: Press the AUTO button on the remote. The clock will automatically adjust its brightness based on the ambient light detected by its built-in sensor. The display will show 'L-AU'.
- Manual Brightness: Press the BRIGHTNESS button repeatedly to cycle through 10 levels of brightness (L-01 to L-10).

Figure 5.3: Brightness adjustment options, including automatic and 10 manual levels.
5.5 Daylight Saving Time (DST)
The clock can automatically adjust for Daylight Saving Time.
- Enable/Disable DST: Press the DST button on the remote control. The DST indicator on the display will turn ON or OFF. When enabled, the clock will automatically adjust forward or backward by one hour at the appropriate times.

Figure 5.4: How Daylight Saving Time (DST) adjustment works.
5.6 Temperature Display
The clock displays the indoor temperature. You can switch between Celsius and Fahrenheit.
- Change Temperature Unit: Press the °C/°F button on the remote to toggle between Celsius and Fahrenheit display.
6. Maintenance
- Cleaning: Use a soft, dry cloth to clean the clock's surface. Avoid abrasive cleaners or solvents that may damage the finish or display.
- Power Disconnection: If the clock will not be used for an extended period, disconnect it from the power source and remove the backup batteries.
- Environment: Keep the clock away from direct sunlight, extreme temperatures, and high humidity to prevent damage.
7. Troubleshooting
| Problem | Possible Cause | Solution |
|---|---|---|
| Display is off | No power connection; Power outage. | Ensure USB cable is securely connected to a working power adapter and outlet. Check if there's a power outage. |
| Remote control not working | Remote batteries are dead; Obstruction between remote and clock; Remote out of range. | Replace remote batteries. Ensure clear line of sight to the clock. Move closer to the clock. |
| Time is inaccurate | Initial setup error; Backup batteries not installed or low. | Re-set the time using the remote control. Install fresh AAA backup batteries to maintain accuracy during minor power fluctuations. |
| Alarm does not sound during power outage | Backup batteries are not installed or are depleted. | Install fresh AAA alkaline batteries for the backup function. |
| Automatic brightness not working | Auto mode not enabled; Light sensor obstructed. | Press the AUTO button on the remote. Ensure the light sensor on the clock is not covered. |
8. Specifications
| Feature | Detail |
|---|---|
| Brand | JoFomp |
| Model Number | 6626-6629 |
| Display Type | Digital LED |
| Product Dimensions | 12.6"W x 4.1"H |
| Power Source | Corded Electric (USB) |
| Adapter Requirement | 5V/1A or 5V/2A (not included) |
| Battery Backup | 2 AAA batteries (not included) |
| Mounting Type | Wall Mount, Desk Placement |
| Special Features | Remote Control, Auto-Dimming, DST, Dual Alarms, Timer, Temperature Display |
| Indoor/Outdoor Usage | Indoor |
9. Warranty and Support
For warranty information or technical support, please refer to the contact details provided with your purchase documentation or visit the official JoFomp website. Keep your purchase receipt as proof of purchase for any warranty claims.