1. Introduction
This manual provides detailed instructions for the safe installation, operation, and maintenance of your Amico 4-Inch 5CCT Ultra-Thin LED Recessed Lighting with Junction Box. Please read this manual thoroughly before installation and retain it for future reference.
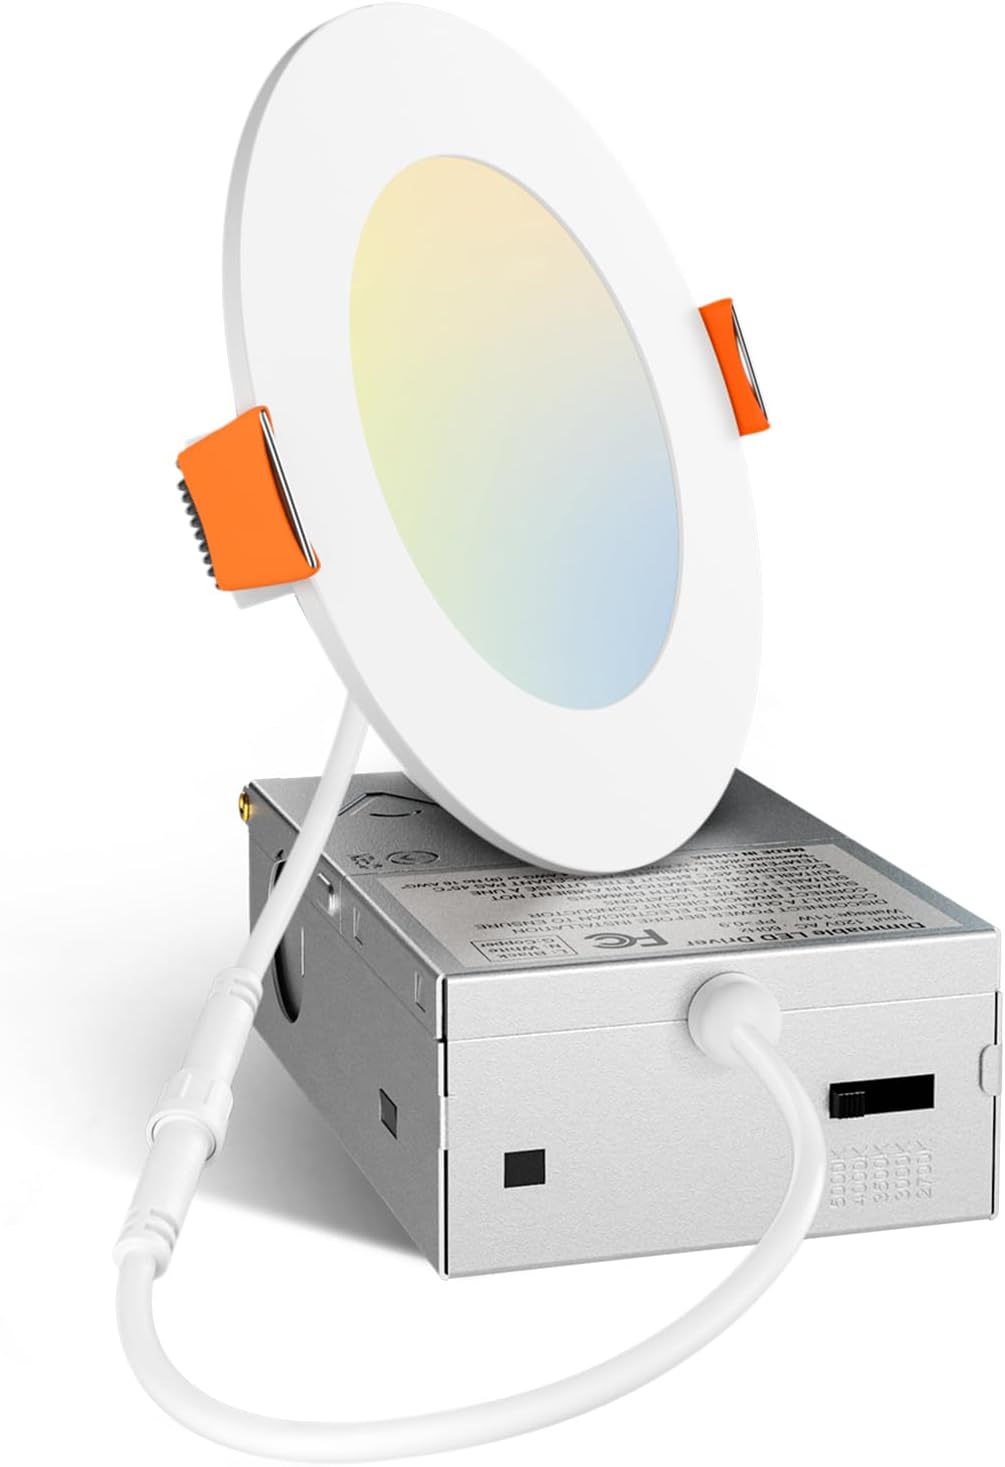
Image 1.1: Amico 4-Inch 5CCT Ultra-Thin LED Recessed Light with Junction Box. This image displays the complete lighting unit, including the ultra-thin LED panel and the connected junction box.
2. Safety Information
- WARNING: Risk of electric shock. Disconnect power at the fuse or circuit breaker before installation or servicing.
- Installation must be performed by a qualified electrician in accordance with all national and local electrical codes.
- Do not install in locations where the operating temperature exceeds the fixture's rated temperature.
- Ensure all electrical connections are secure and properly insulated.
- This fixture is IC Rated, meaning it is suitable for direct contact with insulations in ceilings.
- Do not modify the fixture or its components.
3. Package Contents
Verify that all components are present before beginning installation:
- 1x Amico 4-Inch 5CCT Ultra-Thin LED Downlight
- 1x Junction Box
- 1x Hole Template
- Instruction Manual (this document)
4. Specifications
| Feature | Specification |
|---|---|
| Model | 143 |
| Size | 4 Inch |
| Color Temperature (CCT) | 2700K, 3000K, 3500K, 4000K, 5000K Selectable |
| Brightness | 800 Lumens |
| Wattage | 11 Watts (Equivalent to 70W Halogen) |
| Dimmability | 5%-100% Smooth Dimmable |
| Voltage | 120 Volts |
| Lifespan | 50,000 Hours |
| Certifications | ETL, FCC, IC Rated |
| Material | Aluminum |
| Product Dimensions | 4.7"L x 4.7"W x 0.9"H (Light Fixture) |
| Junction Box Dimensions | Approximately 4.0"L x 2.7"W x 1.4"H |
| Advised Hole Cutout Size | 4.35 inches |

Image 4.1: Detailed dimensions of the Amico 4-inch recessed light and its junction box, including the recommended cutout size of 4.35 inches.
5. Installation Instructions
Follow these steps for proper installation. Ensure power is disconnected before starting.
5.1 Pre-Installation
- Turn off power at the circuit breaker or fuse box.
- Determine the desired location for the light fixture. Ensure there is sufficient clearance above the ceiling for the junction box.
- Use the provided hole template to mark the cutout area on the ceiling. The advised hole cutout size is 4.35 inches.
5.2 Cutting the Hole
- Carefully cut the marked hole in the ceiling using an appropriate tool.

Image 5.1: Visual guide for the installation process, showing steps for cutting the hole, connecting wiring, connecting the light panel, and mounting the light.
5.3 Wiring Connections
- Open the junction box cover.
- Connect the house wiring to the junction box wires:
- Connect the black wire (Live) from the house to the black wire of the junction box.
- Connect the white wire (Neutral) from the house to the white wire of the junction box.
- Connect the ground wire from the house to the green wire of the junction box.
- Secure all connections with wire nuts (not included) and ensure they are properly insulated.
- Close the junction box cover.
5.4 CCT (Color Temperature) Selection
- Before mounting the light, locate the CCT selection switch on the side of the junction box.
- Slide the switch to select your desired color temperature: 2700K (Soft White), 3000K (Warm White), 3500K (Neutral White), 4000K (Cool White), or 5000K (Daylight).

Image 5.2: Illustration of the 5 CCT (Color Correlated Temperature) options available on the Amico recessed light, showing different ambiances for various room types and the physical switch for selection.
5.5 Mounting the Light
- Connect the LED light panel to the junction box via the provided connector.
- Gently push the junction box through the cutout hole into the ceiling cavity.
- Push the spring clips on the LED light panel upwards and insert the light into the cutout hole. Release the clips to secure the light flush against the ceiling.
- Restore power at the circuit breaker.
6. Operating Instructions
Once installed and powered, the Amico LED recessed light operates as follows:
- Power On/Off: Control the light using a standard wall switch connected to the circuit.
- Color Temperature Adjustment: The CCT is set via the switch on the junction box during installation. To change the CCT, power must be disconnected, the light removed, the switch adjusted, and the light reinstalled.
- Dimming: This fixture is 5%-100% smooth dimmable. Use a compatible LED dimmer switch (not included) for dimming functionality. Refer to the dimmer manufacturer's instructions for installation and operation. Note: Smart dimmers are not recommended.

Image 6.1: A compatibility chart for various dimmer models from Amico, Lutron, and Leviton, indicating their star rating for use with the recessed light. This image also notes that smart dimmers are not recommended.
7. Maintenance
The Amico LED recessed light requires minimal maintenance due to its long lifespan.
- Cleaning: Ensure power is off before cleaning. Wipe the fixture with a soft, dry, or slightly damp cloth. Do not use harsh chemicals or abrasive cleaners.
- Bulb Replacement: The LED light source is integrated and not user-replaceable. The fixture has a rated lifespan of 50,000 hours.
8. Troubleshooting
| Problem | Possible Cause | Solution |
|---|---|---|
| Light does not turn on | No power to the fixture; Loose wiring connection; Faulty switch; Incorrect CCT setting. | Check circuit breaker/fuse; Verify all wiring connections are secure; Test the switch; Ensure CCT switch is set to a valid position. |
| Light flickers | Incompatible dimmer switch; Loose wiring connection; Voltage fluctuations. | Ensure a compatible LED dimmer is used (not a smart dimmer); Check wiring connections; Consult an electrician for voltage issues. |
| Light is dim or too bright | CCT setting is not preferred; Dimmer setting is too low/high. | Adjust the CCT switch on the junction box (requires power off and removal); Adjust the dimmer switch. |
9. Warranty and Support
This Amico product comes with a Limited Warranty. For specific warranty terms and conditions, please refer to the documentation included with your purchase or contact Amico customer support.
Amico's customer support team is available to address your concerns. You can expect a response within 12 hours.
For support, please visit the official Amico website or contact their customer service department.
10. Disposal Information
This product contains electronic components and should not be disposed of with general household waste. Please dispose of this product in accordance with local regulations for electronic waste recycling.


