1. Safety Instructions
Please read all safety instructions carefully before operating the ShockFlo TP06 Portable Tire Inflator. Failure to follow these instructions may result in product damage, property damage, or personal injury.
General Safety
- Keep the device away from children and pets.
- Do not operate the device in wet conditions or near flammable liquids or gases.
- Avoid prolonged exposure to direct sunlight or extreme temperatures.
- Do not disassemble, modify, or attempt to repair the device. Contact customer support for assistance.
- Ensure proper ventilation during operation to prevent overheating.
Electrical Safety
- Use only the provided charging cables and adapters.
- Do not operate the device with damaged cables or connectors.
- Disconnect the device from the power source when not in use or during cleaning.
Usage Safety
- Always check the recommended pressure for the item being inflated. Over-inflation can cause damage or injury.
- Do not leave the inflator unattended during operation.
- The air hose and nozzle may become hot during prolonged use. Handle with care.
- Allow the device to cool down between uses if inflating multiple items or for extended periods.
2. Product Overview
The ShockFlo TP06 is a portable tire inflator designed for various inflation needs, featuring a powerful battery, digital pressure gauge, and emergency LED lighting.
Included Components
The package includes the following items:
- 1 x ShockFlo Tire Inflator (Model TP06)
- 1 x Power Cord (for 12V DC car outlet)
- 1 x USB-C Charging Cable
- 1 x Replacement Fuse
- 1 x Dunlop Valve Clamp
- 1 x Presta Valve Adapter
- 1 x Swimming Ring Needle
- 1 x Ball Needle
- 1 x User Manual
- 1 x Storage Bag

Image: The ShockFlo TP06 Portable Tire Inflator shown with its carrying case, air hose, and various adapters.
Key Features
- Fast Inflation: Inflates tires quickly with a high-speed motor.
- Large Battery Capacity: Equipped with a 7800mAh rechargeable battery for cordless operation.
- Digital Pressure Gauge: LCD display shows current and target tire pressure.
- 4+N Inflation Modes: Preset modes for cars, motorcycles, bicycles, balls, and a manual mode.
- Dual Power Supply: Can be powered by the internal battery or a 12V DC car outlet.
- Emergency LED Light: Features bright, warning, and SOS flashing modes.
- Portable Power Bank: Can be used to charge mobile devices via USB.

Image: The inflator connected to a car tire using its internal battery, and connected to a car's 12V DC outlet for continuous power.
3. Setup
Charging the Device
- Connect the provided USB-C charging cable to the charging port on the inflator.
- Connect the other end of the USB-C cable to a compatible USB power adapter (not included) or a 12V DC car outlet using the provided power cord.
- The battery indicator on the display will show the charging status. Charge the device fully before first use.
Connecting the Air Hose
- Screw the air hose securely onto the air outlet port of the inflator.
- Select the appropriate nozzle adapter for the item you wish to inflate (e.g., Schrader valve for car tires, Presta valve for some bicycles, needle for balls).
- Attach the selected nozzle adapter to the end of the air hose.
4. Operating Instructions
Powering On/Off
- To power on, press and hold the power button for a few seconds. The display will illuminate.
- To power off, press and hold the power button again. The device will also automatically power off after a period of inactivity.
Selecting Inflation Modes
The inflator features 4 preset modes and a manual mode:

Image: Visual representation of the five inflation modes: Car (26-50 PSI), Motorcycle (26-45 PSI), Bicycle (30-90 PSI), Ball (5-16 PSI), and Manual (3-150 PSI).
- After powering on, press the 'Mode' button (often represented by an icon like a car or a gear) to cycle through the available preset modes.
- Each mode has a default pressure range. The display will show the selected mode and its default target pressure.
- For manual mode, select the 'Manual' option (often represented by a person icon) to set any desired pressure within the device's operating range (3-150 PSI).
Setting Target Pressure
- Once a mode is selected, use the '+' and '-' buttons to adjust the target pressure.
- The display will show the target pressure.
- To change pressure units (PSI, BAR, KPA), press the unit button (if available, often indicated by 'M' or a unit icon).
Inflation Process
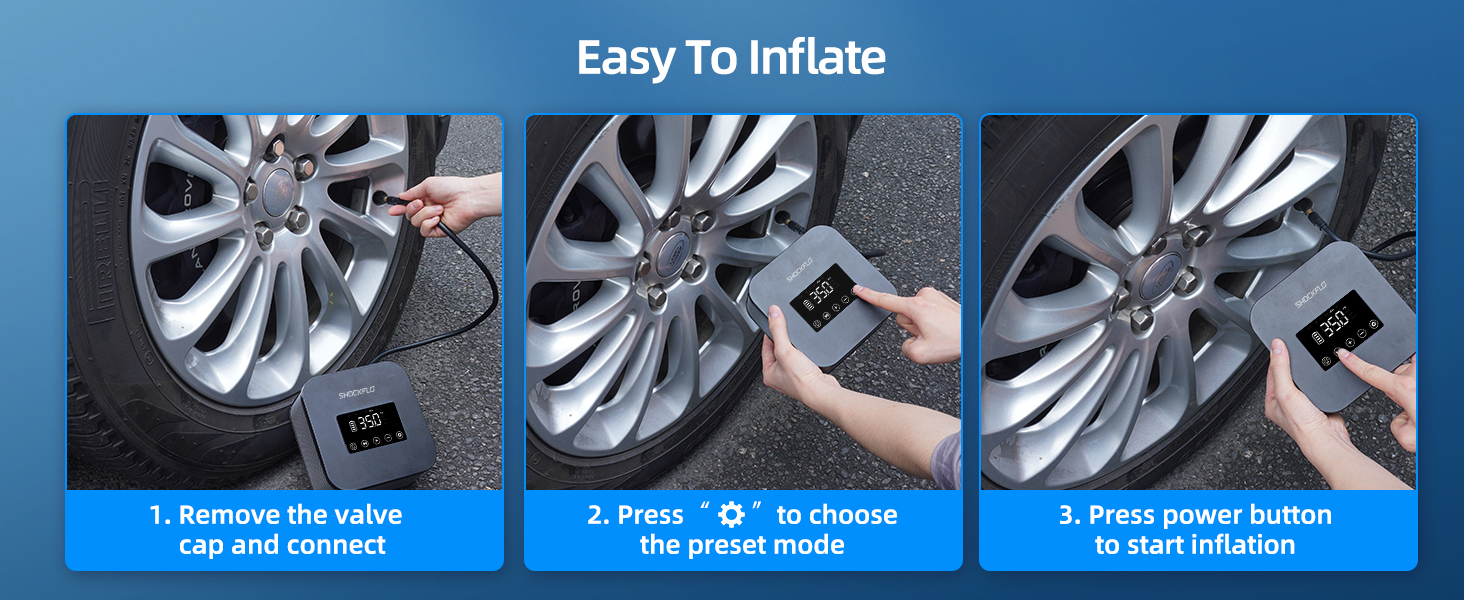
Image: Step-by-step guide showing how to connect the inflator to a tire valve, select a preset mode, and start inflation.
- Ensure the air hose is securely connected to the inflator and the appropriate nozzle adapter is attached to the item's valve.
- Power on the inflator and select the desired inflation mode and target pressure.
- Press the 'Start/Stop' button (often a play/pause icon) to begin inflation. The display will show the real-time pressure.
- The inflator will automatically stop once the target pressure is reached.
- Carefully disconnect the nozzle from the valve and then the air hose from the inflator.
Using the LED Light
The device includes an integrated LED light for illumination in low-light conditions or emergencies.
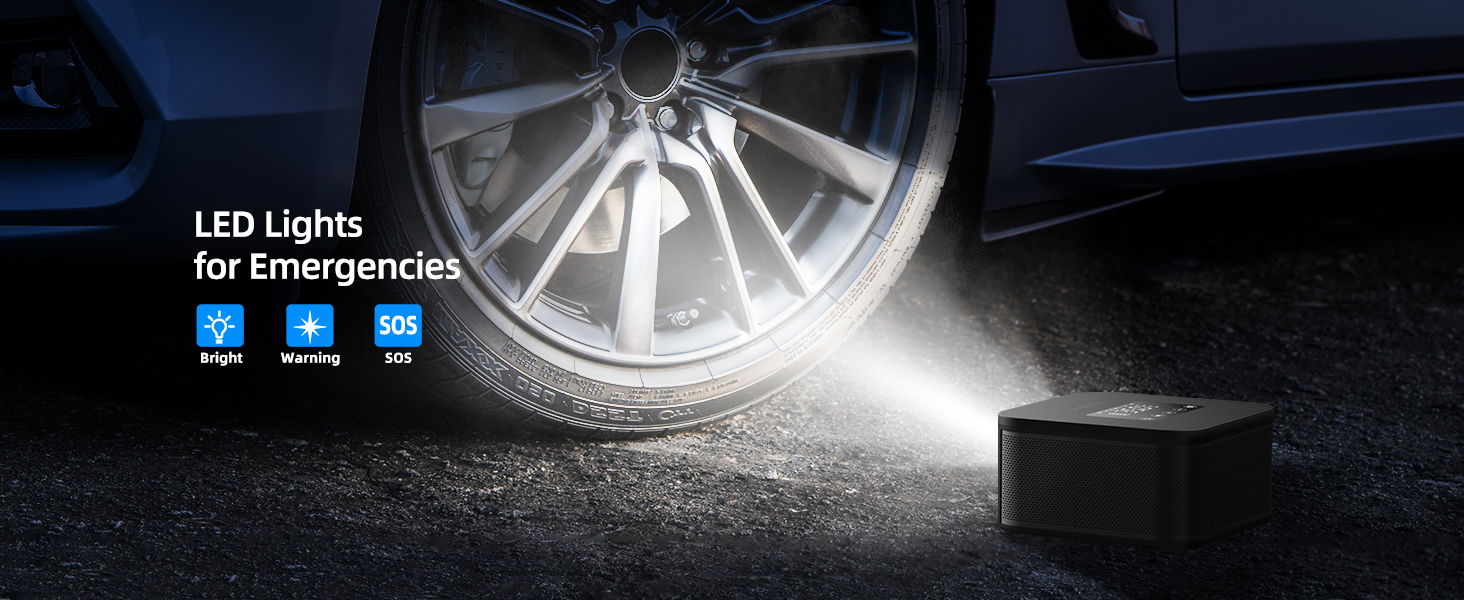
Image: The inflator's LED light shining on a car tire, illustrating its use in emergency situations with bright, warning, and SOS flashing modes.
- Press the 'Light' button (often a flashlight icon) to cycle through the light modes: Bright, Warning (flashing red), and SOS (Morse code for SOS).
- Press the button again to turn off the light.
Using as a Portable Power Bank
The ShockFlo TP06 can provide temporary power to charge mobile devices.

Image: The ShockFlo TP06 connected to a smartphone with a USB-C cable, demonstrating its power bank functionality.
- Connect your device's charging cable to the USB output port on the inflator.
- The inflator will begin charging your device.
- Note that using the power bank feature will deplete the inflator's battery.
5. Maintenance
- Cleaning: Wipe the device with a soft, dry cloth. Do not use harsh chemicals or abrasive cleaners.
- Storage: Store the inflator in a cool, dry place, away from direct sunlight and extreme temperatures. Ensure the battery is partially charged if storing for extended periods.
- Battery Care: To prolong battery life, avoid fully discharging the battery frequently. Recharge the device regularly, even if not in use.
- Hose and Adapters: Inspect the air hose and adapters for any signs of wear or damage before each use. Replace if necessary.
6. Troubleshooting
| Problem | Possible Cause | Solution |
|---|---|---|
| Device does not power on. | Low battery; Power button not held long enough. | Charge the device fully; Press and hold the power button for 3-5 seconds. |
| Inflator not inflating. | Air hose not connected properly; Nozzle not sealed; Target pressure not set; Battery too low. | Ensure all connections are tight; Check nozzle seal; Set target pressure; Recharge battery. |
| Inaccurate pressure reading. | Loose connection; Sensor obstruction. | Ensure connections are secure; Clean the valve and nozzle area. |
| Device overheats and shuts off. | Prolonged continuous operation. | Allow the device to cool down for at least 10-15 minutes before resuming use. |
7. Specifications

Image: Diagram illustrating the compact dimensions of the ShockFlo TP06 inflator.
- Brand: ShockFlo
- Model Name: TP06
- Item Model Number: 4913TPU0062US
- Voltage: 12 Volts (DC)
- Power Source: Battery Powered / 12V DC
- Battery Capacity: 7800mAh (3*2600mAh)
- Maximum Operating Pressure: 150 PSI (10.3 BAR / 1034 KPA)
- Maximum Power: 120 Watts
- Air Flow Capacity: 42 Liters Per Minute
- Noise Level: 75 dB
- Product Dimensions: 5.9"L x 5.9"W x 3.1"H (approximate)
- Item Weight: 2.9 Pounds (approximate)
- Special Features: Automatic Shut-Off, Dual Power Supply, LED Emergency Lights, Portable Power Bank
8. Warranty and Support
ShockFlo products are covered by a warranty. For specific warranty details, please refer to the warranty card included with your purchase or contact ShockFlo customer support.
For any assistance, technical support, or inquiries regarding your ShockFlo TP06 Portable Tire Inflator, please contact our customer service team. Contact information can typically be found on the product packaging or the official ShockFlo website.


