
Cleva VO408S 0901
Armor All VO408S 0901 4 Gallon 3 Peak HP Stainless Steel Wet/Dry Vacuum Instruction Manual
Model: VO408S 0901 | Brand: Cleva
Introduction
This manual provides essential information for the safe and effective operation, maintenance, and troubleshooting of your Armor All VO408S 0901 4 Gallon 3 Peak HP Stainless Steel Wet/Dry Vacuum. Please read all instructions carefully before use and retain this manual for future reference.
Important Safety Information
Always follow basic safety precautions when using this appliance to reduce the risk of fire, electric shock, or injury. Keep this manual for future reference.
- Read all instructions before operating the vacuum.
- Do not leave the appliance unattended when plugged in. Unplug from outlet when not in use and before servicing.
- Do not use with damaged cord or plug. If appliance is not working as it should, has been dropped, damaged, left outdoors, or dropped into water, return it to a service center.
- Do not pull or carry by cord, use cord as a handle, close a door on cord, or pull cord around sharp edges or corners. Do not run appliance over cord. Keep cord away from heated surfaces.
- Do not unplug by pulling on cord. To unplug, grasp the plug, not the cord.
- Do not handle plug or appliance with wet hands.
- Do not use to pick up flammable or combustible liquids, such as gasoline, or use in areas where they may be present.
- Do not pick up anything that is burning or smoking, such as cigarettes, matches, or hot ashes.
- Use extra care when cleaning on stairs.
- Do not use without filters in place.
- Use only as described in this manual. Use only manufacturer's recommended attachments.
- To reduce the risk of electric shock, do not expose to rain. Store indoors.
Package Contents
Verify that all items listed below are included in your package:
- Armor All VO408S 0901 4 Gallon 3 Peak HP Stainless Steel Wet/Dry Vacuum Unit
- 8-ft Power Cord
- 6-ft Hose
- (3) Extension Wands
- Crevice Tool
- Car Nozzle
- Floor Brush Nozzle
- Reusable Cloth Filter
- Foam Wet Filter

Figure 1: Overview of the Armor All VO408S 0901 Wet/Dry Vacuum and its included accessories, such as the hose, extension wands, floor brush, utility nozzle, crevice tool, car nozzle, reusable cloth filter, and foam wet filter.
Setup Instructions
1. Attaching the Casters
- Invert the tank assembly.
- Insert the caster feet into the slots on the bottom of the tank base.
- Press firmly until each caster snaps securely into place.
2. Filter Installation
The vacuum comes with two types of filters: a reusable cloth filter for dry pickup and a foam wet filter for wet pickup. Ensure the correct filter is installed for your task.
For Dry Pickup (Reusable Cloth Filter):
- Remove the power head from the tank by unlatching the side clips.
- Place the reusable cloth filter over the filter cage on the underside of the power head.
- Secure the filter with the filter clamp.
- Replace the power head and secure the side clips.
For Wet Pickup (Foam Wet Filter):
- Remove the power head from the tank.
- Remove the reusable cloth filter if installed.
- Slide the foam wet filter over the filter cage.
- Replace the power head and secure the side clips.
3. Attaching the Hose and Accessories
- Insert the large end of the hose into the vacuum port on the front of the tank for vacuuming.
- For blowing function, insert the hose into the blower port on the back of the power head.
- Attach desired accessories (extension wands, crevice tool, car nozzle, floor brush nozzle) to the end of the hose.

Figure 2: The Armor All VO408S 0901 Wet/Dry Vacuum, showcasing its compact design, balanced top handle, powerful motor, and integrated storage for hose and accessories.
Operating Instructions
1. Dry Vacuuming
- Ensure the reusable cloth filter is correctly installed.
- Plug the power cord into a suitable electrical outlet (120 Volts).
- Press the ON/OFF switch located on the top of the power head to the "ON" position.
- Use the appropriate nozzle for the surface you are cleaning. The floor brush nozzle is ideal for hard floors, while the car nozzle and crevice tool are suitable for vehicle interiors.
- When finished, press the ON/OFF switch to the "OFF" position and unplug the unit.
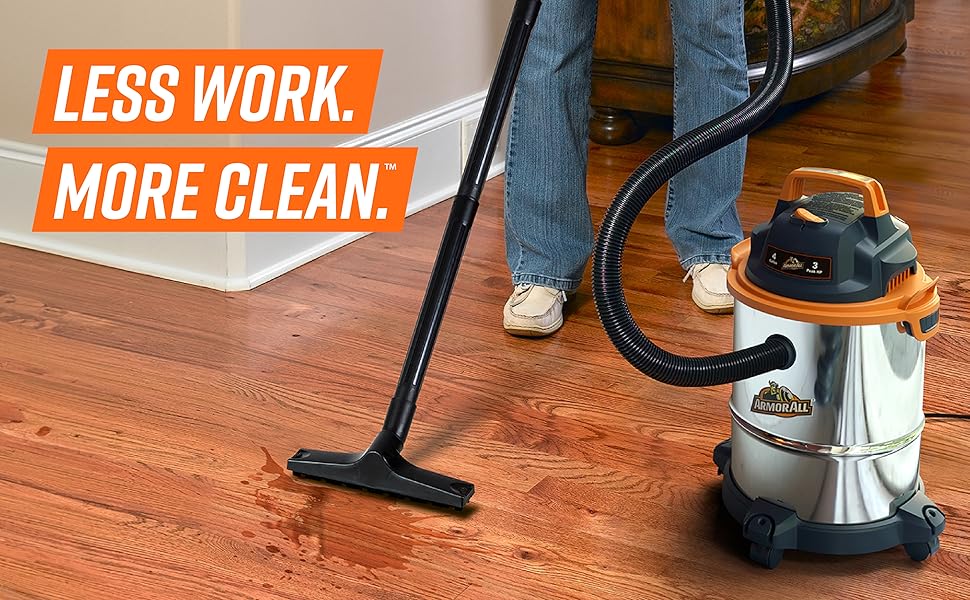
Figure 3: Demonstrating the vacuum's capability to clean wet spills on hard surfaces using the floor brush nozzle.
2. Wet Vacuuming
- Ensure the foam wet filter is correctly installed. Remove the cloth filter if present.
- Do not use the reusable cloth filter for wet pickup, as it can be damaged.
- Plug the power cord into a suitable electrical outlet.
- Press the ON/OFF switch to the "ON" position.
- Use the floor brush nozzle or car nozzle for wet spills.
- The vacuum features an automatic shut-off when the tank is full to prevent overflow. If suction stops, turn off the vacuum, unplug it, and empty the tank.
- When finished, press the ON/OFF switch to the "OFF" position and unplug the unit.
3. Blower Function
- To use as a blower, remove the hose from the vacuum port and insert it into the blower port located on the back of the power head.
- Plug the power cord into an outlet and turn the unit "ON".
- Use the hose to blow leaves and debris from surfaces like garages or windshields.
- When finished, turn the unit "OFF" and unplug it.
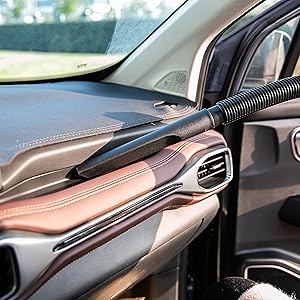
Figure 4: The Armor All VO408S 0901 easily converts to a blower, useful for clearing debris from various surfaces.
Video 1: Official product video demonstrating the features and versatility of the Armor All VO408S 0901 4 Gallon Wet/Dry Vac, including its powerful suction and blower function.
Maintenance
1. Emptying the Tank
- Always unplug the vacuum before emptying the tank.
- Unlatch the side clips and carefully lift the power head off the tank.
- Dispose of collected debris or liquid.
- Clean the inside of the tank with water and mild soap if necessary. Rinse thoroughly and allow to dry before reassembling.
2. Cleaning Filters
Reusable Cloth Filter:
- Remove the cloth filter from the filter cage.
- Shake off any loose dust and debris.
- For thorough cleaning, rinse the filter under running water. Allow it to air dry completely before reinstallation.
Foam Wet Filter:
- Remove the foam filter from the filter cage.
- Rinse the filter under running water to remove any residue.
- Squeeze out excess water and allow it to air dry completely before reinstallation.
3. Accessory Storage
The vacuum features integrated hose and accessory storage to keep all components organized and readily accessible. Store extension wands and nozzles in their designated slots around the base of the unit.
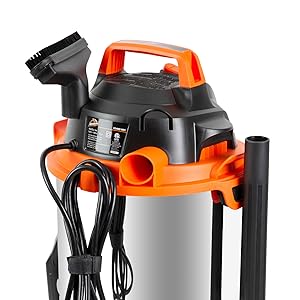
Figure 5: Integrated storage for the hose and various accessories ensures all parts are kept together and organized.
Troubleshooting
| Problem | Possible Cause | Solution |
|---|---|---|
| Vacuum will not turn on. | No power to the unit. | Check power cord connection. Ensure outlet is functional. |
| Loss of suction. | Tank is full, filter is clogged, or hose/nozzle is blocked. | Empty the tank. Clean or replace the filter. Check hose and nozzles for obstructions. |
| Water leaking from unit. | Foam filter not installed correctly for wet pickup, or tank is overfilled. | Ensure foam filter is properly seated. Empty the tank if it's full. |
| Motor runs, but no suction. | Hose not properly connected to the vacuum port. | Ensure the hose is securely inserted into the vacuum port. |
Specifications
- Model Name: VO408S 0901
- Brand: Cleva (Armor All)
- Capacity: 4 Gallons
- Peak Horsepower: 3 HP
- Wattage: 900 watts
- Voltage: 120 Volts
- Amperage: 7.5 Amps
- Power Source: Corded Electric
- Hose Length: 6 Feet
- Cord Length: 8 Feet
- Filter Type: Reusable Cloth, Foam Wet Filter
- Special Feature: Wet/Dry Pickup, Blower Function
- Construction: Stainless Steel Tank
- Portability: 360° Rotating Caster Wheels, Balanced Top Handle
- Item Weight: 7.32 Pounds
- Item Dimensions (L x W x H): 12.2" x 11.81" x 17.91"
- Noise Level: 80 Decibels
Warranty and Support
For warranty information or technical support, please refer to the documentation included with your product or visit the official Cleva website. Keep your purchase receipt as proof of purchase for warranty claims.
Protection Plans:
- 2-Year Protection Plan: $6.99 (one-time)
- 3-Year Protection Plan: $8.99 (one-time)
- Complete Protect: $16.99 (monthly, covers all eligible past and future purchases)
Related documentsVO408S 0901


Ask a question about this manual
Ask about setup, troubleshooting, compatibility, parts, safety, or missing instructions. Manuals+ will review the question and use this page’s manual context to help answer it.