
Pockrif home safes fireproof waterproof
Pockrif 1.6 Cub Home Safe User Manual
Model: home safes fireproof waterproof
Introduction
This user manual provides comprehensive instructions for the safe operation, setup, and maintenance of your Pockrif 1.6 Cubic Home Safe. Designed for securing valuables, important documents, jewelry, and money, this safe offers robust protection with its digital keypad, emergency keys, and durable construction. Please read this manual thoroughly before using the safe to ensure proper functionality and security.
Safety Information
- Always keep emergency keys in a secure location away from the safe. Do not store them inside the safe.
- Ensure the safe is placed on a stable, level surface or securely mounted to prevent tipping.
- Do not expose the safe to extreme temperatures or humidity.
- Regularly check battery levels to ensure continuous operation of the electronic keypad.
- The safe is designed to deter unauthorized access and protect against fire and water damage to a certain extent, but it is not completely impervious to all forms of attack or extreme conditions.
Package Contents
Verify that all items are present in your package:
- 1 x Pockrif 1.6 Cub Home Safe
- 1 x User Manual (this document)
- 1 x Fireproof and Waterproof Document Bag
- 1 x Emergency Battery Box
- 2 x Emergency Keys
- 4 x Expansion Screws for mounting
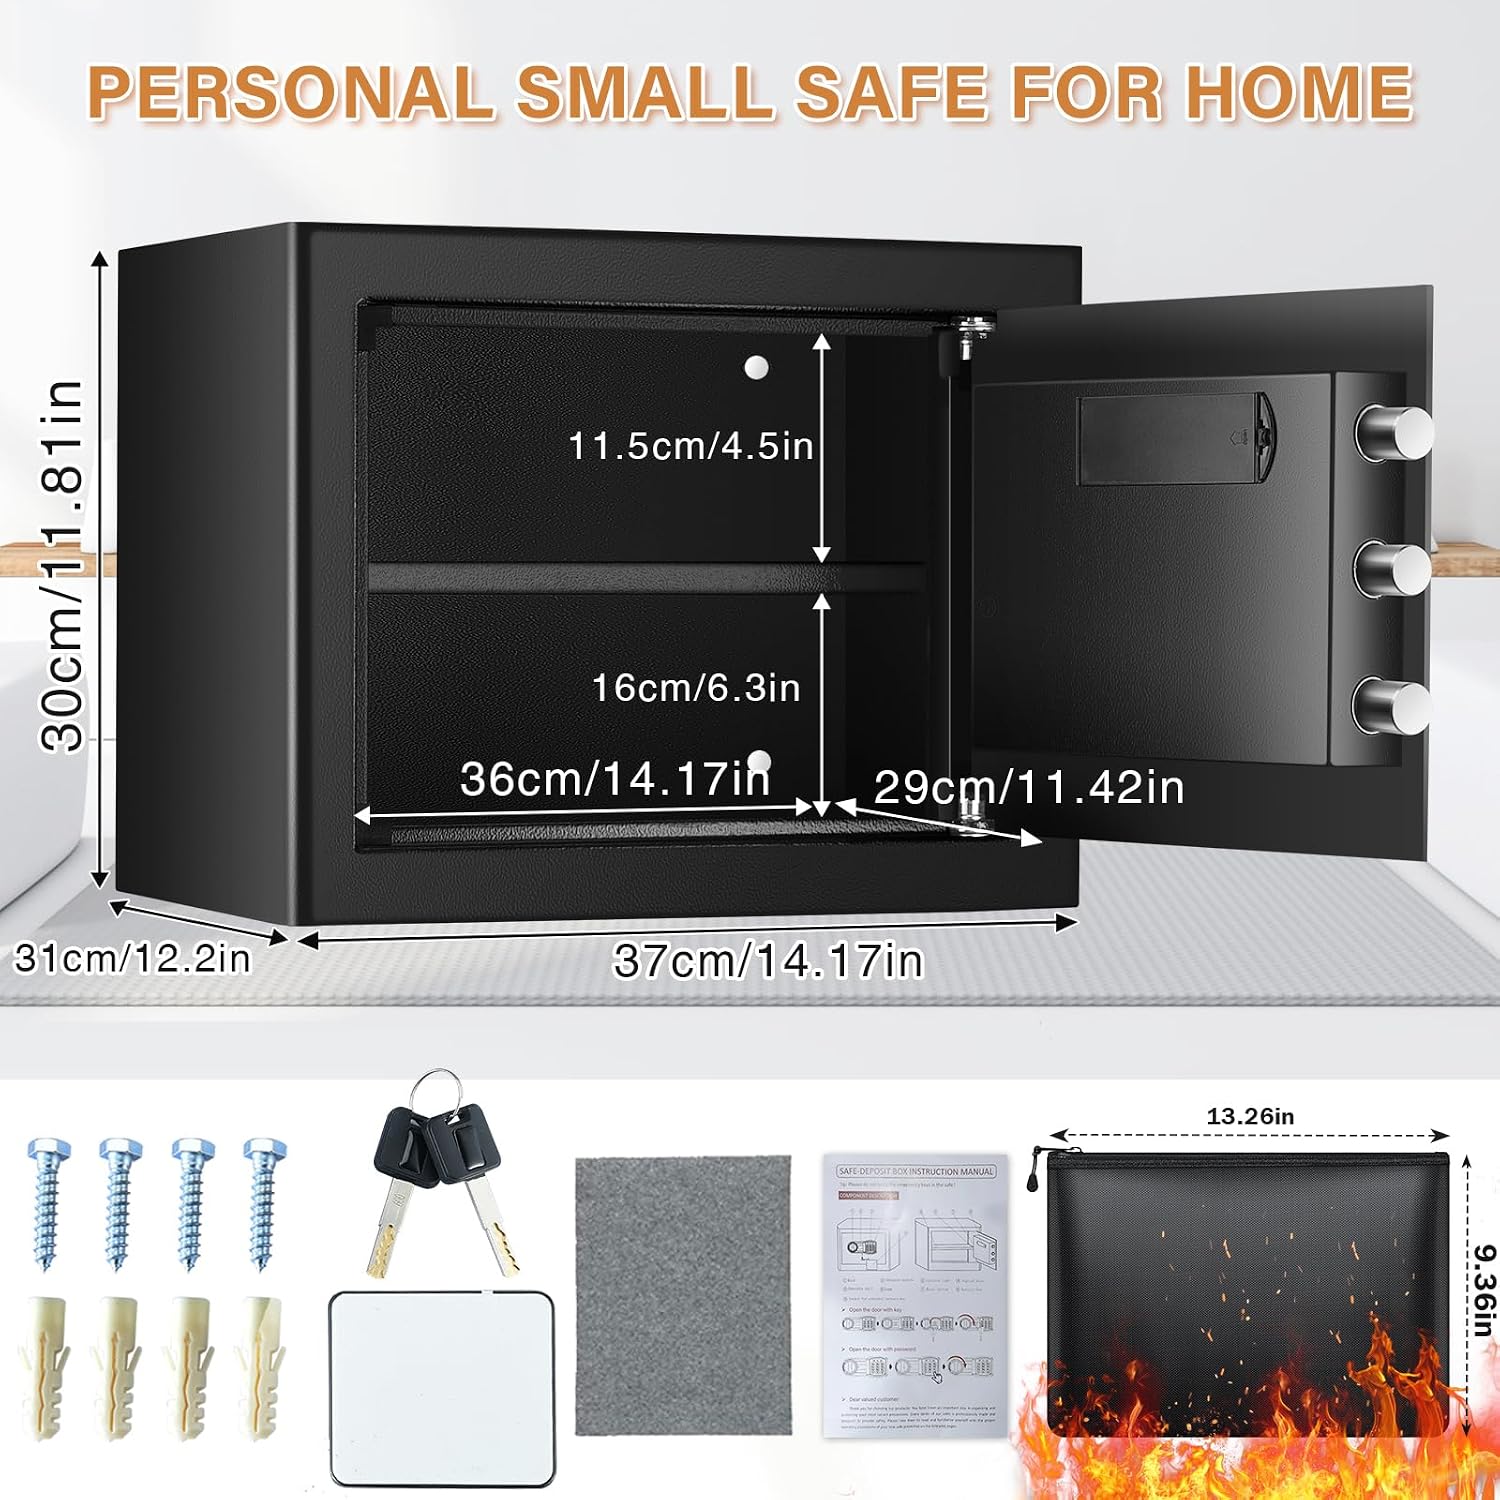
Figure 1: Safe dimensions and included accessories. The image displays the safe's external measurements (30cm/11.81in H, 37cm/14.17in W, 31cm/12.2in D) and internal shelf dimensions (11.5cm/4.5in H, 16cm/6.3in H, 36cm/14.17in W, 29cm/11.42in D). Below the safe, the fireproof bag (13.26in x 9.36in), two emergency keys, an emergency battery box, and four expansion screws are shown.
Setup
1. Initial Opening
Upon receiving your safe, it will be in a locked state. Use one of the provided emergency keys to open it for the first time.
- Locate the keyhole cover on the electronic keypad panel. Gently remove it.
- Insert one of the emergency keys into the keyhole and turn it clockwise.
- While the key is turned, rotate the knob on the safe door clockwise to open the safe.
- Once open, remove the keys and any internal packaging. Keep the emergency keys in a safe place outside the safe.

Figure 2: Methods for opening the safe. This diagram shows the electronic keypad, the keyhole for emergency access, and the knob. It highlights that the safe can be opened using a personal password combined with turning the knob, an emergency key combined with turning the knob, or by using the external battery box with a password and knob if internal batteries are depleted.
2. Battery Installation
The electronic keypad requires batteries (not included) for operation.
- Open the safe door.
- Locate the battery compartment on the inside of the safe door.
- Insert 4 AA batteries (not included) into the compartment, ensuring correct polarity.
- Close the battery compartment cover.
3. Setting Your Personal Code
It is highly recommended to change the factory default code immediately.
- With the safe door open, locate the red reset button on the inside of the door, near the hinge or battery compartment.
- Press the red reset button. You will hear a beep, and the yellow indicator light on the keypad will illuminate.
- Enter your desired 3-8 digit personal code on the keypad.
- Press the "#" button to confirm your new code. You will hear a confirmation beep.
- Test your new code with the door open before closing it. Enter your code, then press "#", and turn the knob. The bolts should retract.

Figure 3: Internal view of the safe, highlighting the removable shelf and the hidden reset button for setting the digital code. The image shows the safe with the shelf installed, containing various valuables, and also without the shelf, demonstrating more vertical storage space. The hidden reset button is clearly marked.
4. Mounting the Safe
For enhanced security, the safe can be mounted to a wall or floor using the provided expansion screws.
- Choose a suitable location for mounting, ensuring it is a solid surface (e.g., concrete wall, wooden stud, or floor).
- Mark the drilling points through the pre-drilled holes at the back or bottom of the safe.
- Drill pilot holes into the wall or floor using an appropriate drill bit.
- Align the safe with the drilled holes and secure it using the expansion screws.
- Ensure the safe is firmly attached and does not wobble.

Figure 4: Wall or floor mounting installation steps. This image provides a visual guide for securely attaching the safe to a surface, showing the process from marking drill points to final installation.
Operating Instructions
1. Opening the Safe with Digital Code
- Enter your personal 3-8 digit code on the keypad.
- Press the "#" button. The green indicator light will illuminate.
- Within 5 seconds, rotate the knob clockwise to open the safe door.
2. Opening the Safe with Emergency Key
This method is used if you forget your code, the batteries are dead, or for initial opening.
- Remove the keyhole cover on the keypad panel.
- Insert an emergency key into the keyhole and turn it clockwise.
- While the key is turned, rotate the knob clockwise to open the safe door.
3. Dual Security Alarm System
The safe is equipped with an alarm system to deter unauthorized access:
- If an incorrect password is entered 3 times consecutively, the system will lock for 20 seconds.
- If an incorrect password is entered 6 times consecutively, the system will lock for 5 minutes.
- During the locked period, the keypad will be unresponsive. Wait for the lockout period to expire before attempting to enter the code again.

Figure 5: Smart Alarm System and Low Battery Reminder. This image highlights the safe's alarm function, which activates after multiple incorrect code entries, and also indicates the low battery warning light.
4. Removable Shelf
The internal shelf can be removed or re-positioned to accommodate items of various sizes.
- To remove: Gently lift the shelf and slide it out of its supports.
- To install: Align the shelf with the internal supports and slide it into place.

Figure 6: Home Safe with Removable Shelf. This image displays two views of the safe's interior: one with the shelf installed, showing organized storage for smaller items, and another without the shelf, illustrating space for larger items like documents or jewelry.
5. Fireproof and Waterproof Bag
The included bag provides an additional layer of protection for highly sensitive documents and valuables against fire and water damage.
- Place important documents, cash, or jewelry inside the fireproof and waterproof bag.
- Seal the bag securely before placing it inside the safe.

Figure 7: Safe Box with Fireproof and Waterproof Bag. This image prominently features the safe and the included fireproof/waterproof document bag, with visual effects of fire and water droplets to highlight its protective capabilities for items like firearms, cash, jewelry, passports, and medicines.
6. Internal LED Light
The built-in LED light provides illumination inside the safe for better visibility, especially in low-light conditions.
- The LED light automatically activates when the safe door is opened.
- It will turn off automatically when the door is closed.
Maintenance
1. Battery Replacement
When the battery low reminder light illuminates (Figure 5), it's time to replace the batteries.
- Open the safe door.
- Remove the battery compartment cover.
- Replace all 4 AA batteries with new ones, ensuring correct polarity.
- Close the battery compartment cover.
Note: Replacing batteries does not erase your personal code.
2. Cleaning
Clean the exterior of the safe with a soft, damp cloth. Do not use abrasive cleaners or solvents.
Troubleshooting
1. Safe Does Not Open with Code
- Incorrect Code: Ensure you are entering the correct personal code. Remember to press "#" after entering the code.
- Low Batteries: Check if the low battery indicator light is on. Replace batteries if necessary. If batteries are completely dead, use the emergency battery box (insert 4 AA batteries into the external box and plug it into the port on the keypad) or the emergency key.
- Lockout Period: If you entered the wrong code multiple times, the safe may be in a lockout period (20 seconds or 5 minutes). Wait for the period to expire.
2. Forgotten Code
If you forget your personal code, you can open the safe using the emergency key. Once open, you can reset the code by following the "Setting Your Personal Code" instructions.
3. Keys Lost
If you lost your emergency keys, contact Pockrif customer support with the serial number of your safe to inquire about replacement keys.
Specifications
| Feature | Detail |
|---|---|
| Brand | Pockrif |
| Model Number | home safes fireproof waterproof |
| Product Dimensions | 12.2"D x 14.2"W x 11.8"H |
| Capacity | 1.6 Cubic Feet |
| Lock Type | Electronic Combination Lock |
| Material | Alloy Steel |
| Special Features | Alarm System, Sensor Light, Waterproof, Fireproof (with included bag) |
| Mounting Type | Floor and Wall Mount |
| Item Weight | 19.8 Pounds |
| Batteries Required | Yes (4 x AA, not included) |
Warranty and Support
Pockrif provides a 2-year warranty and lifetime technical support for this product. Your satisfaction is our aim.
- Warranty Period: 2 years from the date of purchase.
- Technical Support: Lifetime technical support is available.
- Returns/Exchanges: 120-day return or exchange service is provided.
- Contact: For any problems or questions, please contact Pockrif customer service.
Ask a question about this manual
Ask about setup, troubleshooting, compatibility, parts, safety, or missing instructions. Manuals+ will review the question and use this page’s manual context to help answer it.