
keisnoaja SP29 Series
Contents
SP29 Series Waterproof Connector User Manual
Brand: keisnoaja | Model: SP29 Series
1. Introduction
This user manual provides comprehensive instructions for the safe and effective use of the SP29 Series Waterproof Connector. Please read this manual thoroughly before installation and operation to ensure optimal performance and longevity of the product. This connector is designed for reliable electrical connections in harsh environments, offering superior water and dust protection.
2. Product Overview
The SP29 Series Waterproof Connector is a robust 2-pin plug and socket system featuring a straight, standard type design with rear-nut mount and solder contacts. Its primary characteristic is the IP68 rating, ensuring excellent performance in challenging environmental conditions. The connector is engineered for easy and quick connection and disconnection, providing a high cost-effective solution without compromising quality.
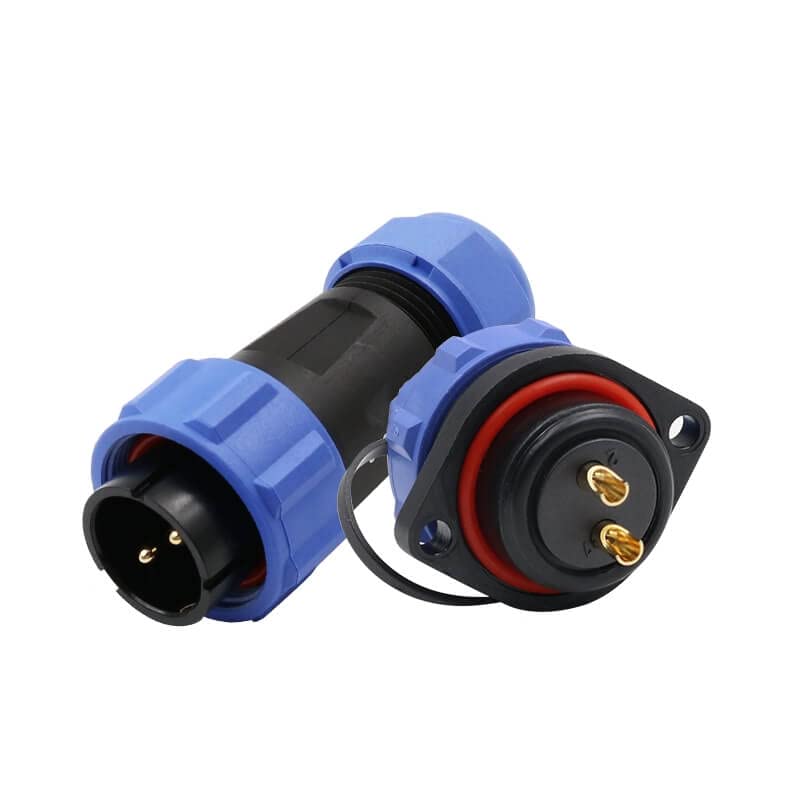
Figure 2.1: An image showing the SP29 Series Waterproof Connector, featuring both the plug and socket components in black with blue locking nuts and red O-rings.
3. Product Structure
The SP Series Waterproof Connectors are composed of several key components designed for secure and waterproof connections. Understanding these parts is crucial for proper assembly and maintenance.
Video 3.1: An official product video demonstrating the features, structure, and usage of the SP Series Waterproof Connectors. This segment (0:15 - 0:43) illustrates the internal and external components of the connector.
Key components typically include:
- Retaining Nut: Secures the internal components.
- Insulation: Provides electrical isolation.
- Panel Connector Shell: The main body of the panel-mounted connector.
- O-Ring: Ensures a watertight seal.
- Contact: The conductive pins or sockets for electrical connection.
- Locking Nut: Secures the connection between plug and socket.
- Back Shell: The rear part of the connector, often providing strain relief.
- Compression Nut: Compresses the rubber ring for cable sealing.
- Rubber Ring: Provides a seal around the cable entry.
Note: Each side of the connector can be designed with male or female contacts depending on the specific application.
4. Product Types and Specifications
The SP Series offers various models, each with specific rated current and voltage capabilities, designed to meet diverse application requirements. The SP29 series is part of this family.
Video 4.1: This segment of the product video (0:55 - 1:03) provides an overview of different SP Series models and their electrical ratings.
| Model | Rated Current | Rated Voltage |
|---|---|---|
| SP11 | 3A/5A | 125V/180V |
| SP13 | 3A/5A/13A | 125V/180V/200V/250V |
| SP17 | 5A/10A | 400V/500V |
| SP21 | 5A/15A/30A | 400V/500V |
| SP29 | 5A/10A/25A/50A | 400V/500V |
5. Setup and Connection
Proper connection is essential for the waterproof integrity and electrical performance of the SP29 connector. Follow these steps carefully.
5.1. Connecting an In-line Cable Connector
Video 5.1: This segment of the product video (1:04 - 1:18) demonstrates the connection process for an in-line cable connector.
- Align: Carefully align the two connector halves, ensuring the keyways and pins/sockets are correctly oriented.
- Insert: Gently push the two halves together until they are fully seated.
- Secure: Turn the locking nut clockwise until it is hand-tight. This secures the connection and engages the waterproof seal.
5.2. Connecting a Right-angled Cable Connector (Rear-nut Mount)
Video 5.2: This segment of the product video (1:28 - 1:39) illustrates the connection procedure for a right-angled cable connector.
- Align: Align the right-angled connector with its mating part, ensuring proper pin/socket orientation.
- Insert: Push the connectors firmly together.
- Secure: Rotate the locking nut clockwise until it is securely tightened, forming a robust and waterproof seal.
6. Operation and Disconnection
Disconnecting the SP29 connector is a straightforward process. Ensure power is off before disconnecting any electrical connections.
6.1. Disconnecting an In-line Cable Connector
Video 6.1: This segment of the product video (1:19 - 1:27) demonstrates the disconnection process for an in-line cable connector.
- Unscrew: Turn the locking nut counter-clockwise until it is loose.
- Separate: Gently pull the two connector halves apart.
6.2. Disconnecting a Right-angled Cable Connector
Video 6.2: This segment of the product video (1:40 - 1:51) shows how to disconnect a right-angled cable connector.
- Unscrew: Rotate the locking nut counter-clockwise to loosen the connection.
- Separate: Pull the connector halves apart to disconnect.
7. Technical Specifications
Detailed technical parameters for the SP29 Series Waterproof Connector are provided below:
Electrical Characteristics:
- Insulation Resistance: 1500MΩ
- Contact Resistance: 0.5MΩ/1MΩ/2.5MΩ/5MΩ (depending on pin configuration)
- Rated Voltage: 500V/400V
- Rated Current: 50A/25A/10A/5A (depending on pin configuration)
Mechanical Characteristics:
- Mating Type: Thread coupling
- Termination: Solder / Screw
- Durability (mating): 500 cycles
Environmental Characteristics:
- Temperature Range: -40°C ~ +85°C
- IP Rating: IP68
Material:
- Shell Material: PA66
- Insert Material: PPS
- Contact: Copper, Gold Plated
- Contact Diameter: 3.5MM, 2.5MM, 1.5MM, 1MM (depending on pin configuration)
8. Maintenance
To ensure the long-term performance and reliability of your SP29 Series Waterproof Connector, consider the following maintenance guidelines:
- Regular Inspection: Periodically inspect connectors for any signs of damage, corrosion, or wear, especially the O-rings and locking mechanisms.
- Cleaning: If necessary, clean the connector surfaces with a soft, dry cloth. Avoid using harsh chemicals or abrasive materials that could damage the housing or seals.
- Proper Storage: When not in use, store connectors in a clean, dry environment away from direct sunlight and extreme temperatures. Utilize the protective caps to prevent dust and moisture ingress.
- Avoid Over-tightening: While securing the locking nut, tighten it firmly by hand. Over-tightening can damage the threads or internal components.
9. Troubleshooting
If you encounter issues with your SP29 Series Waterproof Connector, refer to the following common troubleshooting tips:
- Difficulty Connecting/Disconnecting:
- Ensure proper alignment of the keyways and pins/sockets. Do not force the connection.
- Check for any debris or foreign objects obstructing the mating surfaces.
- Verify that the locking nut is fully unscrewed before attempting to disconnect.
- Loss of Connection/Intermittent Signal:
- Confirm that the locking nut is fully tightened to ensure secure contact.
- Inspect the contacts for corrosion or damage. Clean if necessary.
- Check the cable termination (solder/screw) for secure and proper wiring.
- Water Ingress:
- Ensure the O-rings are properly seated and not damaged.
- Verify that the locking nut is fully tightened.
- Check the cable entry point for proper sealing by the compression nut and rubber ring.
- Confirm the IP68 rating is suitable for your specific environmental conditions.
If problems persist after following these steps, contact customer support for further assistance.
10. Warranty and Support
Specific warranty details and customer support contact information are not provided within this manual. Please refer to the product packaging, the seller's website, or your purchase documentation for warranty terms and support channels.
Ask a question about this manual
Ask about setup, troubleshooting, compatibility, parts, safety, or missing instructions. Manuals+ will review the question and use this page’s manual context to help answer it.