
Aigo DK352-MESH
Aigo Darkflash DK352 Mesh Gaming PC Case User Manual
Product Overview
The Aigo Darkflash DK352 Mesh Gaming PC Case is designed for enthusiasts seeking efficient cooling, aesthetic appeal, and ease of use. This mid-tower case supports ATX, Micro-ATX, and Mini-ITX motherboards, offering ample space for high-performance components. It features a mesh front panel for optimal airflow and a tempered glass side panel to showcase your build. Four pre-installed ARGB fans provide immediate cooling and customizable lighting.
Model: DK352-MESH
Brand: Aigo

Figure 1: Front-left view of the Aigo Darkflash DK352 Mesh Gaming PC Case.
Key Features
- Pre-installed ARGB Fans: Comes with 4 ARGB pre-installed fans for efficient cooling performance and customizable lighting.
- Thermal Enhancement: Supports up to 140mm fans and a 360mm radiator for superior temperature management.
- Easy To Manage: Features a fully transparent front panel and easy-to-detach dust filters on the top and bottom. The 4mm tempered glass left-side panel is easy to attach and detach for maintenance.
- Top I/O Layout: Conveniently located USB 3.0 port for faster data transfer and HD audio output for media management.
- Easy Expansion: Provides 7 expansion slots for effortless upgrades and a bottom-situated power supply for optimized space management.
Technical Specifications
| Specification | Value |
|---|---|
| Product Dimensions | 45 x 20 x 39 cm; 5.54 kg |
| Manufacturer | Aigo |
| Item Model Number | DK352-MESH |
| Motherboard Compatibility | ATX, Micro-ATX, Mini-ITX |
| Case Type | Mid Tower |
| Recommended Uses | Gaming |
| Color | DK352 Mesh |
| Pre-installed Fans | 4 x 120mm ARGB Fans |
| Radiator Support | Up to 360mm |
| Side Panel | 4mm Tempered Glass |
| Front I/O | USB 3.0, HD Audio |
Setup Guide
Follow these steps to properly set up your Aigo Darkflash DK352 Mesh PC Case and install your components.
1. Unboxing and Inspection
Carefully remove the PC case from its packaging. Inspect the case for any signs of damage that may have occurred during shipping. Ensure all accessories, such as screws, standoffs, and cable ties, are present.
2. Preparing the Case
Before installing components, remove the tempered glass side panel by unscrewing the four thumb screws. Gently pull the panel away from the case. You may also need to remove the solid right-side panel for cable management access.

Figure 2: Interior view of the PC case, ready for component installation.
3. Motherboard Installation
Install the necessary motherboard standoffs into the motherboard tray according to your motherboard's form factor (ATX, Micro-ATX, or Mini-ITX). Carefully place your motherboard onto the standoffs, aligning the screw holes, and secure it with screws.
4. Power Supply Installation
The power supply unit (PSU) is installed at the bottom of the case. Slide your PSU into the designated compartment from the rear of the case and secure it with screws.

Figure 3: Bottom view, showing the PSU intake area.
5. Storage Drive Installation
Install your 2.5-inch SSDs or 3.5-inch HDDs into the designated drive bays. The case provides multiple mounting options for storage devices.
6. Graphics Card and Expansion Card Installation
Remove the necessary PCIe slot covers from the rear of the case. Insert your graphics card or other expansion cards into the appropriate PCIe slots on your motherboard and secure them with screws.
7. Cable Management
Utilize the cable routing cutouts and tie-down points behind the motherboard tray to manage your cables. This improves airflow and gives your build a cleaner appearance.

Figure 4: Interior view highlighting cable management possibilities.
8. Fan and Radiator Installation
The DK352 Mesh comes with four pre-installed ARGB fans. If you wish to add more fans or a liquid cooling radiator, install them in the designated mounting locations (front, top, or rear) and connect them to your motherboard or fan controller.
Operation
Fan Control and Airflow
The pre-installed ARGB fans are designed to provide optimal airflow. Ensure that the fans are properly connected to your motherboard's fan headers or a compatible ARGB controller to manage their speed and lighting effects. The mesh front panel facilitates excellent air intake, while the rear and top fan mounts allow for efficient exhaust, creating a positive pressure system to minimize dust accumulation.
Front I/O Panel Usage
The top-mounted I/O panel provides convenient access to essential ports. Connect your peripherals to the USB 3.0 port for high-speed data transfer. Use the HD audio jacks for headphones and microphones. Ensure all front panel connectors are correctly attached to your motherboard during the setup process.
Maintenance
Dust Filter Cleaning
To maintain optimal airflow and prevent dust buildup inside your PC, regularly clean the dust filters. The Darkflash DK352 Mesh includes easy-to-detach dust filters on the top and bottom (for the PSU intake). Gently slide out the filters, clean them with a soft brush or rinse with water (ensure they are completely dry before re-installing), and then re-attach them.
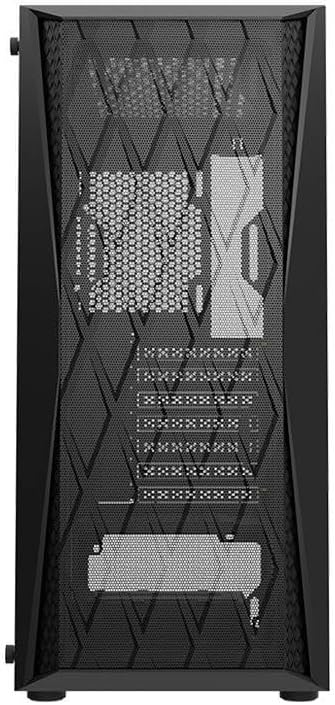
Figure 5: Front mesh panel, which also acts as a dust barrier.
General Cleaning
For the exterior of the case, use a soft, damp cloth to wipe down surfaces. Avoid using harsh chemicals or abrasive materials that could damage the finish or tempered glass. For the interior, use compressed air to blow out any accumulated dust from components and hard-to-reach areas.
Troubleshooting
Common Issues and Solutions
- Poor Airflow/High Temperatures:
- Ensure all fans are spinning correctly and are connected to power.
- Clean dust filters and internal components.
- Verify correct fan orientation (intake/exhaust).
- Check for obstructions blocking airflow inside or outside the case.
- Fans Not Lighting Up (ARGB):
- Confirm ARGB cables are securely connected to the motherboard's ARGB header or a dedicated controller.
- Check your motherboard's software or BIOS settings for ARGB control.
- Front I/O Ports Not Working:
- Ensure all front panel cables (USB 3.0, HD Audio, Power, Reset, LED) are correctly connected to the corresponding headers on your motherboard. Refer to your motherboard manual for header locations.
- Side Panel Difficult to Remove/Attach:
- Ensure all four thumb screws are fully loosened.
- Handle the tempered glass panel carefully to avoid damage.
Warranty and Support
For warranty information and technical support regarding your Aigo Darkflash DK352 Mesh Gaming PC Case, please refer to the warranty card included with your purchase or visit the official Aigo website. You may also contact the retailer from whom you purchased the product for assistance. Keep your proof of purchase for warranty claims.
Manufacturer: Aigo
Ask a question about this manual
Ask about setup, troubleshooting, compatibility, parts, safety, or missing instructions. Manuals+ will review the question and use this page’s manual context to help answer it.