Introduction
Thank you for choosing the Cecotec Bolero GrandSommelier 830 CoolCrystal wine cooler. This manual provides essential information for the safe and efficient use of your appliance. Please read these instructions carefully before installation and operation, and retain them for future reference.
Safety Instructions
To ensure safe operation and prevent damage, please observe the following safety guidelines:
- Read all instructions before using the appliance.
- Ensure the power supply voltage matches the rating label on the appliance.
- Do not immerse the appliance, cord, or plug in water or other liquids.
- Keep the appliance away from direct sunlight, heat sources, and high humidity.
- Do not block ventilation openings. Ensure adequate air circulation around the unit.
- This appliance is for household use only.
- Unplug the appliance before cleaning or when not in use for extended periods.
- Do not allow children to operate or play with the appliance.
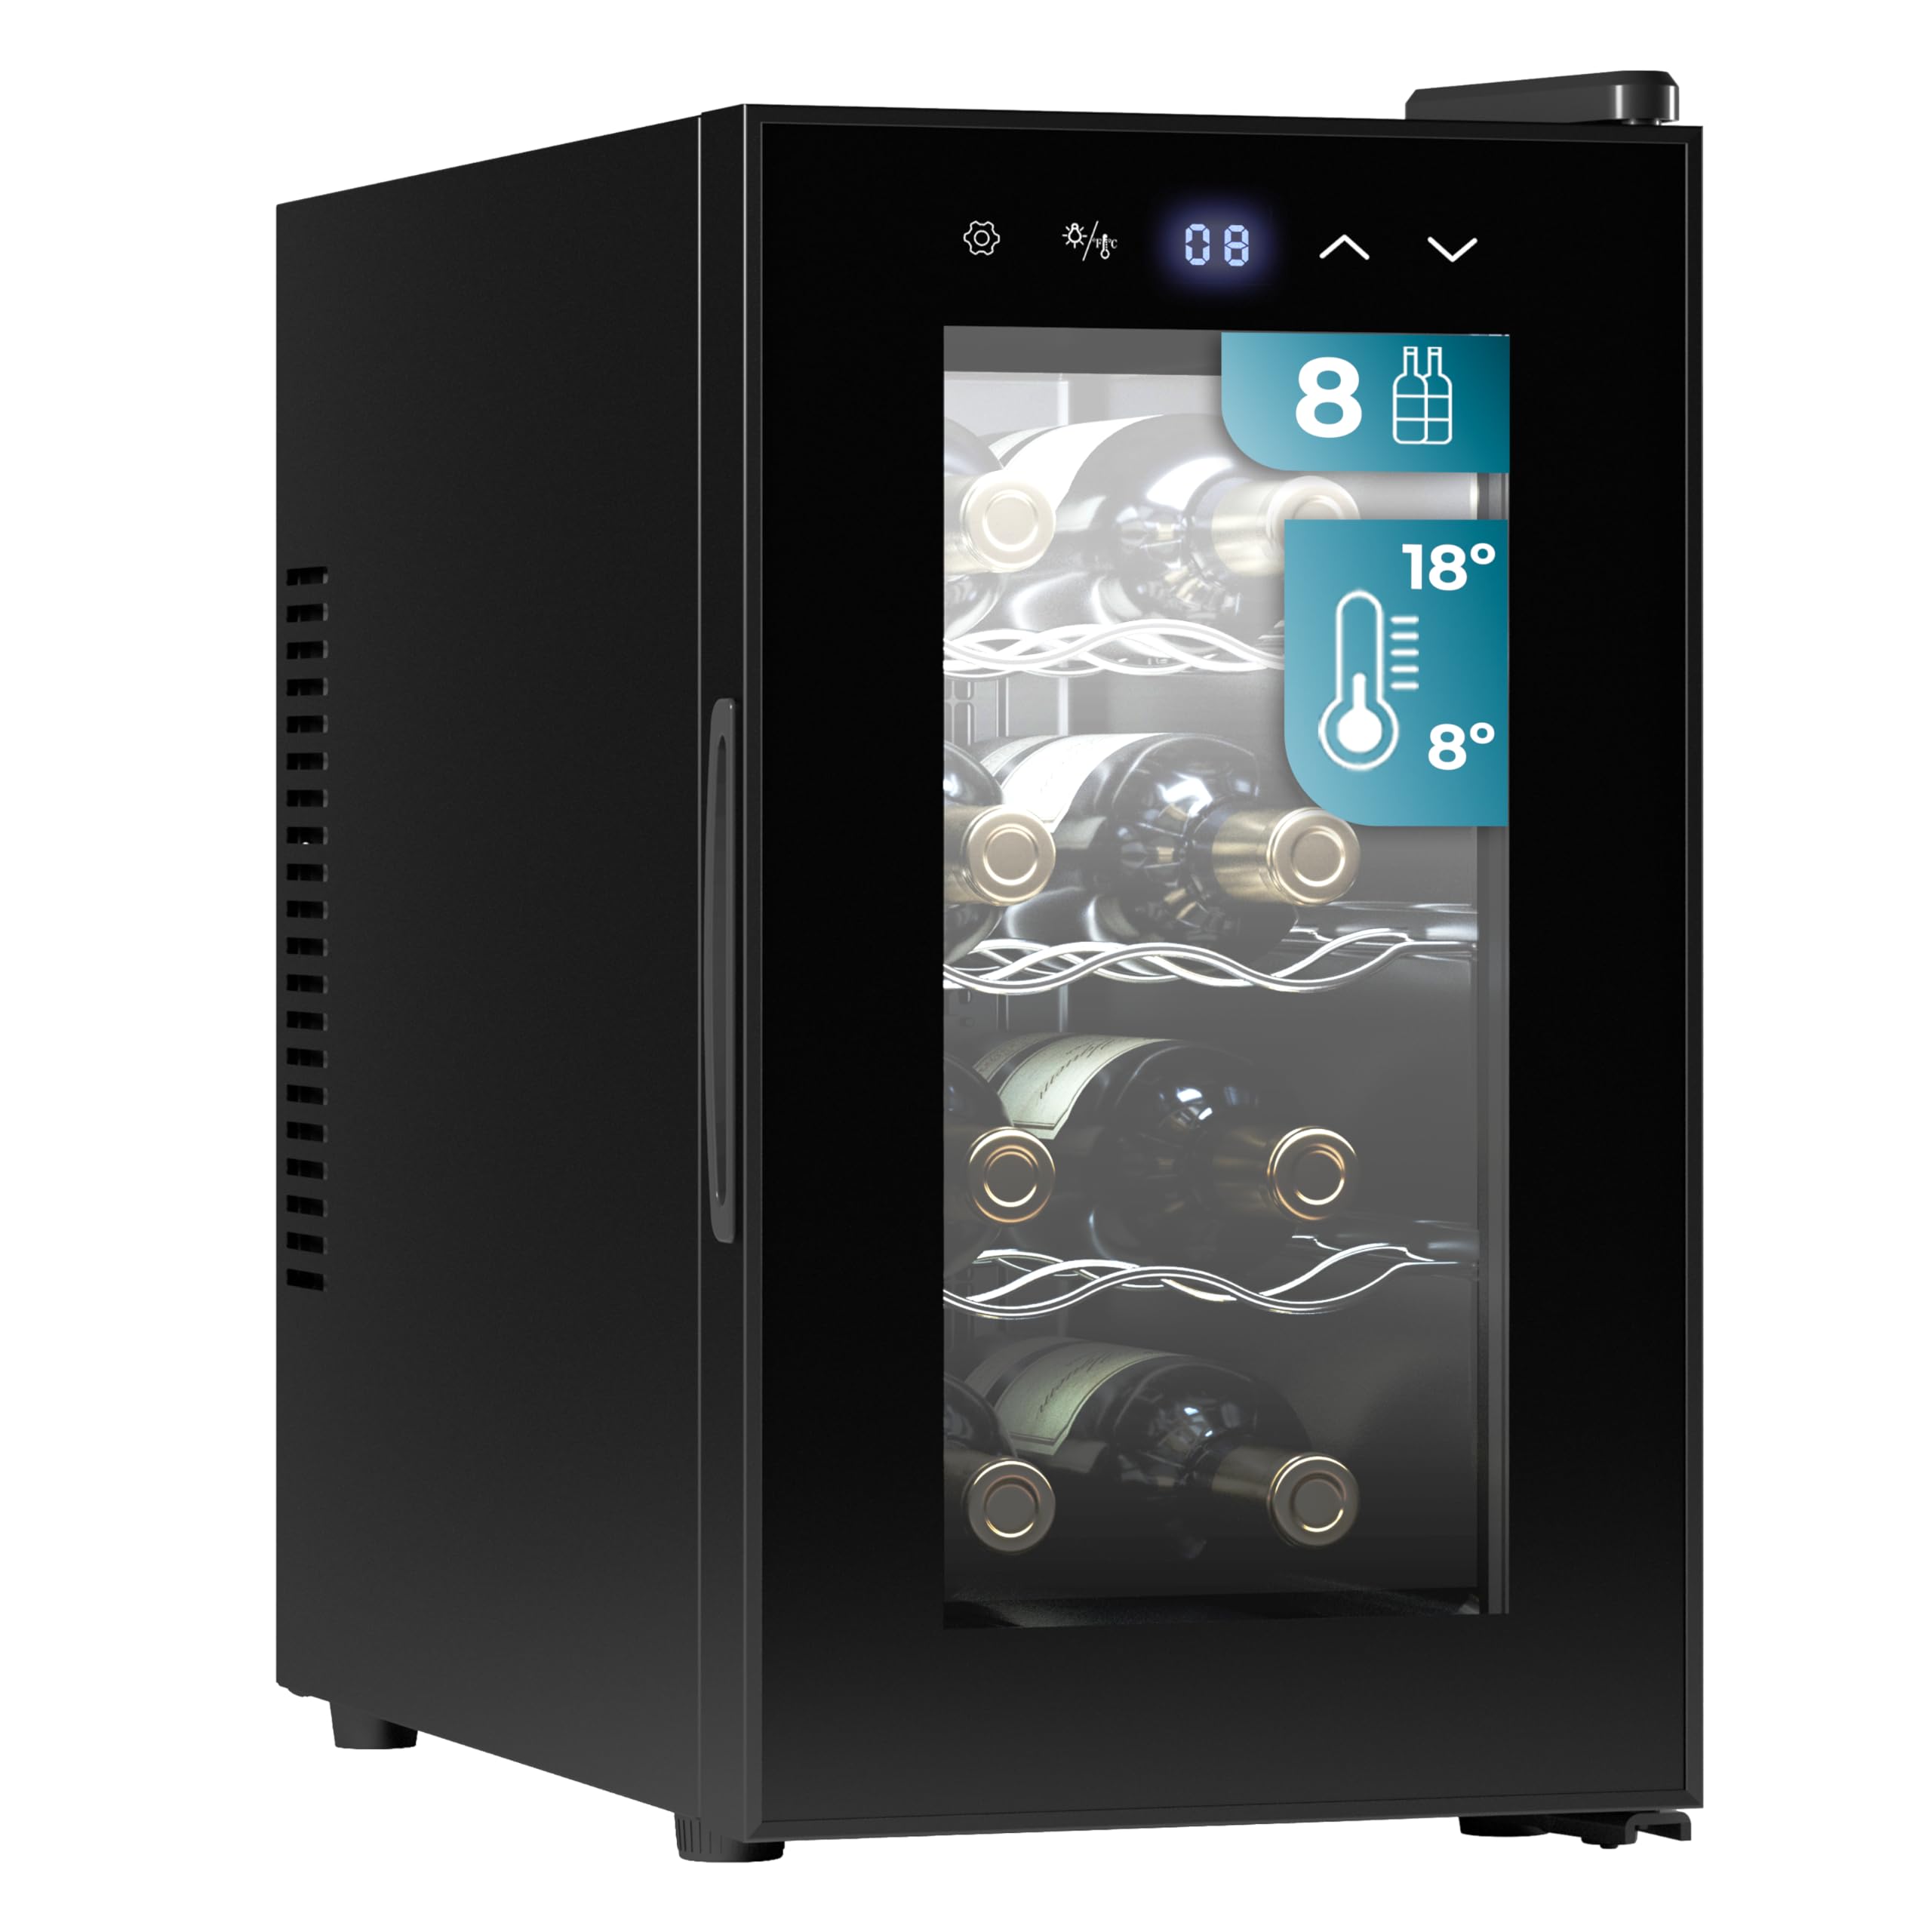
Product Overview
Components
- Thermoelectric cooling unit
- Glass door
- Internal LED light
- Adjustable shelves for 8 bottles
- Touch control panel with digital display
- Ventilation grilles
Features
- 8-Bottle Capacity: Designed to store up to 8 standard wine bottles.
- Thermoelectric Cooling: Efficient and quiet cooling technology.
- Ultra-Quiet Operation: Operates at a low noise level of 35 dB, ensuring minimal disturbance.
- Vibration-Free: Protects wine from harmful vibrations that can affect aging.
- Adjustable Temperature: Temperature range from 8°C to 18°C (46°F to 64°F) to suit various wine types.
- Touch Control Panel: Easy-to-use interface for temperature adjustment and light control.
- Digital Display: Clearly shows the set temperature.
- Internal LED Light: Illuminates the interior for easy viewing without affecting wine quality.
- Eco-Friendly: Utilizes environmentally harmless gas for cooling.
Product Views


Setup
Unpacking
- Carefully remove the wine cooler from its packaging.
- Remove all packing materials, including foam and adhesive tape.
- Inspect the appliance for any signs of damage. If damaged, do not use and contact customer support.
Placement
- Place the wine cooler on a flat, stable surface strong enough to support its weight when fully loaded.
- Ensure there is at least 10 cm (4 inches) of space around the back and sides for proper ventilation.
- Avoid placing the unit near direct sunlight, heat sources (e.g., oven, radiator), or in areas with extreme temperature fluctuations.
- The appliance is designed for freestanding installation.
Initial Power-On
- After placement, allow the wine cooler to stand upright for at least 2 hours before plugging it in. This allows the cooling system to stabilize.
- Plug the power cord into a grounded electrical outlet.
- The display will light up, and the unit will begin cooling to the default temperature.
Operating Instructions
Control Panel


- Power Button: Turns the unit on or off.
- Light Button: Controls the internal LED light.
- °C/°F Button: Toggles between Celsius and Fahrenheit temperature display.
- Up Arrow (▲): Increases the set temperature.
- Down Arrow (▼): Decreases the set temperature.
- Digital Display: Shows the current or set temperature.
Temperature Adjustment
- Press the Up (▲) or Down (▼) arrow buttons to adjust the desired temperature.
- Each press will change the temperature by 1°C or 1°F, depending on the selected unit.
- The display will flash the set temperature for a few seconds, then return to showing the actual internal temperature.
- The unit will automatically adjust to reach and maintain the set temperature.
Internal Light Control
- Press the Light button to turn the internal LED light on or off.
- The light is designed to illuminate the bottles without generating heat.
Maintenance
Cleaning
- Always unplug the wine cooler before cleaning.
- Clean the interior with a soft cloth dampened with a mild detergent solution. Avoid abrasive cleaners.
- Wipe the exterior with a soft, dry cloth.
- Ensure the ventilation grilles are free from dust and debris to maintain proper airflow.
- Do not use harsh chemicals or solvents as they may damage the surfaces.
Storage
- If storing the unit for an extended period, unplug it, clean thoroughly, and leave the door slightly ajar to prevent odors and mold growth.
- Store in a dry, well-ventilated area.
Troubleshooting
Before contacting customer service, please check the following common issues:
| Problem | Possible Cause | Solution |
|---|---|---|
| Unit does not operate | No power supply; Power cord not plugged in; Circuit breaker tripped. | Check power outlet; Ensure cord is securely plugged in; Reset circuit breaker. |
| Temperature is not cold enough | Door not closed properly; Excessive door opening; Ambient temperature too high; Ventilation blocked; Unit overloaded. | Ensure door is sealed; Minimize door openings; Place unit in a cooler environment; Clear ventilation; Reduce number of bottles. |
| Excessive noise | Unit not level; Objects touching the unit. | Adjust leveling feet; Ensure nothing is touching the unit. |
| Internal light not working | Light button not pressed; LED bulb failure. | Press the light button; Contact customer service for bulb replacement. |
Specifications
| Specification | Value |
|---|---|
| Model Number | 02707 |
| Brand | Cecotec |
| Capacity | 8 Bottles / 21 Liters |
| Cooling Technology | Thermoelectric |
| Adjustable Temperature Range | 8°C - 18°C (46°F - 64°F) |
| Noise Level | 35 dB |
| Voltage | 240 Volts |
| Product Dimensions (D x W x H) | 51 x 26.5 x 47.5 cm |
| Item Weight | 10.9 Kilograms |
| Defrost System | Automatic |
| Installation Type | Freestanding |
| Color | Black | Series 30 |
| Finish Type | Glossy |
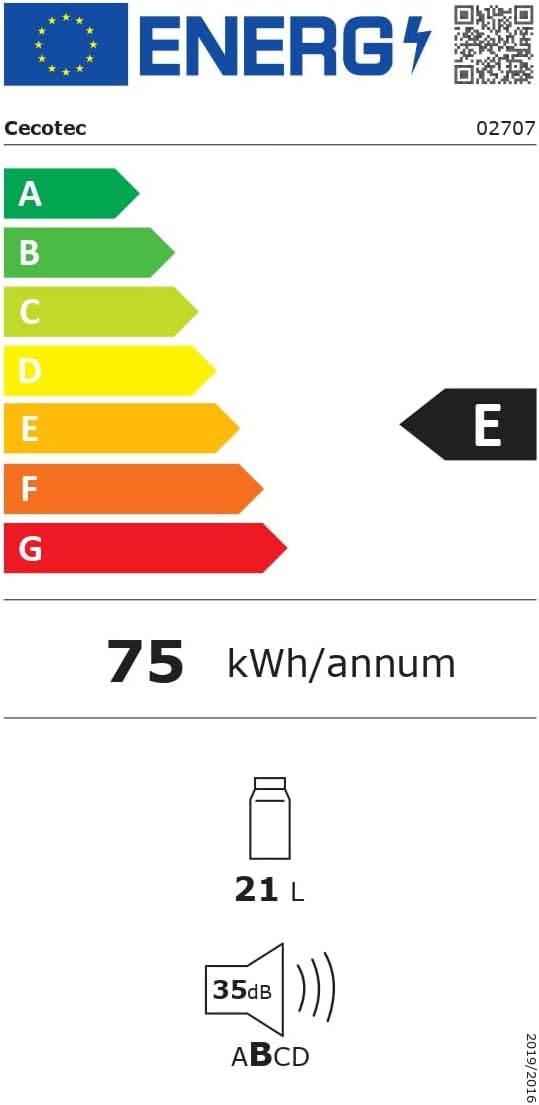
Energy Information

Warranty and Support
This product comes with a manufacturer's warranty. Please refer to the warranty card included in your packaging for specific terms and conditions. For technical support, spare parts, or warranty claims, please contact Cecotec customer service through their official website or the contact information provided with your purchase.
Keep your purchase receipt as proof of purchase for any warranty-related inquiries.


