
1. Introduction and Overview
Thank you for choosing the XOOMRSCP Nose Hair Trimmer Model 001. This versatile 2-in-1 device is designed for effective and comfortable removal of unwanted hair from the nose, ears, eyebrows, and face. Featuring a powerful motor, dual-edge blades, and a waterproof design, it offers a precise and painless grooming experience.

Image 1: The XOOMRSCP Nose Hair Trimmer demonstrating its use for trimming ear hair, nose hair, and eyebrow hair.
2. What's in the Box
Your XOOMRSCP Nose Hair Trimmer package includes the following components:
- XOOMRSCP Nose Hair Trimmer Unit (with Nose/Ear Trimmer Head attached)
- Eyebrow/Sideburn Trimmer Head
- Cleaning Brush
- USB-C Charging Cable
- Dust-proof Cap
- User Manual

Image 2: All components included in the XOOMRSCP Nose Hair Trimmer package, neatly arranged.
3. Setup
3.1 Charging the Device
Before initial use, fully charge your XOOMRSCP Nose Hair Trimmer. The device comes with a USB-C charging cable for convenience.
- Connect the USB-C end of the charging cable to the charging port at the bottom of the trimmer.
- Connect the USB-A end of the cable to a compatible USB power source (e.g., computer, wall adapter).
- The indicator light will show red while charging and turn green when fully charged. A full charge typically provides 2-3 months of continuous use (based on 2 minutes per use).

Image 3: The trimmer connected to its USB-C charging cable, illustrating the charging process and indicator light status.
3.2 Attaching Trimmer Heads
The trimmer comes with two interchangeable heads: one for nose/ear hair and one for eyebrows/sideburns.
- To remove a head, gently twist it counter-clockwise and pull upwards.
- To attach a head, align the grooves on the head with the slots on the trimmer body, then push down and twist clockwise until it locks into place.
4. Operating Instructions
The XOOMRSCP Nose Hair Trimmer features a simple one-button operation.
4.1 Power On/Off
Press the power button located on the front of the trimmer to turn it on or off.
4.2 Trimming Nose and Ear Hair
Use the conical nose/ear trimmer head for these areas.
- Ensure the device is fully charged.
- Turn the power button on.
- Slowly insert the comfortable cone tip into your nose or ear.
- Gently move the trimmer around to cut unwanted hair. Allow the trimmer to operate for at least 60 seconds for thorough trimming.
- The inner 360° rotating dual-edge blades are designed to smoothly and painlessly remove hair without pulling.

Image 4: A detailed view of the trimmer's internal mechanism, highlighting the 360° rotating dual-edge blades for efficient hair removal.
4.3 Trimming Eyebrows and Sideburns
Attach the eyebrow/sideburn trimmer head for these areas. This head often includes a comb attachment for different lengths.
- Attach the eyebrow/sideburn trimmer head.
- If desired, attach the comb guide to achieve a specific hair length (e.g., long or short settings).
- Turn the trimmer on and gently guide it over the eyebrows or sideburns to trim hair to the desired length.
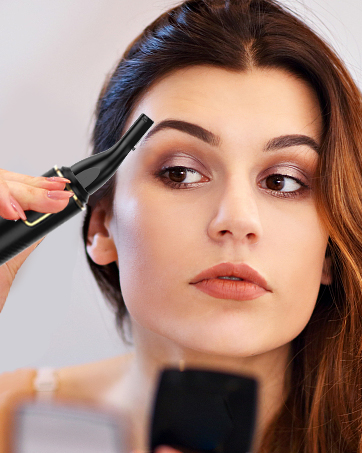
Image 5: The eyebrow trimmer attachment, showing its design for precise grooming of eyebrows.
5. Maintenance and Cleaning
Regular cleaning ensures optimal performance and hygiene for your trimmer.
- Turn off the trimmer and remove the trimmer head.
- Rinse the washable trimmer head under running water to remove hair clippings. The device is IPX7 waterproof, allowing for easy rinsing of the head.
- Use the provided cleaning brush to remove any stubborn hair or debris from the blades and inside the trimmer head.
- Allow all parts to air dry completely before reattaching the head and storing the trimmer.
- Always replace the dust-proof cap when not in use to protect the blades.

Image 6: Visual guide for cleaning the trimmer head: rotate to detach, rinse with water, and reinstall.
6. Troubleshooting
If you encounter any issues with your trimmer, please refer to the following common solutions:
- Trimmer not turning on: Ensure the device is fully charged. If the battery is low, the indicator light will not illuminate or will be red.
- Trimmer pulling hair or not cutting effectively: The blades may be dull or clogged with hair. Clean the trimmer head thoroughly as per the Maintenance section. If the issue persists, consider replacing the trimmer head if available, or contact customer support.
- Device not charging: Check if the USB-C cable is securely connected to both the trimmer and the power source. Ensure the power source is active.
- Skin irritation: Always use the comfortable cone tip and avoid applying excessive pressure. Ensure the blades are clean and free of debris.
7. Specifications
| Feature | Detail |
|---|---|
| Model Number | 001 |
| Product Dimensions | 5.79 x 1.26 x 1.26 inches |
| Item Weight | 3.53 ounces (100 Grams) |
| Power Source | USB Rechargeable |
| Battery Type | Built-in (1 AAA batteries required for initial setup/testing, but device is rechargeable) |
| Waterproof Rating | IPX7 |
| Blade Material | Stainless Steel |
| Color | Black |
| Manufacturer | XOOMRSCP |
8. Warranty and Support
The XOOMRSCP Nose Hair Trimmer Model 001 comes with a one-year manufacturer warranty.
For warranty claims, technical support, or any questions regarding your product, please contact XOOMRSCP customer service through the retailer where you purchased the product or refer to the contact information provided in the included user manual.