1. Introduction
This manual provides comprehensive instructions for the safe and efficient operation of your Walfront RF Signal Generator, Model Walfront493bt51fvu. This device is designed to generate radio frequency (RF) signals with audio modulation capabilities, covering a frequency range of 0.5MHz to 470MHz. Its compact design and robust construction make it suitable for various applications in aviation, wireless communication, automotive electronics, and manufacturing.
Please read this manual thoroughly before using the device to ensure proper setup, operation, and maintenance.
2. Safety Information
Observe the following safety precautions to prevent injury and damage to the device:
- Ensure the power supply voltage matches the device's requirements (12 Volts).
- Do not operate the device in wet or damp conditions.
- Avoid exposing the device to extreme temperatures or direct sunlight.
- Do not attempt to open or modify the device. Refer all servicing to qualified personnel.
- Disconnect power before cleaning or when the device is not in use.
- Handle the device with care to prevent physical damage.
3. Product Overview
The Walfront RF Signal Generator features a user-friendly interface with a clear display and tactile controls. Its durable ABS casing ensures longevity and resistance to environmental factors.
3.1. Front Panel Layout

Figure 1: Front view of the Walfront RF Signal Generator, showing the display, keypad, RF output, and power button.

Figure 2: Close-up view of the front panel, highlighting the LCD display, numeric keypad (0-9, F1-F4), RF OUT BNC connector, and the red power button.
- Power Button: Red button on the left for turning the device on/off.
- RF OUT Connector: BNC connector for RF signal output.
- LCD Display: Shows current frequency, modulation status, and other operational parameters.
- Numeric Keypad (0-9): Used for entering frequency values.
- Function Keys (F1-F4): Specific functions for modulation, frequency steps, or presets (refer to display for exact function).
- Arrow Keys (∧, ∨): For adjusting values or navigating menus.
3.2. Side View
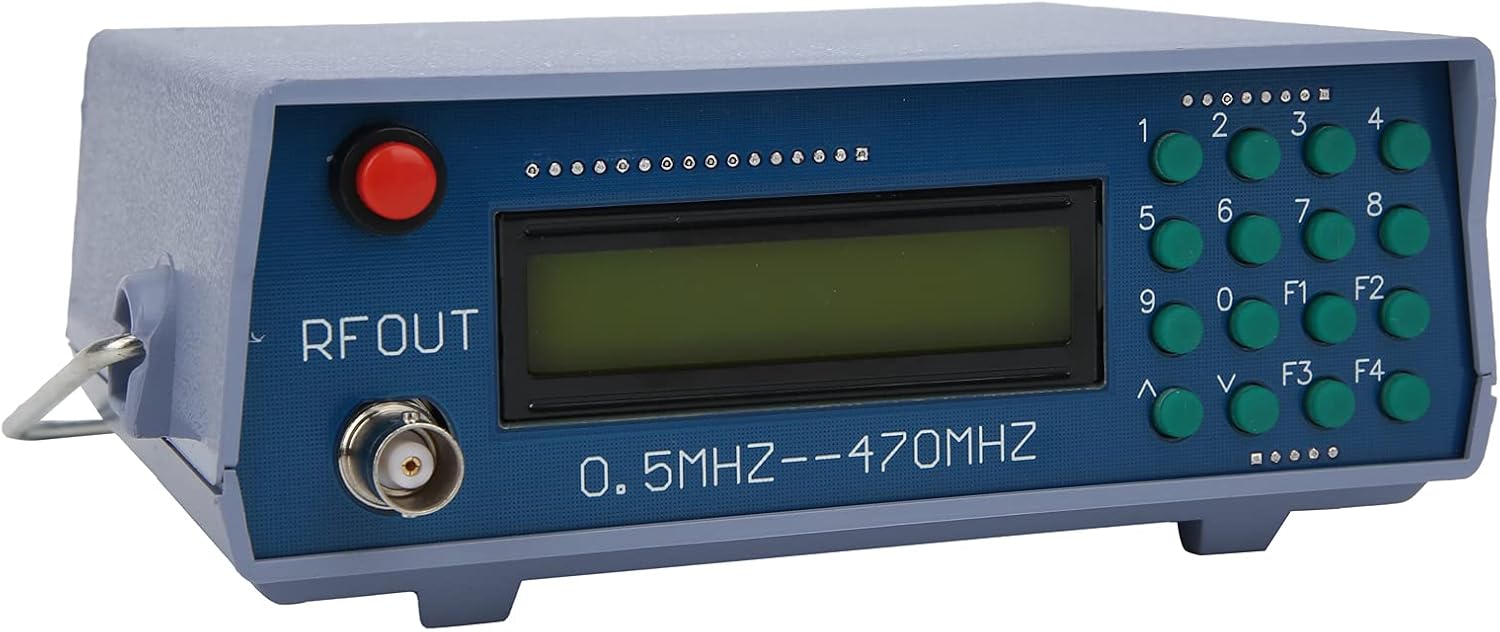
Figure 3: Angled view of the device, illustrating its compact form factor and side panel design.

Figure 4: Side view of the RF signal generator, showing the ventilation slots and overall casing structure.
4. Setup
- Unpacking: Carefully remove the RF Signal Generator from its packaging. Inspect for any signs of damage.
- Power Connection: Connect a 12V DC power adapter (not included) to the power input port on the rear or side of the device. Ensure the adapter's polarity is correct.
- Output Connection: Connect a BNC cable (not included) to the "RF OUT" connector on the front panel. Connect the other end of the cable to your receiving device (e.g., spectrum analyzer, radio receiver).
- Power On: Press the red power button on the front panel to turn on the device. The LCD display should illuminate.
5. Operating Instructions
This section outlines basic operation. Specific functions of F1-F4 keys may vary based on firmware version; observe the display for context.
- Setting Frequency:
- Use the numeric keypad (0-9) to enter the desired frequency. The display will show the entered digits.
- Press a function key (e.g., F1, F2) or an arrow key (∧, ∨) to confirm the entry or select the frequency unit (MHz, kHz).
- The device supports frequencies from 0.5MHz to 470MHz.
- Adjusting Frequency:
- Use the ∧ and ∨ arrow keys to fine-tune the frequency in small increments.
- Some function keys (F1-F4) might allow for larger step adjustments or direct frequency presets.
- Audio Modulation:
- The device supports audio modulation. Look for a function key (e.g., F3 or F4) that activates or adjusts modulation settings.
- The display will indicate the modulation status (e.g., AM, FM, or audio tone frequency).
- The internal audio modulation frequency is 800Hz.
- Power Off: Press the red power button again to turn off the device.
6. Maintenance
- Cleaning: Use a soft, dry cloth to clean the exterior of the device. Do not use liquid cleaners or solvents.
- Storage: Store the device in a cool, dry place away from direct sunlight and extreme temperatures.
- Inspection: Periodically check cables and connectors for wear or damage.
7. Troubleshooting
| Problem | Possible Cause | Solution |
|---|---|---|
| Device does not power on. | No power, incorrect adapter, faulty power button. | Check power adapter connection and voltage. Ensure the power outlet is functional. |
| No RF signal output. | Incorrect frequency setting, faulty BNC cable, receiving device issue. | Verify frequency setting on the display. Check BNC cable for proper connection and integrity. Ensure the receiving device is correctly configured. |
| Display is blank or unreadable. | Power issue, internal fault. | Cycle power. If the problem persists, contact customer support. |
8. Specifications
| Brand | Walfront |
| Model | Walfront493bt51fvu |
| Part Number | Walfront493bt51fvu |
| Frequency Range | 0.5MHz - 470MHz |
| Audio Modulation Frequency | 800Hz |
| Voltage | 12 Volts |
| Casing Material | ABS |
| Package Dimensions | 20 x 14.3 x 10.7 cm |
| Weight | 350 g |
| Batteries Included | No |
| Battery Operated | No |
| ASIN | B0BPSCC6ND |
9. Warranty and Support
Walfront products are manufactured to high-quality standards. For warranty information, technical support, or service inquiries, please refer to the documentation included with your purchase or contact your retailer. Keep your purchase receipt as proof of purchase.
For further assistance, you may visit the Walfront store on Amazon: Walfront Store
