
1. Introduction
Thank you for choosing the GIGABYTE B760M DS3H DDR4 Motherboard. This motherboard is designed to support Intel 13th and 12th Gen Series Processors, offering a robust platform for your personal computer. It features a Hybrid 6+2+1 Phases Digital VRM Solution, Dual Channel DDR4 memory support up to 5333MHz (OC), and next-generation storage with two PCIe 4.0 x4 M.2 connectors. This manual will guide you through the installation, configuration, and maintenance of your new motherboard.
2. Safety Information
Please read the following safety guidelines carefully before installing or using your motherboard to prevent damage to the product or injury to yourself.
- Always disconnect the power cord from the wall outlet before touching any components inside the computer case.
- Wear an anti-static wrist strap or frequently touch a grounded metal object to discharge static electricity before handling the motherboard or other components.
- Handle the motherboard by its edges to avoid touching sensitive components.
- Ensure proper ventilation within your computer case to prevent overheating.
- Keep the motherboard away from moisture and extreme temperatures.
3. Package Contents
Verify that all items listed below are included in your motherboard package. If any item is missing or damaged, contact your retailer.
- GIGABYTE B760M DS3H DDR4 Motherboard
- User Manual / Quick Installation Guide
- SATA Cables
- I/O Shield (if not pre-attached)
- M.2 Screws / Standoffs
- Driver CD/DVD (or link to download drivers)

This image displays the Gigabyte B760M DS3H DDR4 motherboard alongside its retail box, highlighting the product's branding and model name.
4. Setup Guide
4.1 Before You Begin
- Prepare your computer case with adequate space and ventilation.
- Gather all necessary components: CPU, CPU cooler, DDR4 RAM modules, M.2 SSDs (if applicable), graphics card, power supply unit (PSU), and SATA drives.
- Ensure your power supply is compatible with the motherboard's power connectors (24-pin ATX and 8-pin CPU power).
4.2 Motherboard Installation Steps
- Install the CPU: Carefully open the LGA 1700 socket lever. Align the triangular mark on the CPU with the mark on the socket. Gently place the CPU into the socket without forcing it. Close the lever to secure the CPU.
- Install the CPU Cooler: Apply thermal paste (if not pre-applied to the cooler) and mount your CPU cooler according to its manufacturer's instructions. Connect the CPU fan cable to the CPU_FAN header on the motherboard.
- Install RAM Modules: Open the clips on the DDR4 DIMM slots. Align the notch on the RAM module with the key in the slot. Press down firmly on both ends of the module until the clips snap into place. For dual-channel performance, refer to your motherboard's manual for recommended slot population (e.g., slots A2 and B2).
- Install M.2 SSDs: Locate the M.2 slots. Remove the M.2 Thermal Guard if present. Insert the M.2 SSD into the slot at an angle, then gently push it down and secure it with the provided screw/standoff. Reattach the M.2 Thermal Guard.
- Install Graphics Card (GPU): Open the EZ-Latch on the PCIe 4.0 x16 slot. Align your graphics card with the slot and press down firmly until it clicks into place. Secure the card with a screw to the case.
- Mount Motherboard in Case: Install the I/O shield into your case's rear panel opening. Align the motherboard with the standoffs in your case and secure it with screws.
- Connect Power Supply: Connect the 24-pin ATX power connector and the 8-pin CPU power connector from your PSU to the motherboard. Connect PCIe power cables to your graphics card if required.
- Connect Storage Drives: Connect SATA data cables from your SATA SSDs/HDDs to the SATA ports on the motherboard. Connect SATA power cables from your PSU to the drives.
- Connect Front Panel Cables: Connect the power button, reset button, HDD LED, power LED, USB, and audio cables from your case's front panel to the corresponding headers on the motherboard. Refer to the motherboard diagram for correct pin alignment.
- Connect Case Fans: Connect case fans to the available FAN headers on the motherboard. The Smart Fan 6 feature allows for intelligent fan control.
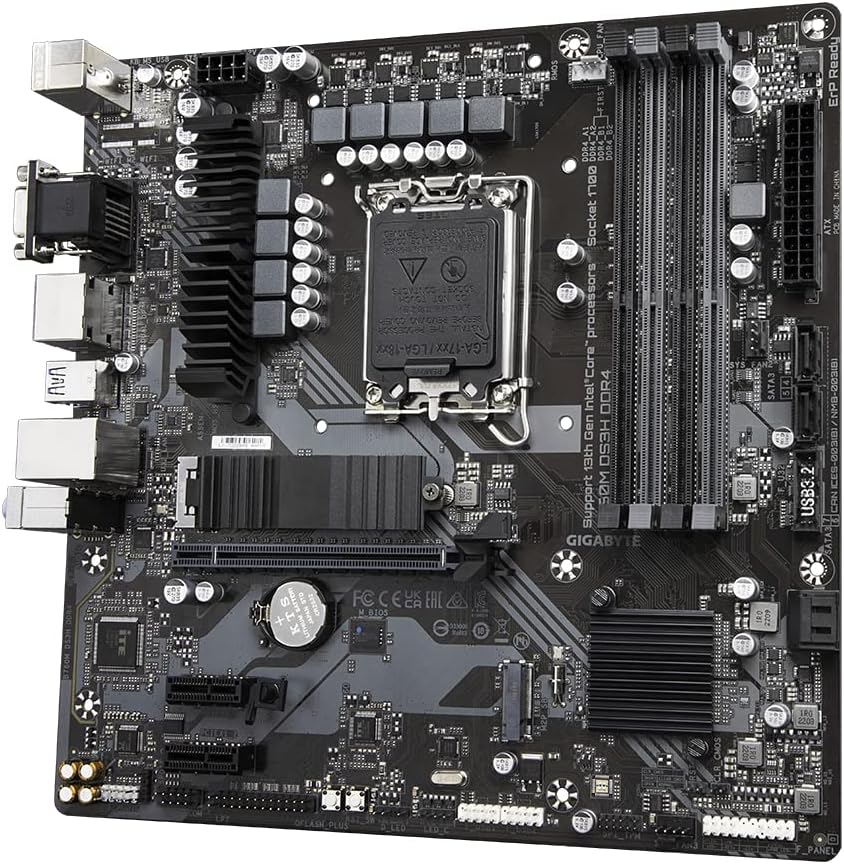
A detailed overhead view of the Gigabyte B760M DS3H DDR4 motherboard, illustrating the central LGA 1700 CPU socket, four DDR4 DIMM slots, and two PCIe 4.0 M.2 slots for storage.

This image shows the rear input/output panel of the motherboard, featuring ports such as USB 2.0, USB 3.2 Gen2 Type-C, HDMI, DisplayPort, VGA, 2.5GbE LAN, and audio jacks.
5. Operating Your Motherboard
5.1 Initial Boot-up
After assembling your system, connect a monitor, keyboard, and mouse. Power on your system. The system should perform a Power-On Self-Test (POST). If successful, you will see the GIGABYTE logo and have the option to enter the BIOS/UEFI setup.
5.2 BIOS/UEFI Configuration
To enter the BIOS/UEFI setup, press the DEL key repeatedly during the initial boot screen. The BIOS allows you to configure various system settings, including:
- Boot Order: Set the priority for your storage devices.
- XMP Profile: Enable XMP for your DDR4 memory to run at its advertised speeds (up to 5333MHz OC).
- Smart Fan 6: Configure fan curves and monitor temperatures.
- Q-Flash Plus: Update BIOS without installing the CPU, memory, or graphics card. This feature is crucial for supporting newer CPUs.
- Storage Configuration: Set SATA modes (AHCI/RAID) and M.2 settings.
5.3 Driver Installation
After installing your operating system, it is essential to install the latest drivers for your motherboard's components. You can find these drivers on the GIGABYTE official website for your specific model. Key drivers include:
- Chipset Drivers
- LAN Drivers (for 2.5GbE LAN)
- Audio Drivers
- USB Drivers
- Graphics Drivers (for integrated graphics, if used)
6. Maintenance and Care
Regular maintenance helps ensure the longevity and optimal performance of your motherboard.
- Keep it Clean: Periodically clean dust from the motherboard and components using compressed air. Ensure the system is powered off and unplugged before cleaning.
- BIOS Updates: Check the GIGABYTE website for the latest BIOS updates. BIOS updates can improve compatibility, stability, and performance. Use the Q-Flash Plus feature for safe updates.
- Driver Updates: Regularly update your drivers to ensure compatibility with new software and to benefit from performance improvements and bug fixes.
- Cable Management: Ensure cables are neatly routed to improve airflow and prevent interference.
7. Troubleshooting Common Issues
If you encounter problems with your motherboard, refer to the following common troubleshooting steps:
- No Power/No POST:
- Check all power connections (24-pin ATX, 8-pin CPU, GPU PCIe power).
- Ensure the PSU is switched on.
- Try booting with only essential components (CPU, one RAM stick, GPU if no integrated graphics).
- Clear CMOS (refer to motherboard manual for jumper/button location).
- No Display:
- Ensure monitor is connected to the correct port (motherboard or graphics card).
- Reseat the graphics card and RAM modules.
- Test with a different monitor or cable.
- System Instability/Crashes:
- Check CPU and GPU temperatures.
- Run memory diagnostic tools.
- Ensure all drivers are up to date.
- Disable any overclocking settings.
- Peripheral Not Detected:
- Try a different USB port.
- Reinstall relevant drivers.
- Check BIOS settings for port enablement.
8. Technical Specifications
| Feature | Specification |
|---|---|
| Brand | GIGABYTE |
| Model Name | B760M DS3H DDR4 |
| CPU Socket | LGA 1700 |
| Compatible Processors | Intel Celeron, Intel Core i3, Intel Core i5, Intel Core i7, Intel Core i9, Intel Pentium Gold (13th and 12th Gen) |
| Chipset Type | Intel B760 |
| RAM Memory Technology | DDR4 |
| Memory Clock Speed | Up to 5333 MHz (OC) |
| DIMM Slots | 4 x DDR4 DIMM slots |
| Storage | 2 x PCIe 4.0 x4 M.2 Connectors |
| LAN | 2.5GbE LAN |
| USB Ports | Rear USB-C 10Gb/s, USB 3.2 Gen2, USB 2.0 |
| Video Output | DP, HDMI, VGA |
| Form Factor | Micro ATX |
| Dimensions (LxWxH) | 9.61 x 9.61 x 1.38 inches |
| Item Weight | 1.32 pounds |
| Operating System Support | Windows, Linux |
9. Warranty and Technical Support
GIGABYTE motherboards come with a limited warranty. Please refer to the warranty card included in your package or visit the official GIGABYTE website for detailed warranty terms and conditions specific to your region.
For technical support, driver downloads, BIOS updates, and FAQs, please visit the official GIGABYTE support website:
https://www.gigabyte.com/support
When contacting support, please have your motherboard model number (B760M DS3H DDR4) and serial number ready.