
SMILOVII QY0012-01
SMILOVII 24V Cordless Strimmer User Manual
Model: QY0012-01
1. Important Safety Information
Please read and understand all safety warnings and instructions before operating this cordless strimmer. Failure to follow the warnings and instructions may result in electric shock, fire, and/or serious injury.
- Always ensure the battery is fully charged before use.
- Charge the battery before it is completely drained to prolong its lifespan.
- Wear appropriate personal protective equipment (PPE) including safety goggles, gloves, and sturdy footwear during operation.
- Keep hands, face, and feet away from the cutting area at all times.
- Ensure the work area is clear of debris, rocks, and other objects that could be thrown by the blades.
- Do not operate the strimmer in wet conditions or near water.
- Keep children and bystanders at a safe distance (at least 15 meters) from the operating area.
- Always remove the battery when cleaning, maintaining, or storing the strimmer.
- Store the strimmer and batteries in a dry, secure place, out of reach of children.
2. Product Overview
The SMILOVII 24V Cordless Strimmer is a versatile garden tool designed for trimming grass, edging lawns, and cutting light brush. It features a lightweight design, adjustable telescopic rod, and multiple blade options for various tasks.
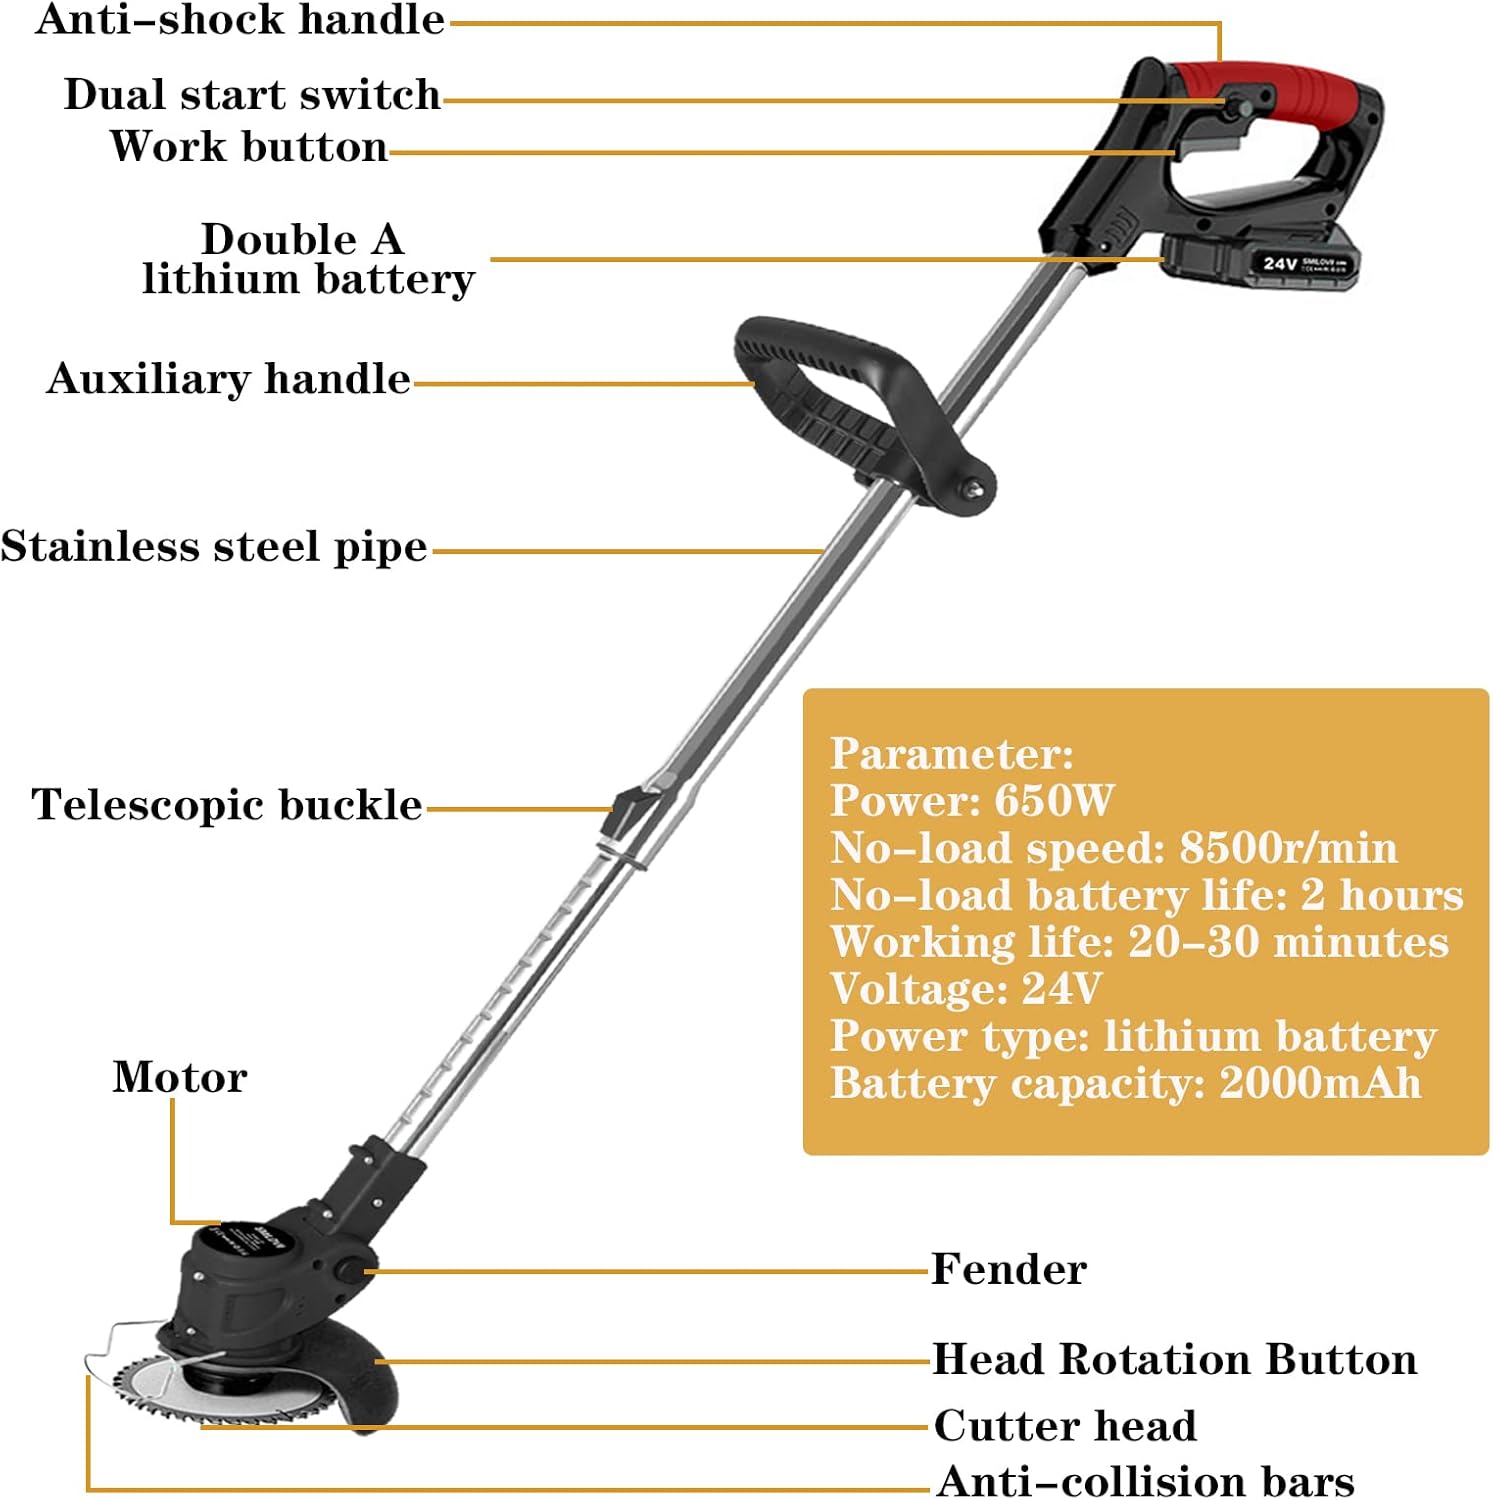
Figure 2.1: Overview of the SMILOVII 24V Cordless Strimmer with key components labeled. This includes the anti-shock handle, dual start switch, work button, lithium battery, auxiliary handle, stainless steel pipe, telescopic buckle, motor, fender, head rotation button, cutter head, and anti-collision bars.
Key Components:
- Main Unit: Includes the motor, cutting head, and main handle with controls.
- Telescopic Rod: Adjustable length for comfortable operation.
- Auxiliary Handle: Provides additional grip and control.
- 24V Lithium Batteries: Two 2000mAh batteries for extended use.
- Charger: For recharging the lithium batteries.
- Cutting Blades: Includes plastic blades, metal blades, and metal circular saw blades for different cutting needs.
- Safety Guard: Protects against debris and splashing.
- Anti-collision Bar: Prevents damage to the blade when working near obstacles.
3. Assembly Instructions
Follow these steps to assemble your SMILOVII 24V Cordless Strimmer. A visual guide is also available in the installation video below.
Video 3.1: Cordless Strimmer installation steps. This video demonstrates the full assembly process, including attaching the guard, installing different blade types, securing the anti-collision bar, inserting the battery, and adjusting the auxiliary handle.
- Attach the Safety Guard:
Remove the protective cover from the cutting head. Align the safety guard with the designated slots on the strimmer head and secure it using the provided screws and wrench. Ensure it is firmly attached to prevent debris from splashing during operation.
Figure 3.1: Strimmer head with safety guard and circular blade installed.
- Install the Cutting Blade:
Depending on your task, select the appropriate blade (plastic, metal, or circular saw). Place the blade onto the spindle, ensuring it sits flush. Secure it with the washer and nut, tightening it firmly with the provided wrench. For circular saw blades, ensure the teeth are facing the correct direction for cutting.
Figure 3.2: Strimmer head with metal blade installed.

Figure 3.3: Strimmer head with plastic blade installed.
- Attach the Anti-collision Bar:
Slide the anti-collision bar into the designated holes on the strimmer head, ensuring it clicks into place. This bar protects the blade from direct contact with hard surfaces.
Figure 3.4: Close-up showing the anti-collision bar and grass guard.
- Insert the Battery:
Align the 24V lithium battery with the battery slot on the main handle. Push it firmly until it clicks into place, ensuring a secure connection.Figure 3.5: The 2000mAh large-capacity lithium battery and its connection point.
- Adjust and Attach the Auxiliary Handle:
Slide the auxiliary handle onto the telescopic rod. Adjust its position for comfortable grip and balance, then tighten the knob to secure it.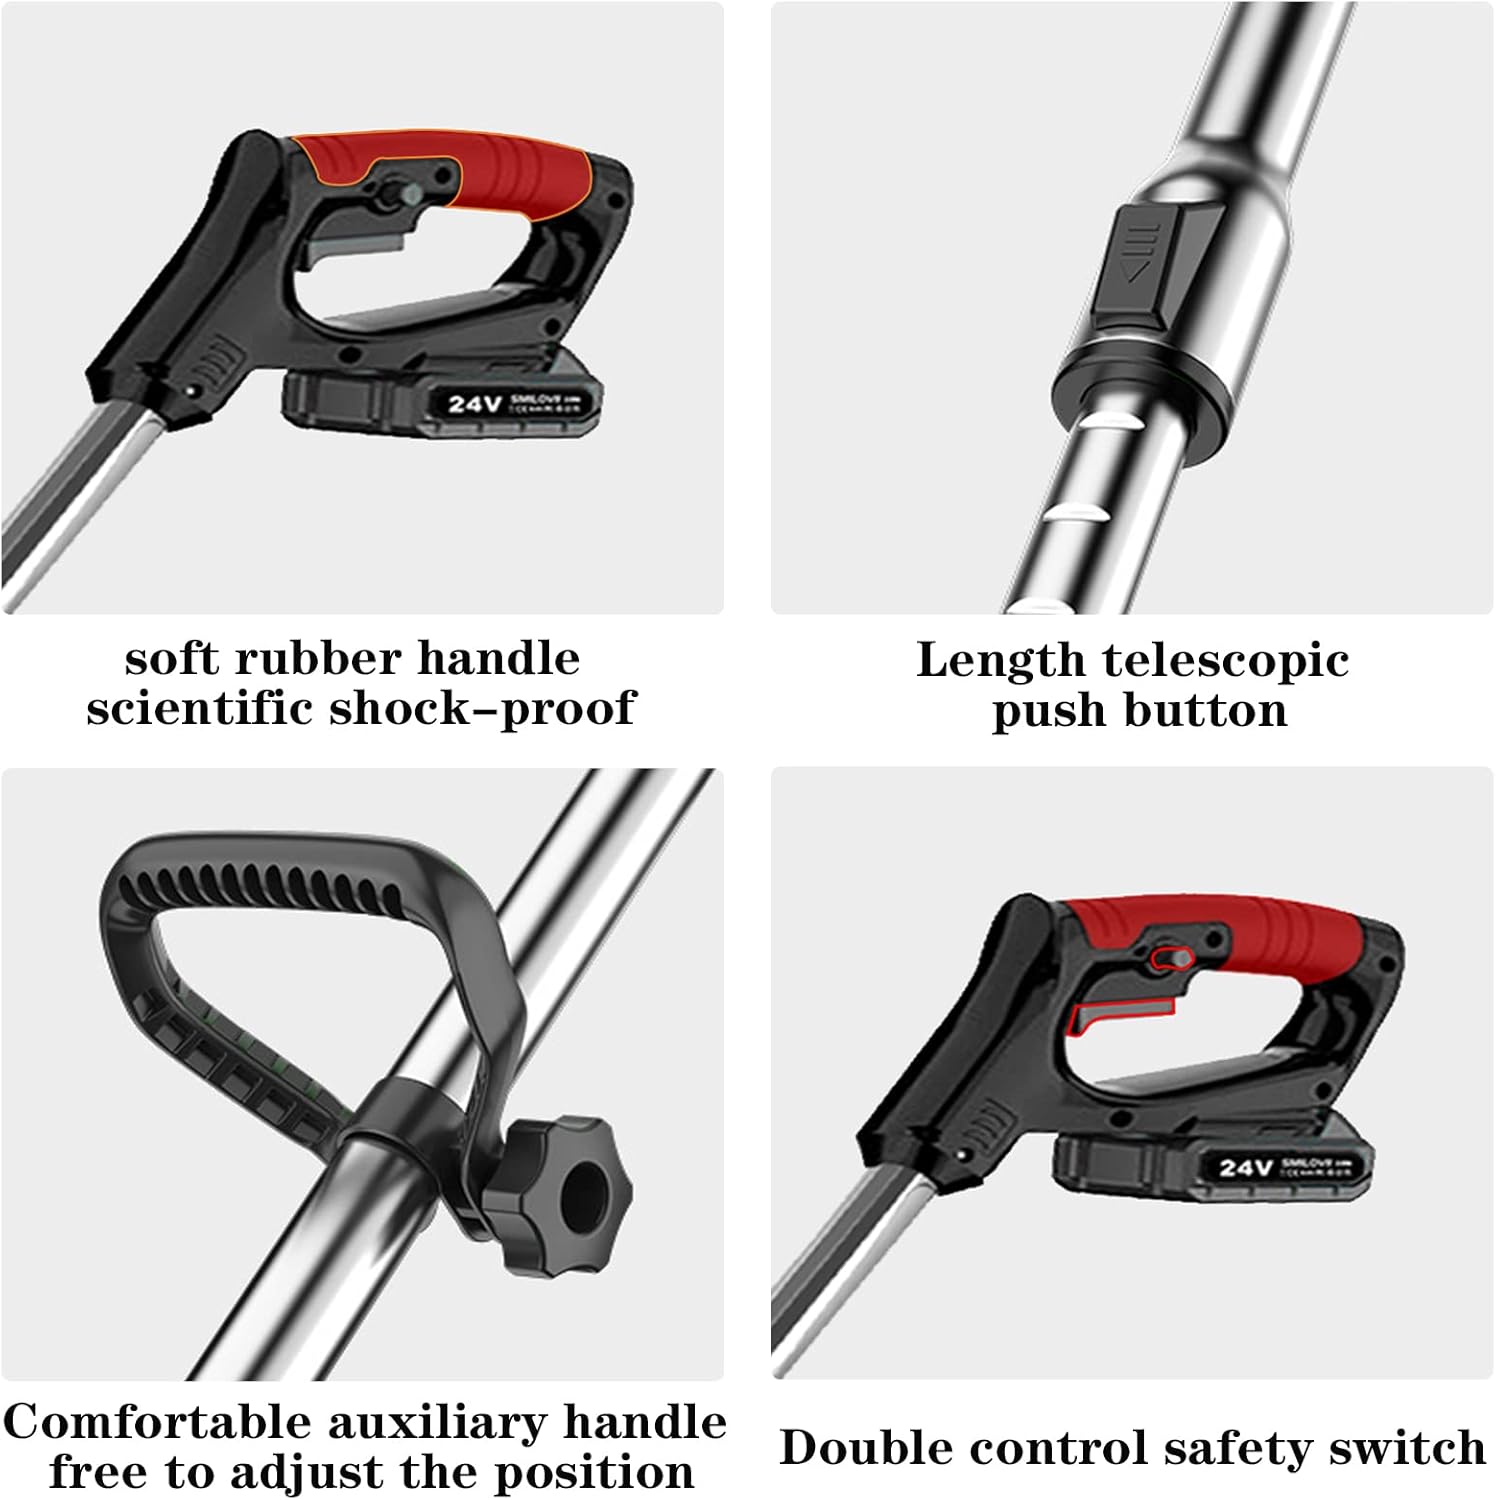
Figure 3.6: The comfortable auxiliary handle, adjustable for optimal positioning.
4. Operating Instructions
4.1 Charging the Battery
Before first use, fully charge both 24V lithium batteries. Connect the charger to a power outlet and then to the battery. The indicator light on the charger will show the charging status. A full charge typically takes approximately 1 hour per battery.
4.2 Starting and Stopping the Strimmer
To start the strimmer, first press the anti-mistouch safety switch (interlock button) located on the main handle, then press the main start switch. Release both to stop the strimmer. This dual-switch mechanism is a safety feature to prevent accidental activation.
Figure 4.1: The dual control safety switch, requiring both the interlock and start switch to be pressed for operation.
4.3 Blade Selection and Usage
The strimmer comes with three types of blades, each suited for specific tasks:
- Plastic Blades (10x included): Ideal for trimming tender lawn grass and edging. Best for light-duty tasks where precision is needed and there's no risk of hitting hard objects.
- Metal Blades (4x included): Suitable for cutting weed piles and thicker grass in complex terrain. Offers more durability than plastic blades.
- Metal Circular Saw Blades (2x included): Designed for cutting branches and hard bushes. Use with caution and ensure no hard objects are in the cutting path.

Figure 4.2: Different blade types (Nylon Saw Blade, Metal Saw Blade, Metal Circular Saw Blade) and their suitable applications for various cutting scenarios.
4.4 Adjusting the Strimmer
- Telescopic Rod Adjustment: The strimmer features an adjustable telescopic rod, allowing the length to be set between 35.4-47.2 inches (90-120 cm). Press the length telescopic push button to extend or retract the rod to your desired height for comfortable operation.
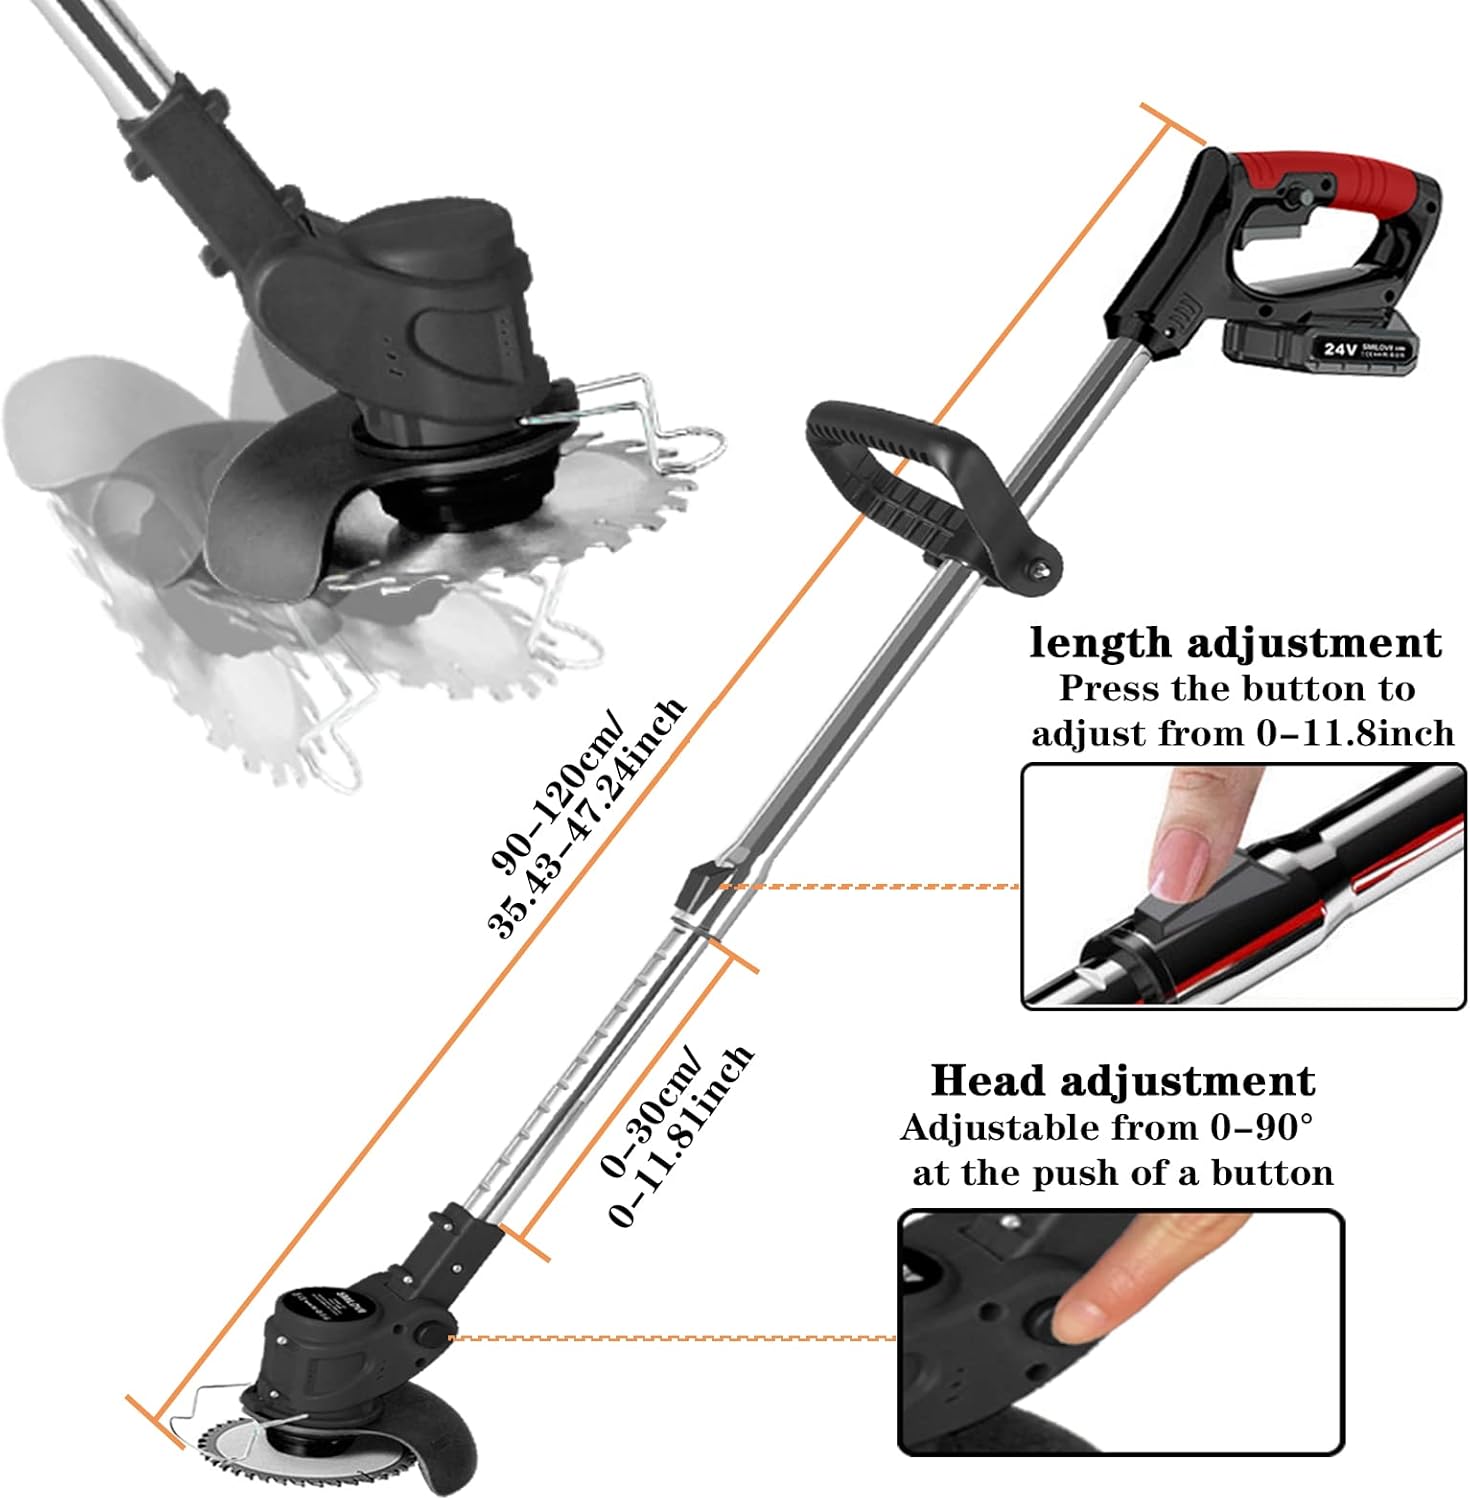
Figure 4.3: The telescopic rod can be adjusted for length, and the cutting head can be adjusted from 0-90 degrees.
- Cutting Head Angle Adjustment: The cutting head can be adjusted up to 90 degrees by pressing the head rotation button. This allows for easy trimming at different angles, such as edging along pathways or under benches.
4.5 General Operation Tips
- Move the strimmer in a sweeping motion, cutting small amounts of grass at a time.
- Avoid forcing the strimmer through thick vegetation; allow the blade to do the work.
- Regularly check the battery level and replace with a charged battery when power diminishes.
- The anti-collision iron bar helps protect the blade when working near walls or hard objects.

Figure 4.4: Proper usage of the strimmer for lawn edging.
5. Maintenance
Regular maintenance ensures the longevity and optimal performance of your strimmer.
- Cleaning: After each use, remove the battery and clean the strimmer body and cutting head with a dry cloth. Remove any grass clippings or debris from the blade area and ventilation slots.
- Blade Inspection and Replacement: Regularly inspect blades for wear, damage, or dullness. Replace worn or damaged blades immediately to maintain cutting efficiency and safety. Always use genuine SMILOVII replacement blades.
- Battery Care: Store batteries in a cool, dry place. Do not expose them to extreme temperatures. For long-term storage, charge batteries to about 50% capacity.
- Storage: Store the strimmer in a dry, secure location, away from direct sunlight and moisture. The strimmer's telescopic design allows for compact storage.
6. Troubleshooting
| Problem | Possible Cause | Solution |
|---|---|---|
| Strimmer does not start | Battery not inserted correctly Battery discharged Safety switch not engaged Main switch faulty | Ensure battery is fully clicked into place Charge the battery Press the anti-mistouch switch before the main switch Contact customer support |
| Short operating time | Battery not fully charged Battery old/worn Cutting thick vegetation | Ensure battery is fully charged Consider replacing battery Cut in smaller passes; use appropriate blade |
| Poor cutting performance | Dull or damaged blade Incorrect blade for task Excessive grass/debris build-up | Replace the blade Select appropriate blade type Clean the cutting head and blade |
| Strimmer vibrates excessively | Blade not balanced or damaged Loose components | Inspect and replace blade if necessary Check all connections and tighten screws |
7. Specifications
| Feature | Detail |
|---|---|
| Model Number | QY0012-01 |
| Power Source | Battery Powered |
| Battery Type | 24V Lithium Ion (2 x 2000mAh included) |
| No-load Speed | 8500 RPM |
| Product Dimensions | 88 x 16 x 12.7 cm |
| Item Weight | 2.74 kg |
| Adjustable Length | 35.4-47.2 inches (90-120 cm) |
| Cutting Head Angle | 0-90 degrees |
| Cutting Width | 15 Centimetres |
8. Warranty and Support
SMILOVII provides a 2-year warranty for this product. If you encounter any product questions, issues, or require technical assistance, please contact SMILOVII customer support. Refer to your purchase documentation for specific contact details or visit the official SMILOVII website.
Ask a question about this manual
Ask about setup, troubleshooting, compatibility, parts, safety, or missing instructions. Manuals+ will review the question and use this page’s manual context to help answer it.