1. Introduction
The ASUS PROART B650-CREATOR is an ATX motherboard designed for AMD Ryzen™ 7000 Series desktop processors, featuring the AMD B650 chipset. It is engineered to provide robust performance, comprehensive connectivity, and advanced cooling solutions for content creators and professional users. This manual provides detailed instructions for installation, operation, and troubleshooting to ensure optimal use of your motherboard.

Figure 1.1: ASUS PROART B650-CREATOR Motherboard and Retail Box
2. What's in the Box
Upon unboxing your ASUS PROART B650-CREATOR motherboard, please verify that all the following components are included:
- ASUS PROART B650-CREATOR Motherboard
- User Guide
- SATA Cables (2x)
- Rubber for M.2 SSD (2x)
- Screw for M.2 SSD
- Screw for M.2 Key E
- ASUS Control Center Express activation key card
- DP-to-DP cable
- ProArt ruler
- Q-Connector

Figure 2.1: Included accessories and components
3. Setup and Installation
3.1 Before You Begin
Ensure you have a static-free environment. Wear an anti-static wrist strap or frequently touch a grounded metal object before handling components. Refer to your PC case manual for specific installation instructions.
3.2 Component Installation
- CPU Installation: Carefully align your AMD Ryzen™ processor with the Socket AM5 on the motherboard. Ensure the triangular mark on the CPU matches the mark on the socket. Gently lower the CPU into the socket and secure the retention lever.
- Memory (RAM) Installation: Open the clips on the DDR5 DIMM slots. Align the notch on the memory module with the key in the slot. Press down firmly on both ends of the module until the clips snap into place. This motherboard supports up to 128 GB of DDR5-SDRAM across four DIMM slots.
- Storage Device Installation:
- M.2 SSD: This motherboard features M.2 PCIe 5.0 and PCIe 4.0 slots with heatsinks. Insert the M.2 SSD into the slot at an angle and secure it with the M.2 Q-Latch mechanism or screw.
- SATA Drives: Connect SATA data cables from your storage drives (HDDs/SSDs) to the SATA 6Gb/s ports on the motherboard.
- Graphics Card (GPU) Installation: Insert your graphics card into the primary PCIe 5.0 x16 SafeSlot. Ensure it is fully seated and secured by the retention clip.
- Other Expansion Cards: Install any additional PCIe cards (e.g., sound cards, network cards) into the available PCIe 4.0 slots.
3.3 Power Connections
Connect the 24-pin ATX power connector and the 8-pin/4-pin CPU power connectors from your power supply unit (PSU) to the corresponding ports on the motherboard. Ensure all connections are secure.
3.4 Initial Boot and BIOS Configuration
After assembling all components and connecting power, connect a monitor, keyboard, and mouse. Power on your system. Press the designated key (usually DEL or F2) during startup to enter the UEFI BIOS. Configure essential settings such as boot order, date/time, and enable XMP/EXPO for memory if desired. Save changes and exit the BIOS to boot into your operating system installation media.
4. Operating Your Motherboard
Once your operating system is installed, ensure all necessary drivers are installed for optimal performance. You can download the latest drivers from the official ASUS support website for the PROART B650-CREATOR model. Regularly update your BIOS and drivers to maintain system stability and performance.
5. Comprehensive Connectivity
The ASUS PROART B650-CREATOR motherboard offers a wide array of connectivity options to support various peripherals and devices:
- USB Ports: Includes USB 3.2 Gen 2x2 Type-C (front-panel with 60W Quick Charge 4+), USB 3.2 Gen 2 Type-C with DisplayPort 1.4 Alt Mode (rear I/O), multiple USB 3.2 Gen 2 Type-A and Type-C ports, and USB 2.0 ports.
- Video Output: HDMI® port (4K@60Hz) and DisplayPort™ input port for the DisplayPort 1.4 Alt Mode Type-C output.
- Networking: Features 2.5 Gigabit Ethernet and Gigabit Ethernet for reliable wired network connections.
- Audio: 5x Audio jacks and 1x Optical S/PDIF out port for high-quality audio output.
- BIOS FlashBack™ Button: Allows for BIOS updates without a CPU or memory installed.

Figure 5.1: Overview of Motherboard Connectivity
6. Robust Power Design & Performance
The PROART B650-CREATOR is built with a robust power delivery system to ensure stable performance for high-end components:
- Power Stages: Features a 12 + 2 + 2 power stage design (60A) for efficient and stable power delivery to the CPU.
- ProCool Power Connectors: Enhanced power connectors ensure a secure and reliable connection from the PSU.
- Memory Support: Supports 4x DDR5 DIMM slots with ASUS OptiMem II technology for improved memory stability and overclocking potential, supporting up to 128 GB of dual-channel memory.
- PCIe 5.0: Equipped with a PCIe 5.0 x16 SafeSlot for the latest graphics cards and a PCIe 5.0 M.2 slot for ultra-fast storage.
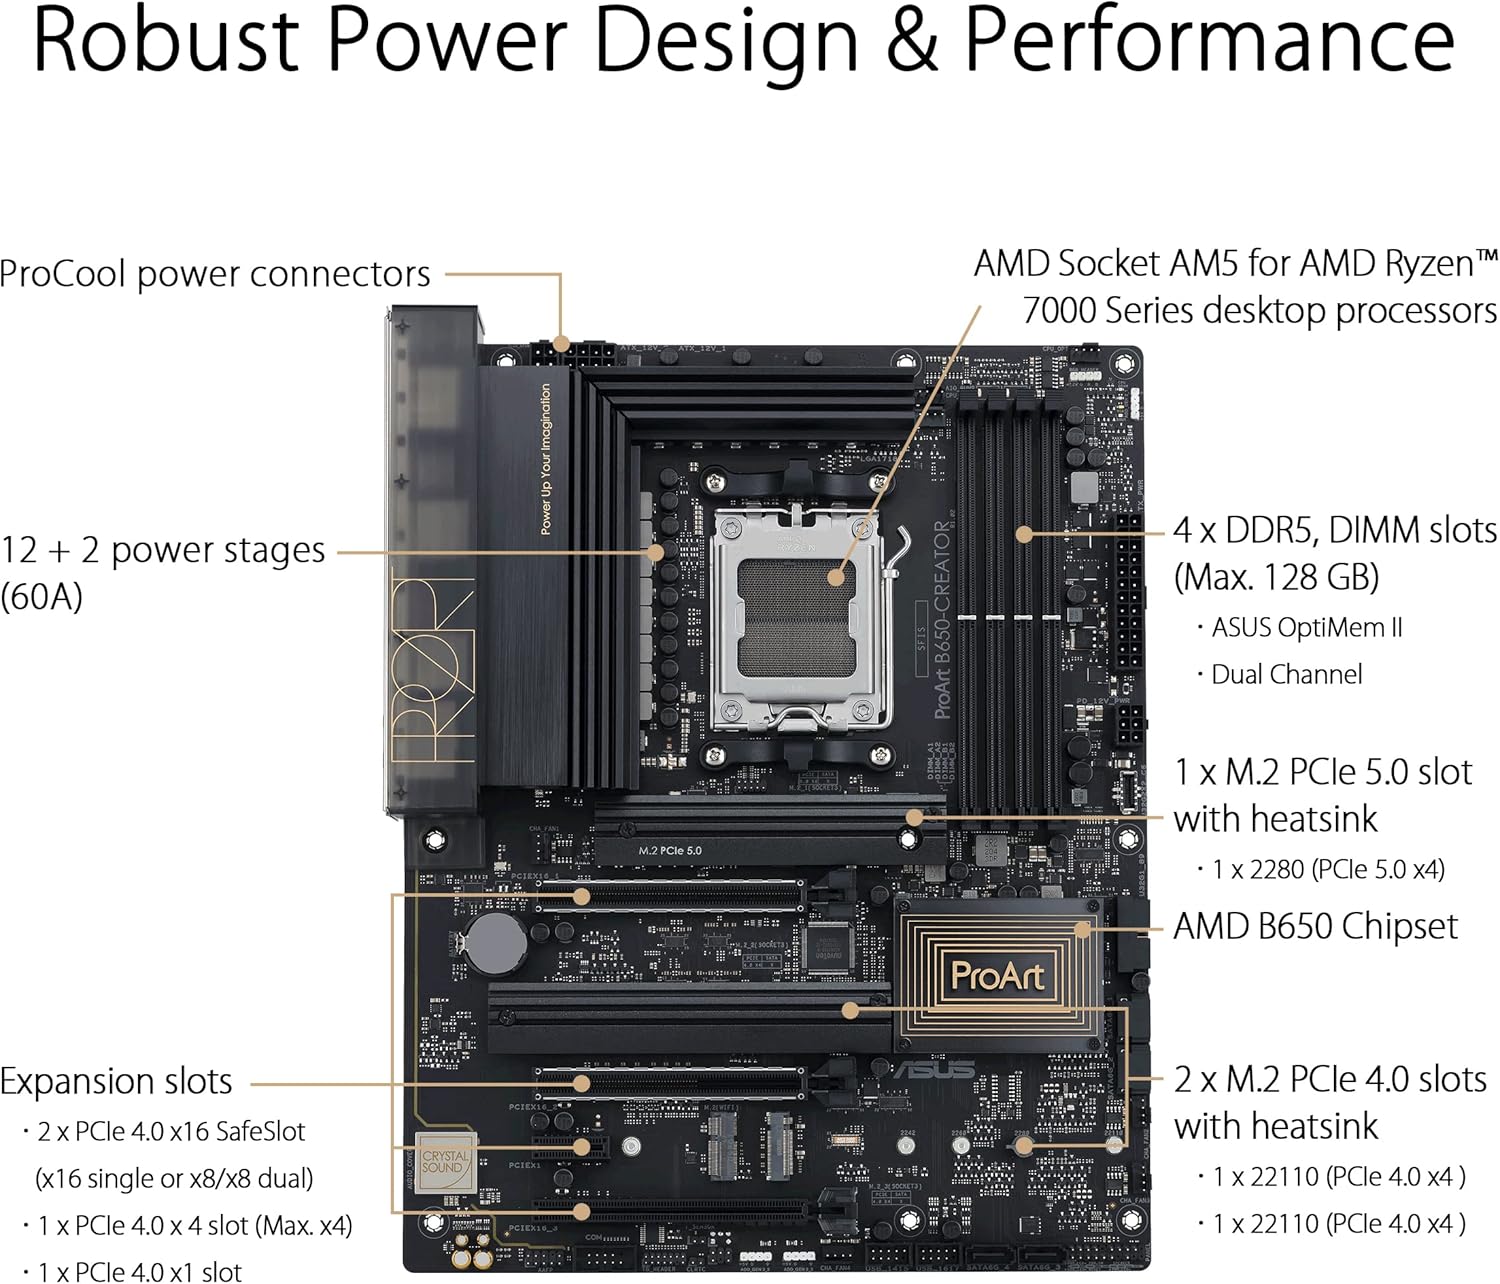
Figure 6.1: Power Design and Performance Features
7. Comprehensive Cooling
Effective thermal management is crucial for system stability and longevity. The PROART B650-CREATOR incorporates several cooling features:
- VRM Heatsinks: Large heatsinks cover the Voltage Regulator Modules to dissipate heat efficiently, ensuring stable power delivery.
- M.2 Heatsinks: Dedicated heatsinks for M.2 SSDs prevent thermal throttling and maintain optimal drive performance.
- Chipset Heatsink: A dedicated heatsink for the AMD B650 chipset ensures stable operation.
- Fan Headers: Includes 6x 4-pin PWM/DC fan headers and an AIO pump header, providing extensive control over system cooling.

Figure 7.1: Cooling Features Overview
8. DIY Friendly Features
ASUS has integrated several features to simplify the PC building process and enhance user experience:
- Q-DIMM: One-sided clips for simple and secure handling of memory modules.
- Q-LED: Onboard LEDs indicate CPU, memory, graphics card, or boot device issues for quick diagnosis.
- SafeDIMM: A fortified metal divider for added support and damage prevention for DIMM slots.
- M.2 Q-Latch: A simple locking mechanism to secure an M.2 SSD without the need for specific tools.
- SafeSlot: Provides stronger PCIe device retention and greater shearing resistance for graphics cards.

Figure 8.1: DIY Friendly Features
9. Technical Specifications
| Feature | Specification |
|---|---|
| Brand | ASUS |
| Model Name | PROART B650-CREATOR |
| Motherboard Form Factor | ATX |
| Processor Socket | Socket AM5 |
| Compatible Processors | AMD Ryzen™ 3, AMD Ryzen™ 7, AMD Ryzen™ 9 7th Gen |
| Chipset Type | AMD B650 |
| RAM Memory Technology | DDR5-SDRAM |
| Maximum Internal Memory | 128 GB |
| Memory Slots Type | 4 x DIMM |
| Supported Storage Drive Interfaces | M.2, SATA III |
| RAID Levels | 0, 1, 10 |
| Ethernet Interface Type | 2.5 Gigabit Ethernet, Gigabit Ethernet |
| Wireless Type | 802.11a/b/g/n/ac, Bluetooth (if applicable model) |
| BIOS Type | UEFI AMI 256 Mbit |
| Product Dimensions (LxWxH) | 19.69 x 19.69 x 11.02 inches |
| Item Weight | 2.64 pounds |
10. Troubleshooting
10.1 No Power / No Boot
- Check all power connections (24-pin ATX, 8-pin/4-pin CPU, PCIe power for GPU).
- Ensure the PSU is switched on and functioning correctly.
- Verify that the front panel power button is correctly connected to the motherboard.
- If using Q-LED, check the illuminated LED for CPU, DRAM, VGA, or BOOT errors.
10.2 No Display Output
- Ensure the monitor cable is connected to the graphics card (if installed) or the motherboard's integrated graphics port (if CPU supports it).
- Reseat the graphics card in its PCIe slot.
- Try a different display cable or monitor.
- If using a CPU without integrated graphics, a dedicated graphics card is required.
10.3 System Instability / Crashes
- Check RAM modules: Ensure they are properly seated. Test with one module at a time if issues persist.
- Verify CPU cooler installation and thermal paste application. Monitor CPU temperatures.
- Update BIOS to the latest version from the ASUS support website.
- Ensure all drivers (chipset, graphics, etc.) are up to date.
- Check for adequate power supply capacity for all components.
10.4 Peripherals Not Detected
- Try connecting the peripheral to a different USB port.
- Ensure the peripheral's drivers are installed.
- Check BIOS settings for USB port enablement.
11. Warranty and Support
Your ASUS PROART B650-CREATOR motherboard comes with a manufacturer's warranty. Please refer to the warranty card included in your product packaging or visit the official ASUS website for detailed warranty terms and conditions specific to your region.
For technical support, driver downloads, BIOS updates, and FAQs, please visit the official ASUS support website:
When contacting support, please have your motherboard's model number (PROART B650-CREATOR) and serial number ready.