Introduction
Welcome to the world of Spirograph Original Shapes! This creative kit allows you to design intricate and beautiful geometric patterns using unique triangular, hexagonal, and other original Spirograph shapes. It's a perfect blend of art and mathematics, fostering creativity and fine motor skills.
This manual provides essential information for setting up, operating, and maintaining your Spirograph set to ensure a safe and enjoyable experience. Please read all instructions carefully before use.
Safety Information
- Recommended Age: This product is suitable for ages 8 and above. Not suitable for children under 3 years due to small parts which may present a choking hazard.
- Adult Supervision: Adult supervision is recommended, especially for younger users.
- Marker Safety: Use markers as intended. Avoid contact with eyes and mouth. Wash hands after use.
- Product Integrity: Do not bend or force the Spirograph wheels and rings, as this may damage them and affect performance.
- Storage: Store all components in the provided storage tray to prevent loss and damage.
Package Contents
Please check the box to ensure all components are present:
- 12 x Spirograph Wheels (various shapes including triangular, hexagonal, pentagon, ellipse, diamond, square, heart, trapezoid, and more)
- 8 x Artistic Markers (various colors)
- 20 x Design Paper Sheets
- 1 x Storage Tray with Lid
- 1 x Design Guide Book
- Spirograph Putty (0.17 oz / 5g)
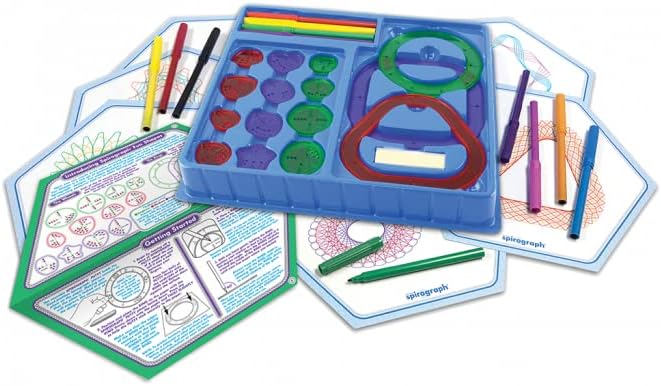
Image: All components of the Spirograph Original Shapes kit, including the uniquely shaped wheels, colorful markers, design paper, and the blue storage tray.
Setup
- Prepare your workspace: Choose a flat, stable surface for drawing.
- Secure the paper: Place a sheet of design paper on your drawing surface. Use the included Spirograph putty to secure the paper firmly to the surface. This prevents the paper from shifting during drawing.
- Select a ring/frame: Choose one of the larger Spirograph rings or frames (e.g., triangular, hexagonal, or circular) and place it on the paper. Secure it in place using the Spirograph putty.
- Choose a wheel: Select a smaller Spirograph wheel that fits inside the chosen ring/frame.

Image: A close-up demonstrating the setup, showing a hand using a marker with a Spirograph wheel inside a frame.
Operating Instructions
Follow these steps to create your Spirograph designs:
- Position the wheel: Place the chosen small wheel inside the larger ring/frame. Ensure the teeth of the wheel engage with the teeth of the ring.
- Insert the marker: Insert the tip of one of the artistic markers into any of the holes on the small wheel.
- Begin drawing: While holding the marker firmly in the hole, gently rotate the wheel along the inner edge of the larger ring/frame. Apply consistent pressure to the marker.
- Complete the design: Continue rotating the wheel until the design is complete and the marker returns to its starting point. You can lift the marker and move it to a different hole on the same wheel to create new patterns within the same design, or change wheels/rings for entirely new creations.
- Experiment: The Spirograph set encourages experimentation. Try different combinations of wheels and rings, use different marker colors, and explore various holes on the wheels to discover countless unique patterns. Refer to the included Design Guide Book for inspiration and step-by-step instructions.

Image: Examples of intricate Spirograph designs created using the kit's unique shapes and wheels.
Maintenance
- Cleaning: If the Spirograph wheels or rings become dirty, wipe them gently with a soft, damp cloth. Do not use harsh chemicals or abrasive cleaners.
- Marker Care: Always recap the markers tightly after use to prevent them from drying out.
- Storage: After each use, return all Spirograph components to the provided storage tray. This protects the pieces from damage and keeps them organized for future use.
Troubleshooting
- Design not smooth/skipping:
- Ensure the paper and the main ring/frame are securely fastened with Spirograph putty and do not move.
- Check that the teeth of the small wheel are properly engaged with the teeth of the large ring/frame.
- Apply consistent, gentle pressure to the marker. Avoid pressing too hard or too lightly.
- Markers drying out:
- Always recap markers immediately after use.
- Store markers horizontally to keep the ink evenly distributed.
- Difficulty rotating the wheel:
- Ensure there is no debris or paper scraps obstructing the gears.
- Verify that the wheel is correctly placed within the ring and not jammed.
Specifications
| Feature | Detail |
|---|---|
| Brand | Silverlit |
| Model Number | 1032Z |
| ASIN | B0BPCXL6FJ |
| Recommended Age | 8 years and up |
| Material | Plastic |
| Number of Pieces | 25 (including wheels, markers, paper, putty, tray, guide) |
| Included Components | 12 Wheels, 8 Artistic Markers, 20 Design Paper Sheets, Spirograph Putty, Storage Tray, Design Guide Book |

Image: The back of the product packaging, illustrating the full contents and key features.
Warranty and Support
This Silverlit Spirograph product is manufactured to high-quality standards. For any questions regarding product defects or operational issues not covered in this manual, please contact Silverlit customer support. Please retain your proof of purchase for any warranty claims.
For further assistance, please refer to the official Silverlit website or contact their customer service department. Contact information can typically be found on the product packaging or the manufacturer's official website.


